|
|
Abstract
Present step-by-step instructions to install Debian Unstable (Sid)
into root and boot partitions of an X86 system supporting
full-virtualization.
A bare machine without any operating system may be used if some
other system is used to create the Debian Installer (Jessie Alpha 1)
installation media.
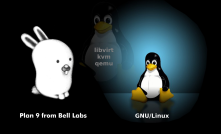
The goal is to produce a host system for the Plan 9 guest system
to be installed in the next section.
|
 Except where otherwise noted, content in this document
is licensed under the standard Creative Commons
Attribution–ShareAlike 4.0 International License.
Except where otherwise noted, content in this document
is licensed under the standard Creative Commons
Attribution–ShareAlike 4.0 International License.
Source code (scripts) are licensed under
GPLv2.
|
Virtual Plan 9 Cookbook — Section 2: GNU/Linux Host Preparation
This recipe installs an up-to-date Debian Unstable (codename
Sid—the breaker of toys in "Toy Story") on the project
computer to serve as the virtualization host operating system
for the guest virtual machine to be installed in the next
section.
Sid has some attributes that make it more attractive for this
situation than either Debian Stable (currently codename Wheezy)
or Debian Testing (currently codename Jessie):
-
Sid is nowhere as buggy as its Unstable title suggests.
Although it can break without warning, it seldom has,
which bespeaks the consistent quality of the work performed
by the Debian package maintainers.
As this project is primarily educational and not production,
stability is not the most important consideration.
You do have to be be prepared for more package troubleshooting
than when running Testing or Unstable.
-
Sid has the most current software of the three distributions
mentioned.
This means it will support hardware the others cannot, and
offers software enhancements the others do not.
-
Unstable is a rolling distribution—it never gets promoted
to Testing or Stable or Unsupported (well, that last is not
really a promotion).
It merely gets updated (you should probably do that every 24
hours unless you aren't actually running it, but then updating
it is the first thing you do when you bring it up again).
An R&D project free from the distraction of non-trivial
infrastructural migrations promotes the educational experience.
A rolling release replaces scheduled major migrations once a year
or so plus security patching with a little of all that every day.
You may have requirements that make Sid unsuitable for your
project and choose to use the Stable system installed from the
Debian Live USB-stick without upgrading that to Unstable.
If so, follow the
2014-07-31 GNU/Linux Host Preparation section
to download a suitable Debian Live USB-stick, boot that, and
install Debian Stable (Wheezy) into your project platform.
However, you will have to configure its virtual networking
on your own, as the recipe's incantations do not achieve the
desired results.
If you succeed, share what worked with me to add to this cookbook
so others will not need to reinvent your wheel.
If any hardware in your project computer is less than two years
old, it may not be able to use the latest Debian Installer, let
alone the Debian Live system, to install the host system.
For further details, refer to
Jessie Alpha 1 release of the Debian Installer
and
"Supported Hardware"
in the
Wheezy x86_64 version of the "Debian GNU/Linux Installation Guide"
or whatever version is appropriate for your project computer).
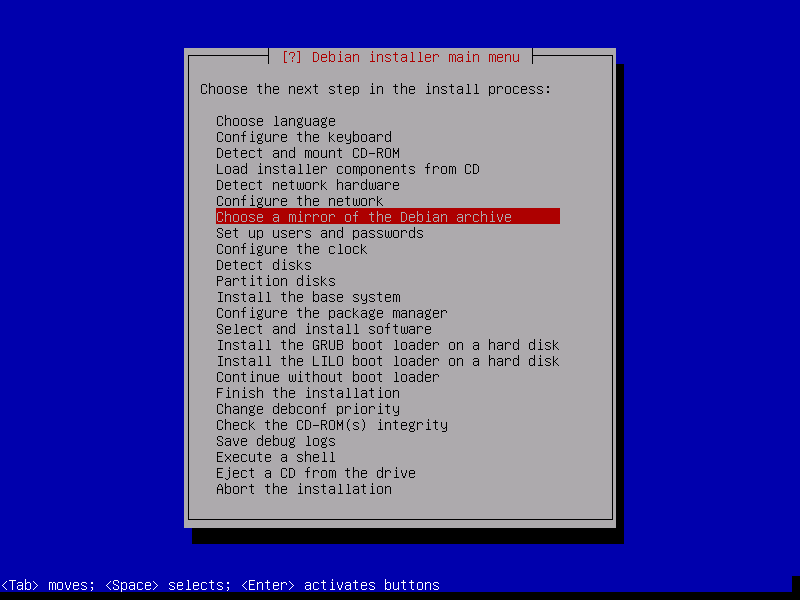
Click on the lines following to jump down to their content:
Subsection 2-1: Build Debian Installer Jessie Alpha 1 Media
Step 2-1-1: Download the ISO image
Step 2-1-2: Copy the ISO image to a USB-stick
Subsection 2-2: Install Jessie Using Debian Installer
Step 2-2-1: Backup the Project Platform As Needed
Step 2-2-2: Boot From the Debian Installer USB-Stick
Step 2-2-3: Choose Language, Location, and Locales
Step 2-2-4: Configure the Keyboard
Step 2-2-5: Detect and Mount CD-ROM
Step 2-2-6: Load Installer Components From CD
Step 2-2-7: Detect Network Hardware
Step 2-2-8: Configure the Network
Step 2-2-9: Choose a Mirror of the Debian Archive
Step 2-2-10: Set Up Users and Passwords
Step 2-2-11: Configure the Clock
Step 2-2-12: Detect Disks
Step 2-2-13: Partition Disks
Step 2-2-14: Install the Base System
Step 2-2-16: Select and Install Software
Step 2-2-17: Install the GRUB Boot Loader on the Hard Disk
Step 2-2-18: Finish the Installation
Subsection 2-3: Upgrade the New Host System to Sid
Subsection 2-4: Install Needed Packages (and aptitude Tutorial)
Subsection 2-5: Reboot and Verify Virt-Manager Setup
Subsection 2-6: Reconfigure Networking To Support Guests
Step 2-6-1: Create Replacement Configuration Files (and ed Tutorial)
Step 2-6-2: Stop the eth0 Interface
Step 2-6-3: Replace the Old Network Configuration Files
Step 2-6-4: Start the br0 Interface
Step 2-1-1: Download the ISO image
Point your browser at
https://www.debian.org/devel/debian-installer/
using an appropriate computer (in my case, the same computer being
used to demonstrate this project running a Debian Sid XFCE system
in a partition this project will ignore by and large).
The top of the page should look something like this (800x600):
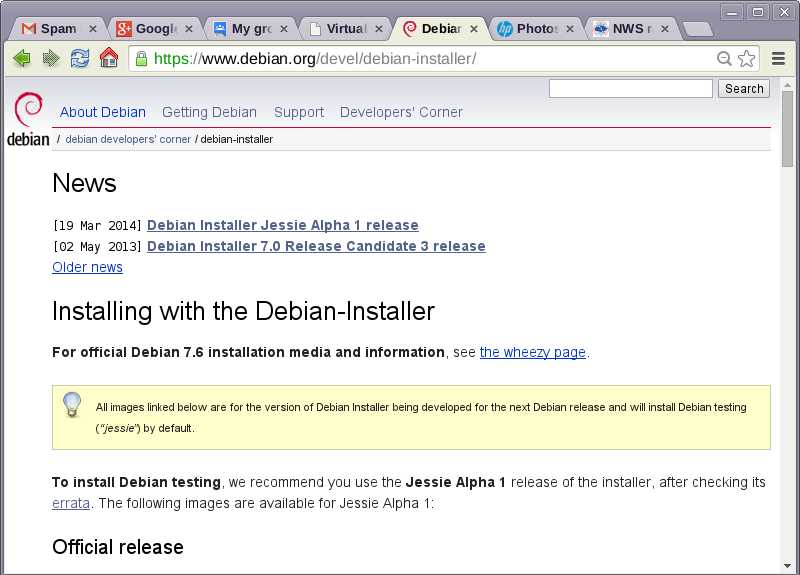
Scroll to the precise ISO file (for me, amd64) under major heading
"Installing with the Debian-Installer", minor heading
"Official release", and media heading
"netinst (generally 150-280MB) CD images"
and copy its link to the clipboard.
It should look something like the following image before you
click to copy (under XFCE, that pop-up menu is produced by a
right-click on the link you're interested in).
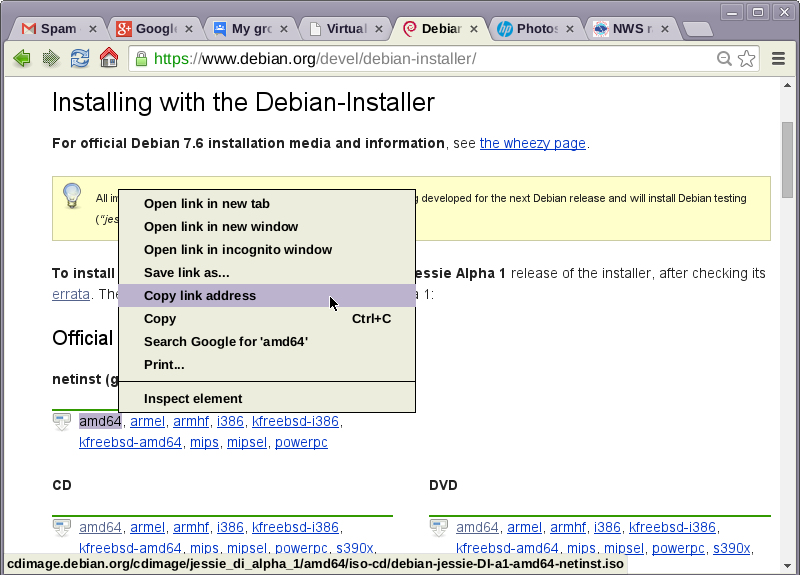
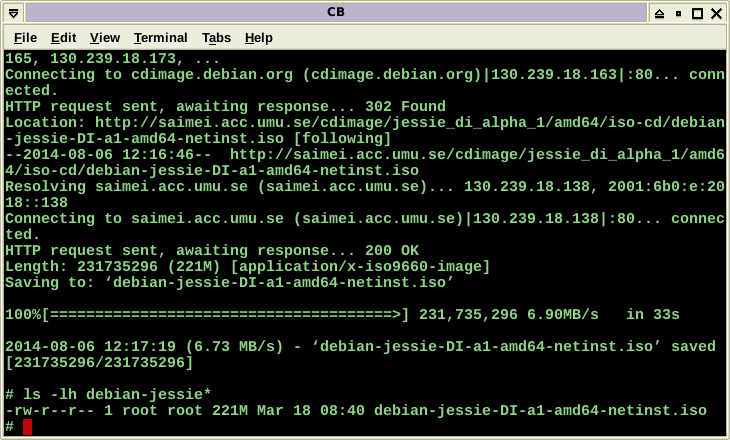
In a root terminal session, cd to /tmp, type "wget -c '",
paste the clipboard where the cursor is, and type the closing
apostrophe—it should look something like this:

Press the Enter key to start the download of about 220 MB.
When that completes, launch a "ls -lh debian-jessie*" command
to verify the downloaded file.
At the end the screen should look something like this (your
bandwidth is probably different and you should adjust the
expected elapsed time accordingly):
Step 2-1-2: Copy the ISO image to a USB-stick
Insert a big enough USB-stick (aka pen-drive, thumb-drive) into
a USB port of the correct speed for the media, and, if necessary,
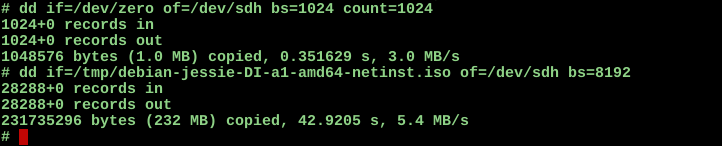
determine the block device assigned to it (in my case, /dev/sdh).
Clear the first magabyte of the stick using the command
"dd if=/dev/zero of=/dev/sdh bs=1024 count=1024").
Then copy the ISO image byte-for-byte to it (I used the command
"dd if=/tmp/debian-jessie-DI-a1-amd64-netinst.iso of=/dev/sdh
bs=8192").
This will require a number of minutes—USB-1 is not recommended.
When it ends it should not have displayed any error messages and
indictate no short blocks were processed; e.g.,
Run the approrpiate cfdisk command to verify the USB-stick looks
bootable (in my case, "cfdisk /dev/sdh").
The output should look pretty much like this (if a screen appears
that mentions GPT, just ignore it and press the Enter key):
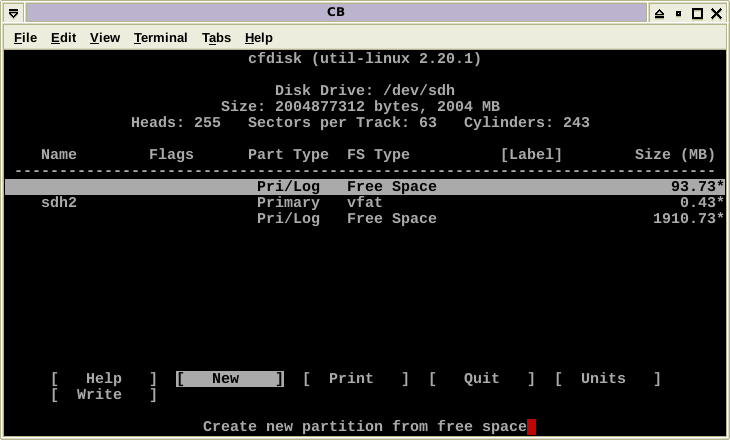
It looks like the media is ready.
Enter two tabs, then Enter to exit cfdisk.
Then run the appropriate command to prepare the system for removal
of the stick from the USB port; e.g., "eject /dev/sdh".
Now the USB-stick can be removed.
I affixed an external label to mine that says, "Debian Installer
Jessie Alpha 1 X86_64 Netinst Mar 2014".
Last of all, delete the ISO file from /tmp unless
you want to keep it around for some reason.
You now have a portable Debian Installer system you can boot from any
computer compatible with the flavor you selected and that supports
booting from a USB-stick (some BIOS and/or boot loader
reconfiguration might be necessary for that to function).
Subsection 2-2: Install Jessie Using Debian Installer
With your bootable USB-stick in hand, we move to the keyboard of
the X86 platform you have made available to install the host and
guest operating systems of this exercise.
This move, as is the case of my demonstration platform, will be
merely a figure of speech if the same physical system that was
used to build the Debian Live install media in the previous
subsection is also the computer into which you intend to install
the Debian and Plan 9 systems of this exercise.
Or it may indeed be a different machine.
Either way, it may have no software already installed that that
you intend to retain (that is, already or soon-to-be empty
non-volatile storage) or there may be storage areas and/or one or
more bootable operating systems that you want to co-exist with
the new Debian host and its Plan 9 guest(s).
If, when you're done, only the new systems will be resident, you
have a relatively simple installation ahead and can probably get
away with just following this cookbook's recipe relatively blindly
(although you are strongly urged to read and understand everything
to come before you continue actually cooking your project—it's
a great way to avoid starting over again).
If, however, this exercise will not be taking over the computer
completely, you have the responsibility to effectively utilize your
system administration skills to tailor the steps in the rest of
this section to produce the needed host environment to install
the Plan 9 guest systems starting in the next section.
If there is nothing already resident on the project computer that
will ever be missed by anyone for the rest of time, you are being
reasonable if you skip this step.
Otherwise, back up everything not already backed up somewhere that
would induce some degree of despair if it disappeared, even if
there's no way it could disappear.
If you do not know how to back up such data and are uninterested in
learning how to do that, you are strongly urged to drop this
project—even more so if it never occurred to you that you
ought to back up such data (whether or not you proceed,
you should study
"BOFH: The Great Backup BACKDOWN"
and
the comments it spawned
to get some really useful enlightenment).
Step 2-2-2: Boot From the Debian Live USB-Stick
If an operating system is currently running on the project platform,
shut it down now.
If the BIOS and/or boot loader of the project computer's firmware
need to be reconfigured to permit booting from a USB-stick, do that
now.
Insert the Debian Installer USB-stick in a suitable USB port, then start
a reboot.
In response to the Debian GNU/Linux installer boot menu, press the
DownArrow key twice so Advanced options is highlighted:
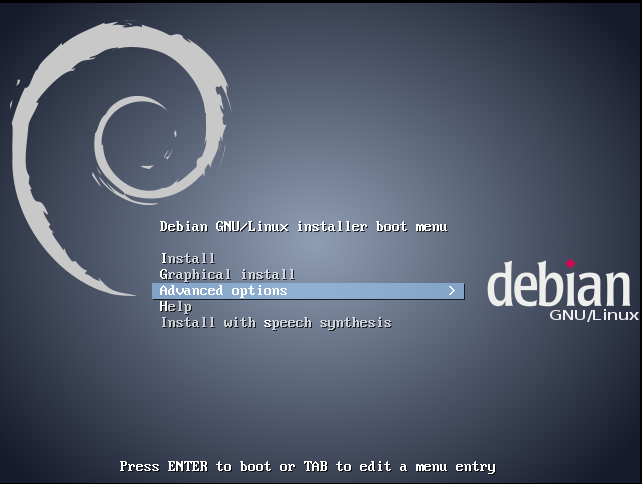
and press to Enter key. Press the DownArrow key once so Expert
install is highlighted:
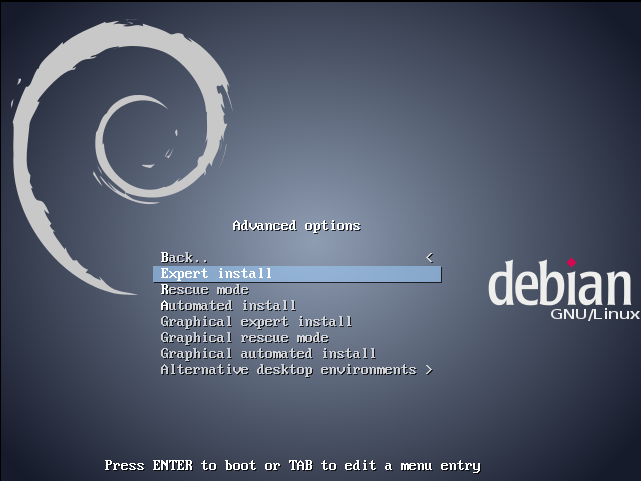
and press to Enter key.
If anything prevents something very much like the following image
from manifesting on the computer's screen, use your system
administration skills to resolve the issue(s) (the
Debian Support portal
is an excellent place to begin seeking help).
Did you ask, "What happened to the GUI?"
But you asked for the expert install. </joke>
If you want pretty but noticably slower, opt for the Graphical
expert install (but don't expect this cookbook to cater to your
aesthetic tastes with graphical screenshots for this phase).
But before you reboot the installer to choose the GUI, finish
reading up to the next step—you might reconsider and save
save yourself a minute or two.
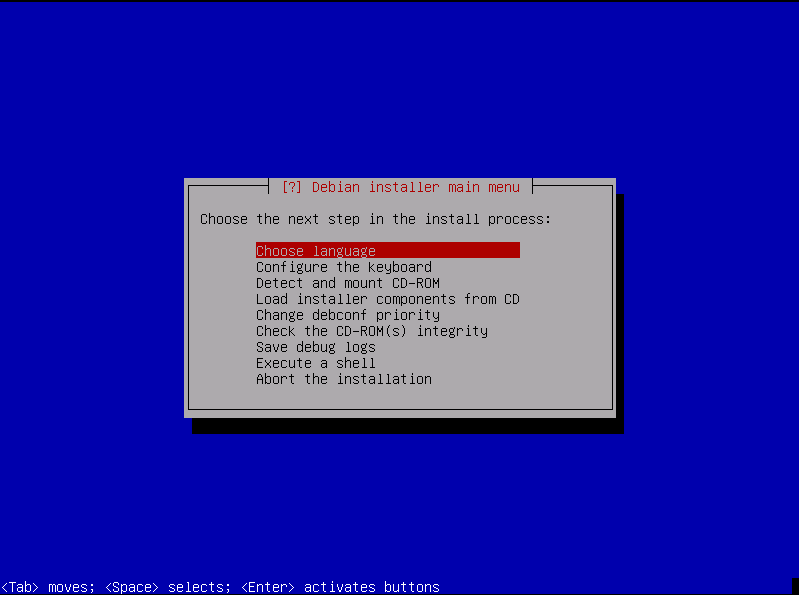
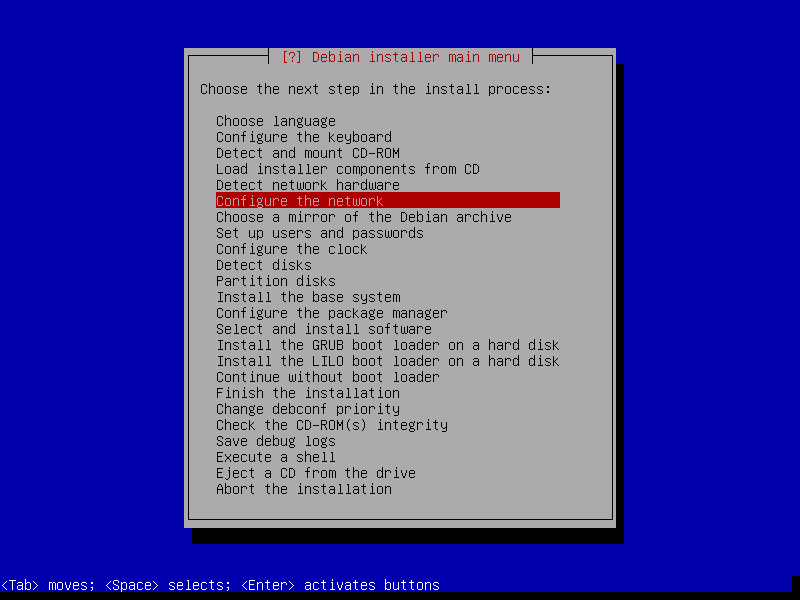
What you see is the initial high level menu of the Debian Installer.
As you progress through the installation steps, the options in this
menu will change, but the concept remains the same: work your way
down to some conclusion.
The current line will be what the installer thinks you should do next,
but you can navigate with the UpArrow and DownArrow keys before you
make the selection via the Enter key (but some steps you will not be
allowed to re-do—those will be pointed out along the way).
The Tab key will cycle through the buttons at the bottom and the main
data entry area.
Does this non-GUI appearance and keyboard-centric interface strike you
as deplorably unsexy?
It does?
Oh, dear.
As the saying goes, "You ain't seen nothin' yet."
You are proceding toward interacting with Plan 9.
It does not support Chrome or even FireFox.
There are in fact one or two good reasons for that condition.
Plan 9 is unashamably not UNIX and certainly not GNU; similar in
many ways, but significantly different.
Never forget Plan 9 exists primarily for researching operating system
design.
While it is highly usable in its way as well as stable, and learning
how it is different and why are worthy goals, do not get it into your
head that it needs to be "improved" to be more like modern day UNIX.
Rather, it would be you that needs to be improved to be able to
appreciate the positive qualities of the design and paradigms Plan 9
offers.
Then you would be able to show proper respect to the guys who created,
fix, and extend it (many of whom also created UNIX before they created
Plan 9—I daresay they know more than you do).
They do tend to be more inclined to help newbies who are respectful,
probably just like you are.
Step 2-2-3: Choose Language, Location, and Locales
So press Enter now to proceed to, like it says, choose the language.
That should present the following:
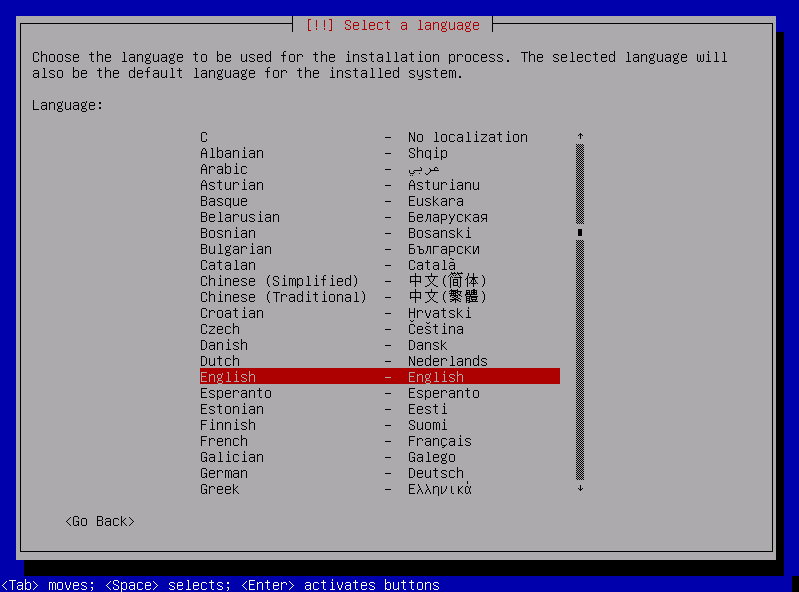
The note here regards the C locale at the top that you might be
inclined to use.
Plan 9 is a UTF-8 environment, not C (those guys invented UTF-8 for
Plan 9), so you may find the host in C responsible for subtle problems
when communicating with Plan 9 guest consoles and terminals.
If you normally want to be in C, remember to change to a UTF-8 locale
before connecting to a Plan 9 service.
If you want C at all, you must choose it here—it is not available
when choosing additional locales later.
Choose your language and press Enter to proceed to:
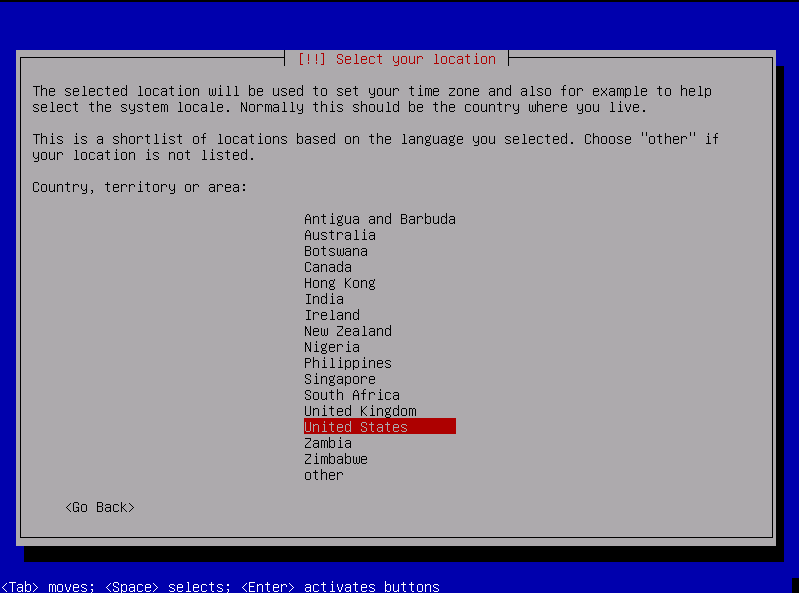
Choose your location and press Enter to proceed to:
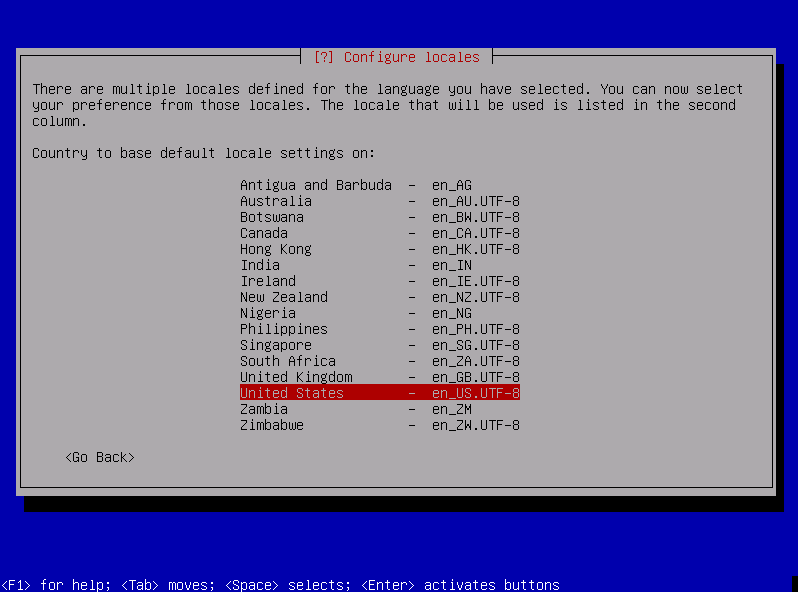
Choose your default locale and press Enter to proceed to:
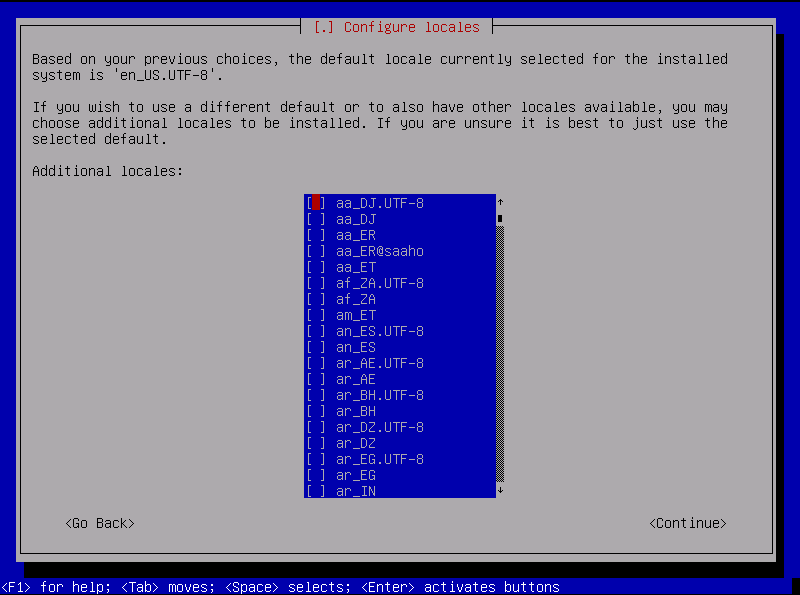
Choose your additional locales, if any, then tab to the <Continue>
button and press Enter to return to the main menu:
Press Enter to configure the keyboard:
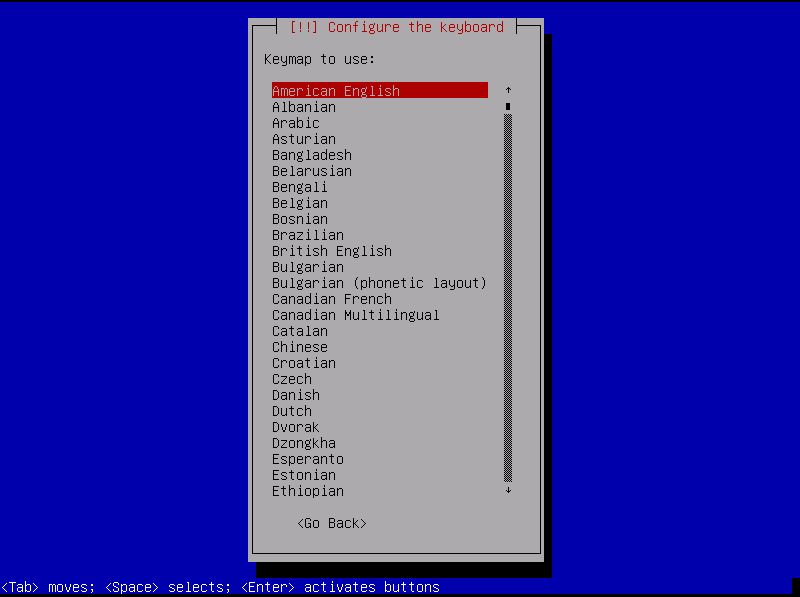
Configure your keyboard, and press Enter to return to
the main menu:
Step 2-2-5: Detect and Mount CD-ROM
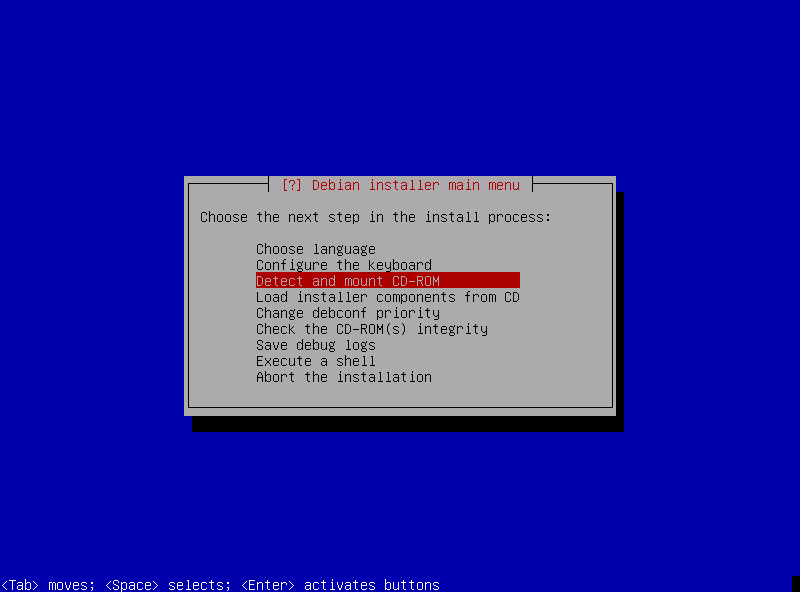
Get this right the first time; otherwise you will need to
reboot the installer.
Press Enter to let the installer find the USB-stick:
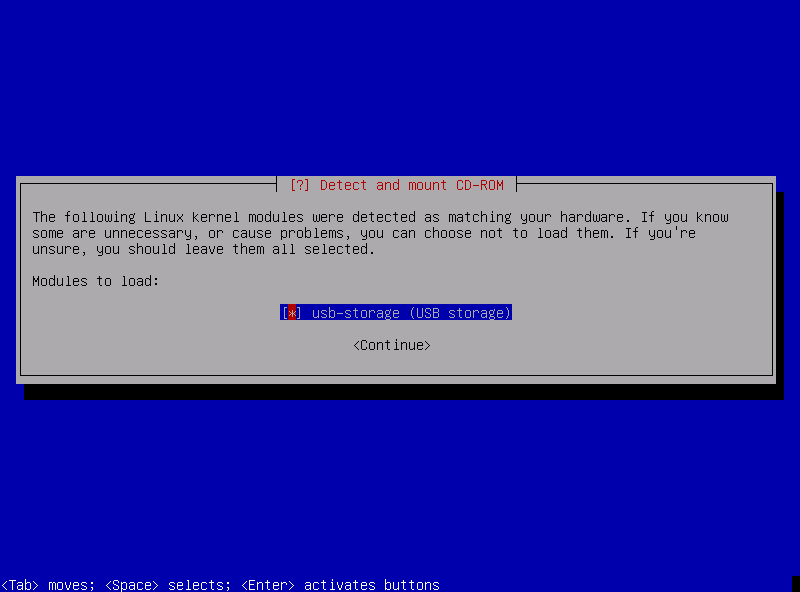
Once the installer has the correct media identified and
selected (the asterisk within the brackets), tab to the
<Continue> button and press Enter:
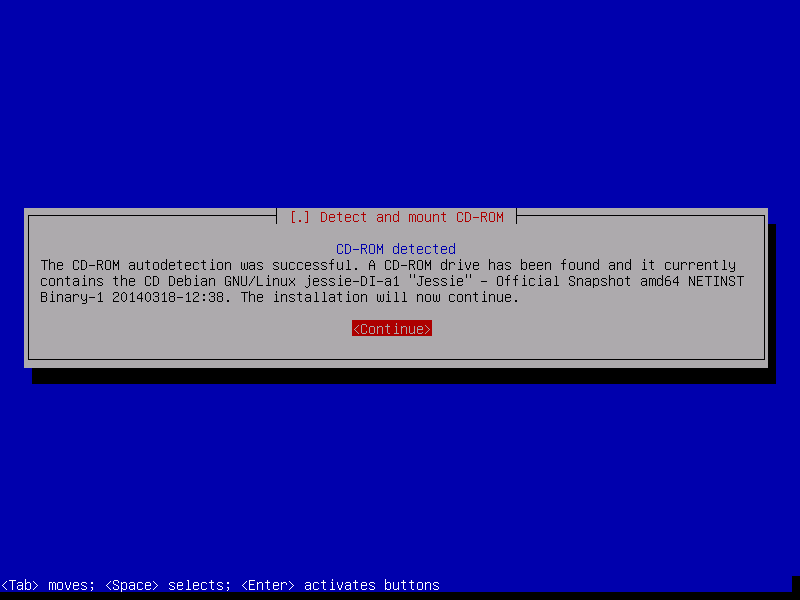
Verify this is the correct CD-ROM image (if not, you
will need to reboot the installer to try again), and press
Enter to return to the main menu:
Step 2-2-6: Load Installer Components From CD
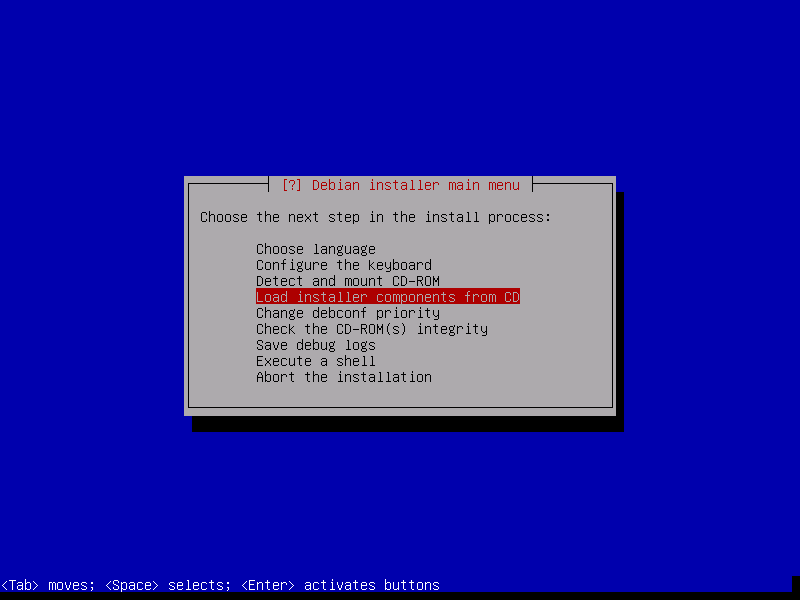
Press the Enter key to define what the installer will load to
analyze your platform's storage areas and allocate space for
host system, which will display the options for you to select.
Arrow down, pressing the space bar to mark each component that
needs to be loaded for your install.
I selected choose-mirror, mbr-udev, and parted-udev.

After you have looked at all the options and selected what you
need, tab to the <Continue> button and press Enter to
let the installer load the modules and return to the main menu.
Step 2-2-7: Detect Network Hardware
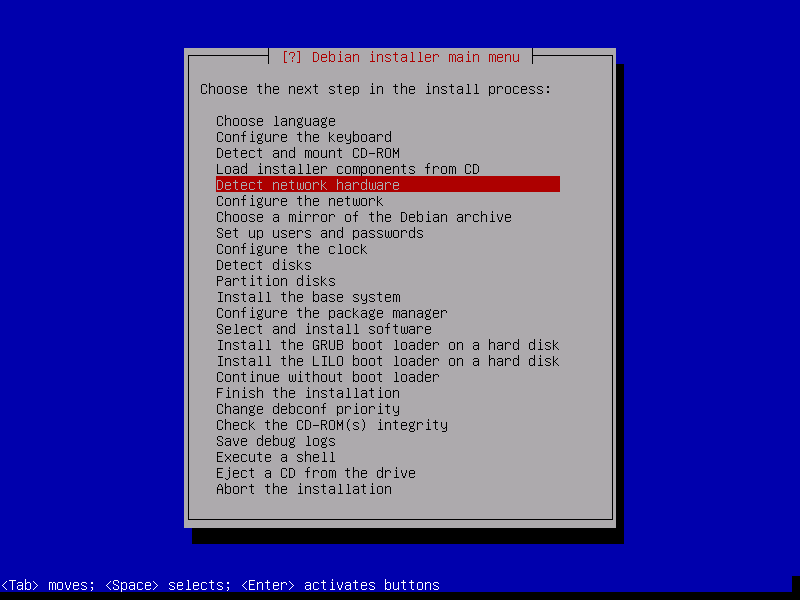
Press the Enter key to allow the installer to probe the platform's
network hardware and return to the main menu.
Press the Enter key to begin configuring the network interface
for the installation and installed host machine:
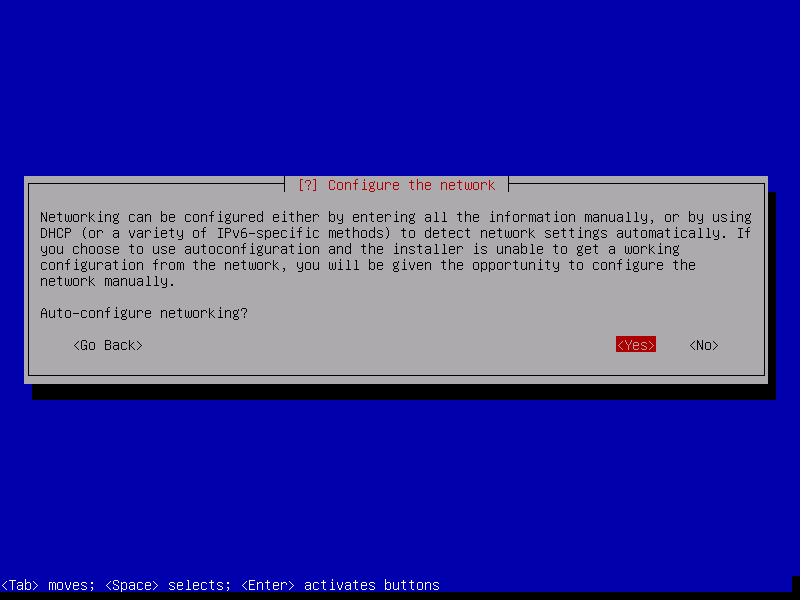
My project computer will use its only wired Ethernet port
for network access by the host system as well as all guest
virtual machines of that host system.
All these systems will be visible to the LAN inside my home
catenet by the magic of virtual bridging; however, that cannot
be configured at this time—prerequisite software will be
installed later in this subsection.
For now the NIC will be configured to use static IPv4 (the
external DNS server already knows about all these new host
systems).
Thus, I tab to the <No> button and press the Enter key,
key in my IP address/CIDR netmask, tab to the <Continue>
button:

and press the Enter key.
Since the installer correctly calculated my gateway address,
I simply tab to the <Continue> button:
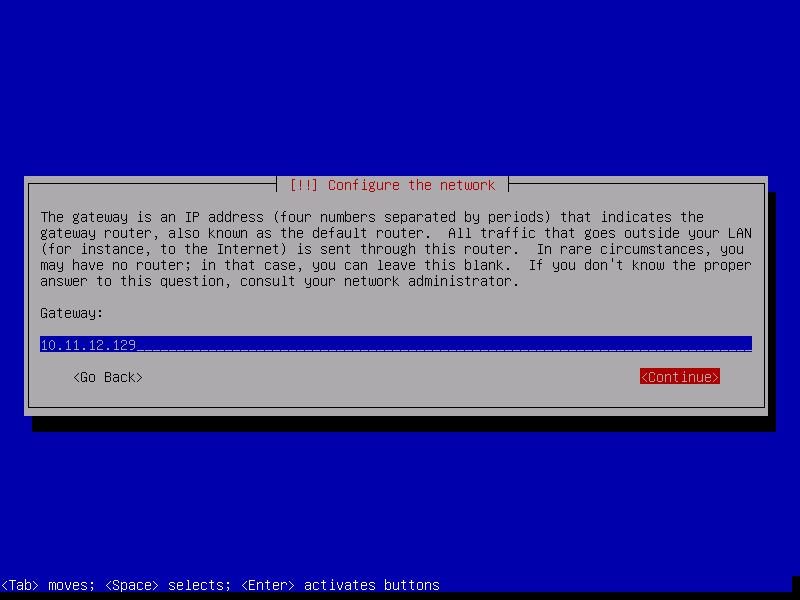
and press the Enter key.
I replace the installer's bad guess with my network's DNS server
addresses, tab to the <Continue> button:
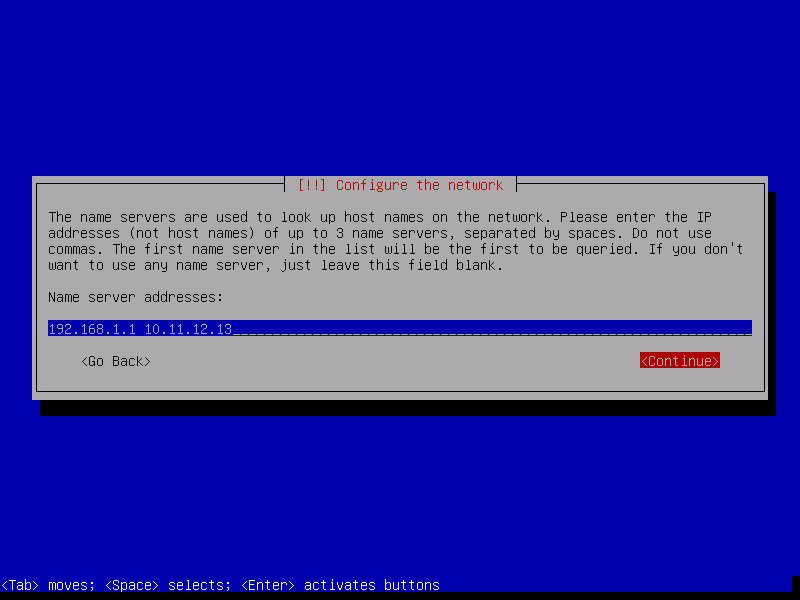
and press the Enter key.
My review of the configuration finds nothing to go back and change,
so I ensure the <Yes> button is highlighted:
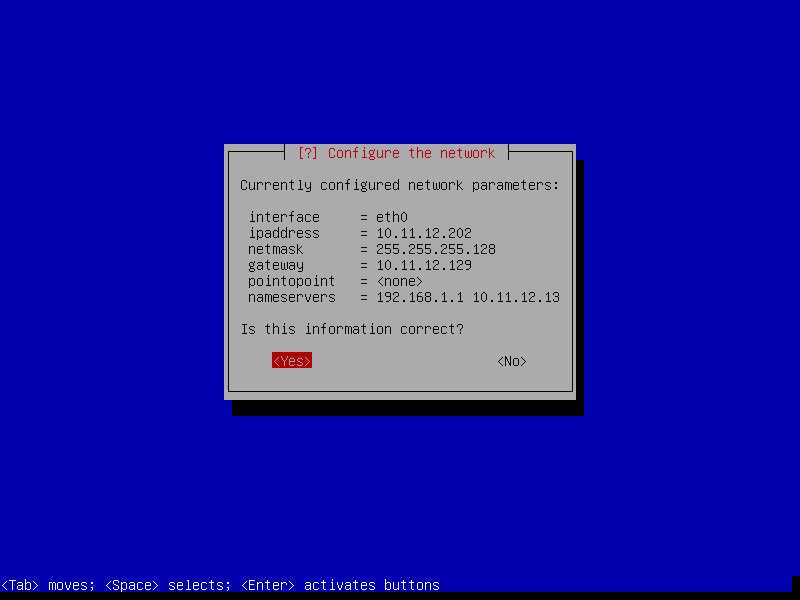
and press the Enter key.
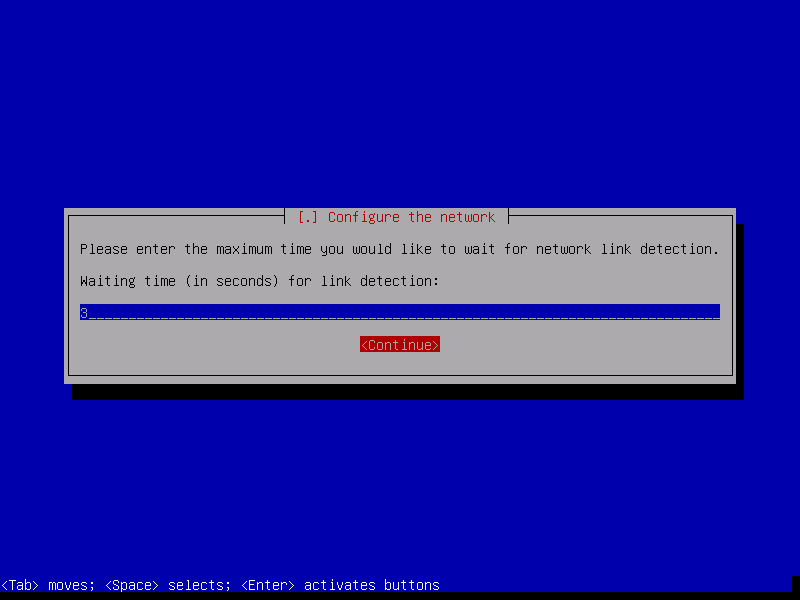
I'm happy with the default here, so there's nothing more to do than
press the Enter key.
I key in the hostname that my host system will go by, tab to the
<Continue> button:
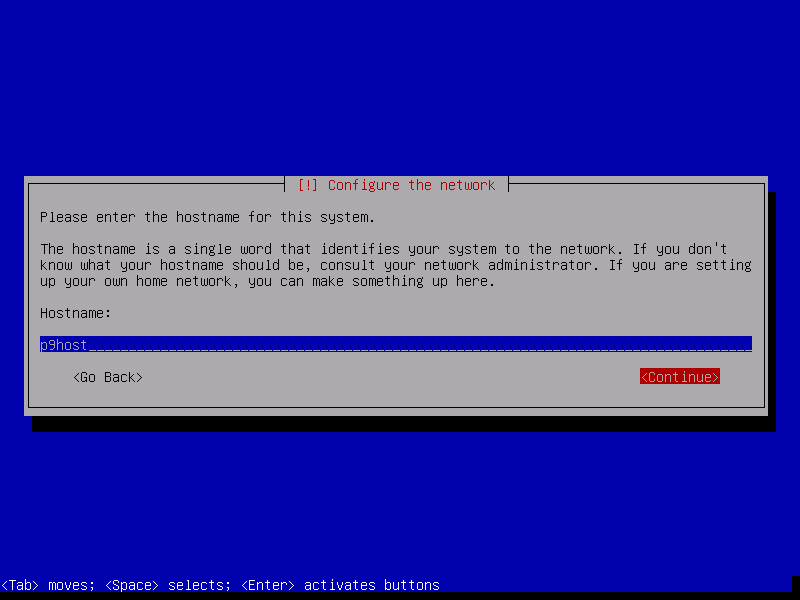
and press the Enter key.
I key in the domain name that my host system will found by in my
catenet (no trailing period), tab to the <Continue> button:
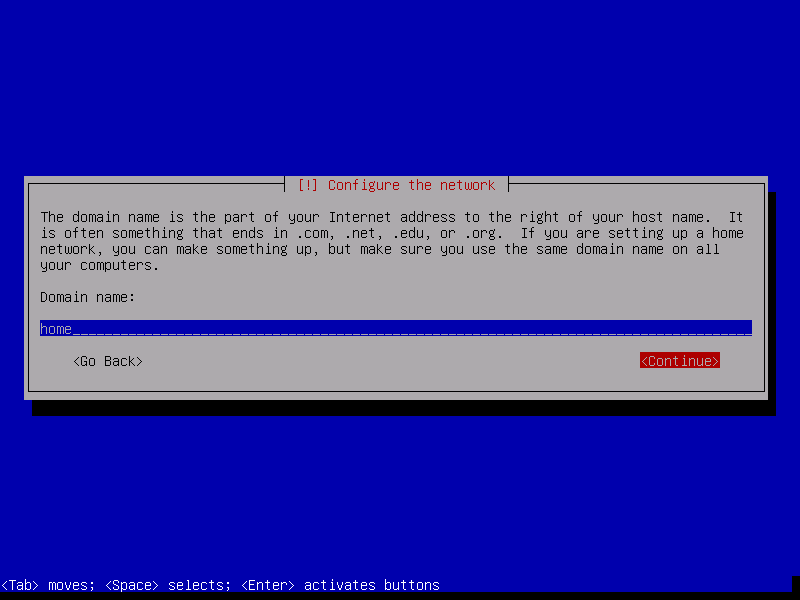
and press the Enter key, returning to the main menu:
Step 2-2-9: Choose a Mirror of the Debian Archive
The reason to use a mirror is to reduce the load on the Debian
repository servers and hopefully increase the download speed you
are afforded.
This option requires you already know which mirror you want to use
(in my case, debian.csail.mit.edu).
Find yours at the
Debian mirror list
web page.
Now I press the Enter key to begin the selection.
I tab once to select FTP:
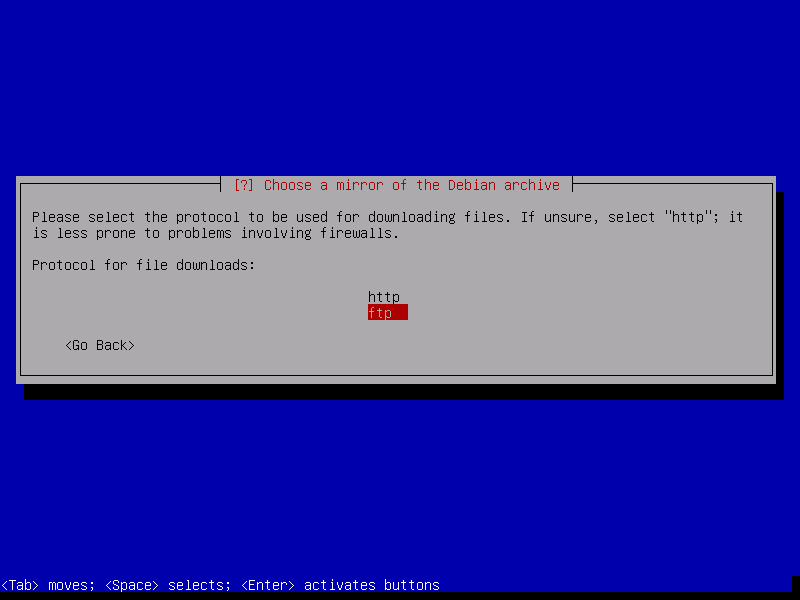
and press the Enter key.
I key in the mirror name, tab to the <Continue> button:
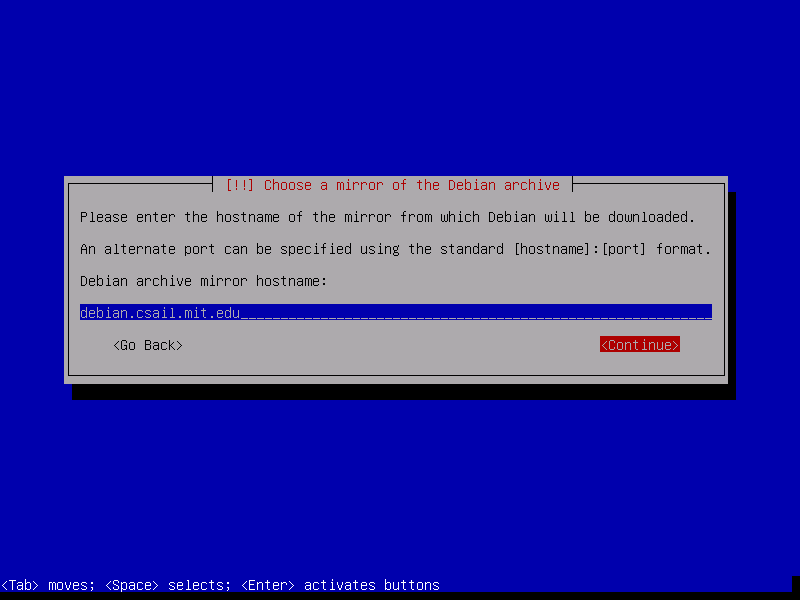
and press the Enter key.
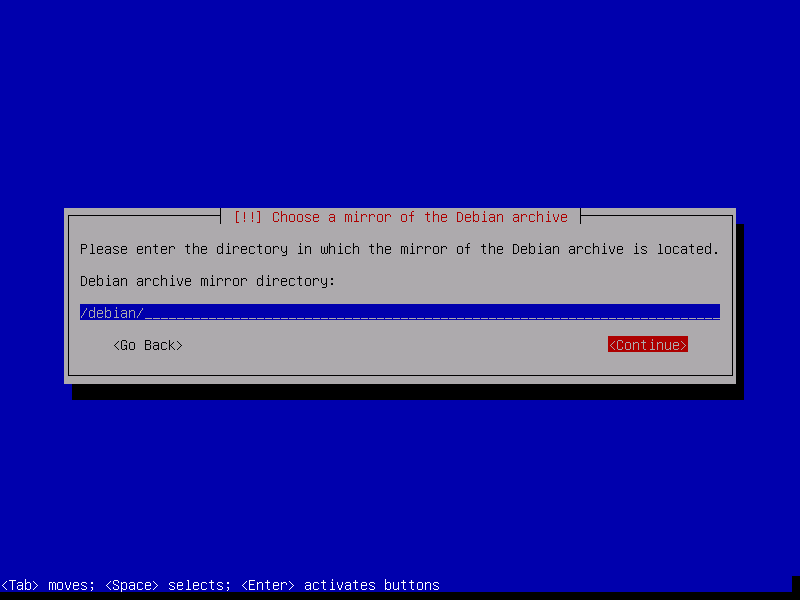
The default directory is correct, so I ensure the <Continue>
button is highlighted and press the Enter key:
My project environment does not require proxy specifications,
so I tab to the <Continue> button:
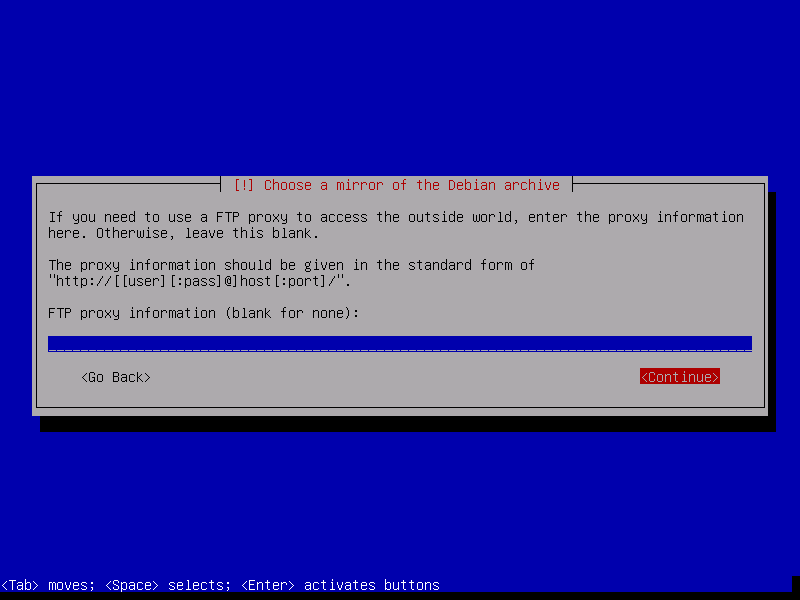
and press the Enter key, returning to the main menu.
Step 2-2-10: Set Up Users and Passwords
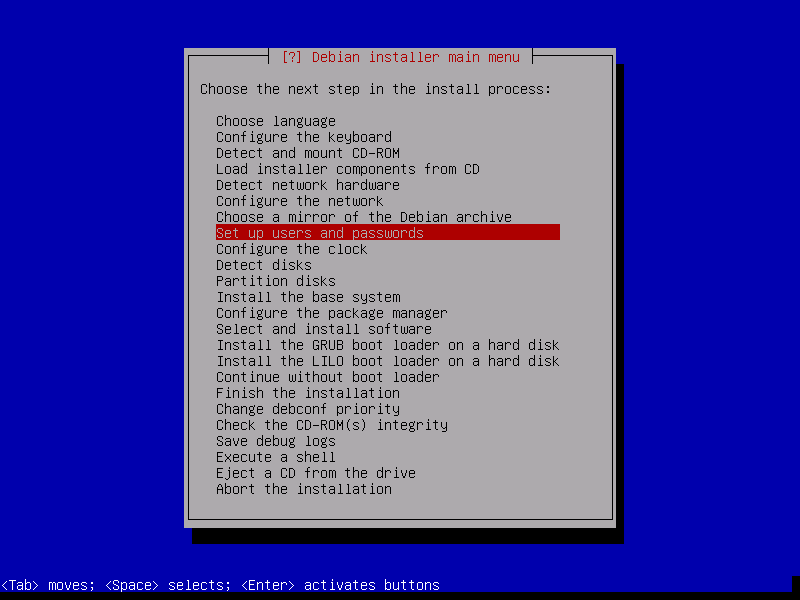
Press the Enter key to start defining the root and vmadm users for
the host system.
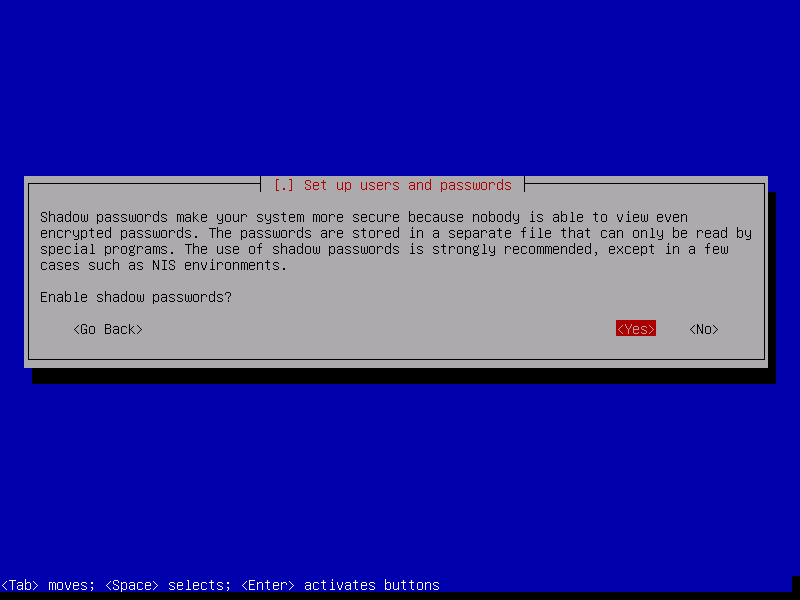
Press the Enter key to simply accept the default to enable shadow
passwords and proceed to:
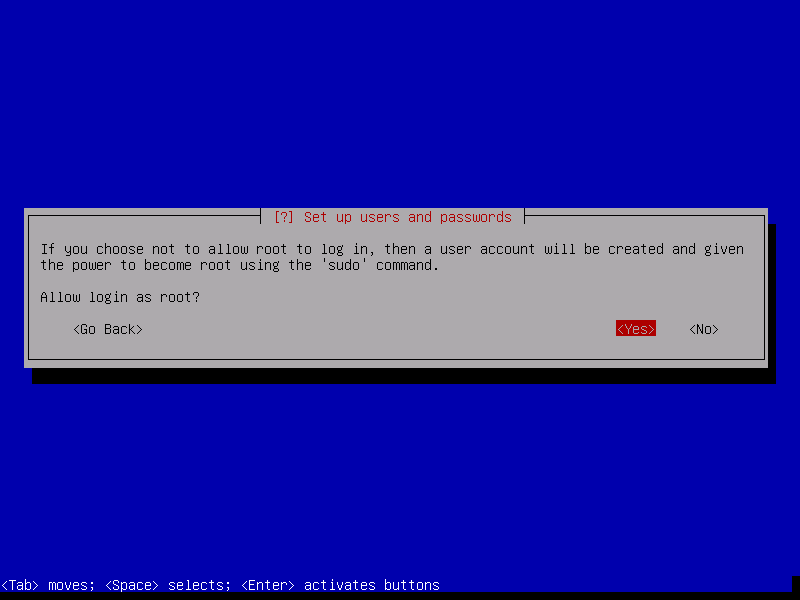
Press the Enter key to simply accept the default to enable root
to logon and not force the non-root user to have sudo powers.
This brings up:
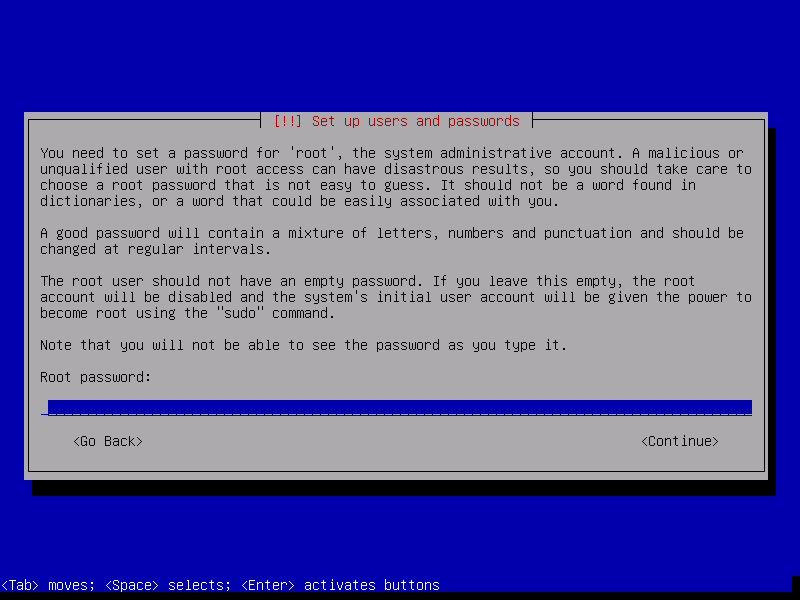
Key in the root password for the host system, tab to the
<Contnue> button:
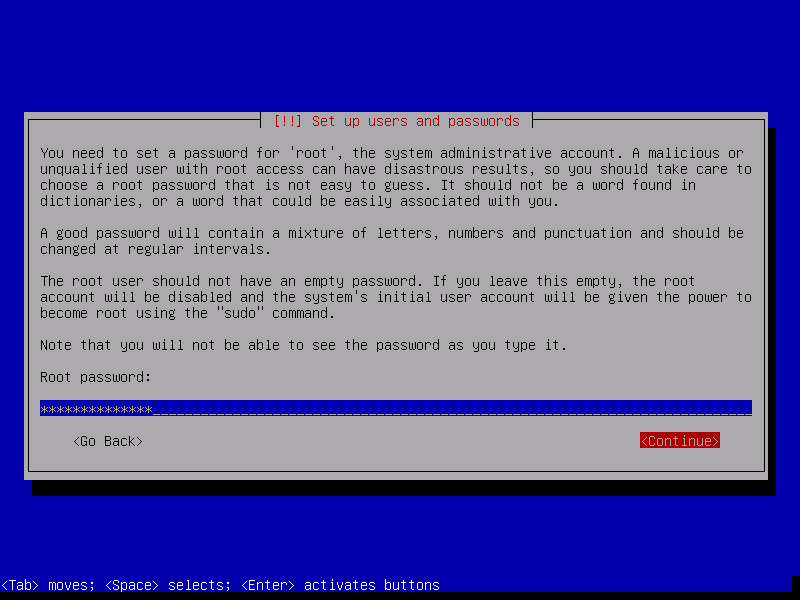
and press the Enter key.
Key in the root password again, tab to the <Contnue> button:
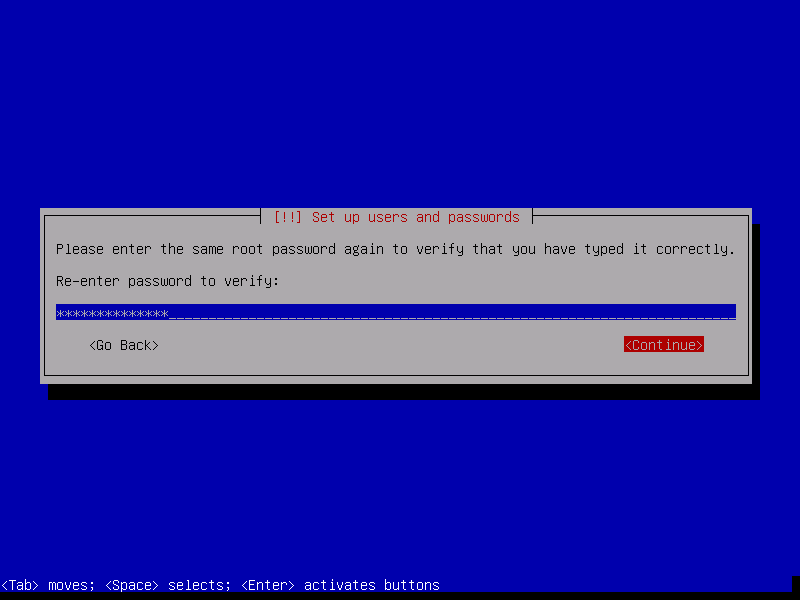
and press the Enter key.
Since we want to create the vmadm user, for this screen:
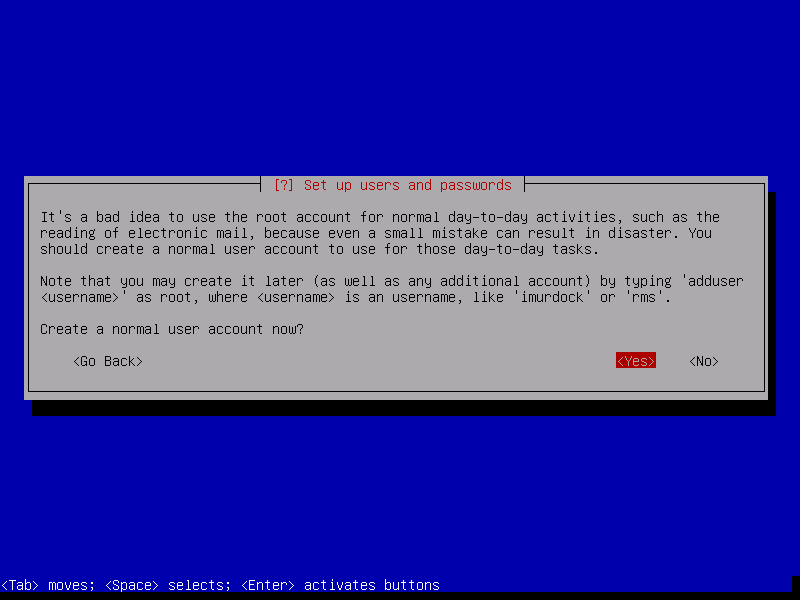
we simply press the Enter key.
I use "VM Administrator" for my user's full name (you can use
whatever you wish).
I type that in, tab to the <Contnue> button:
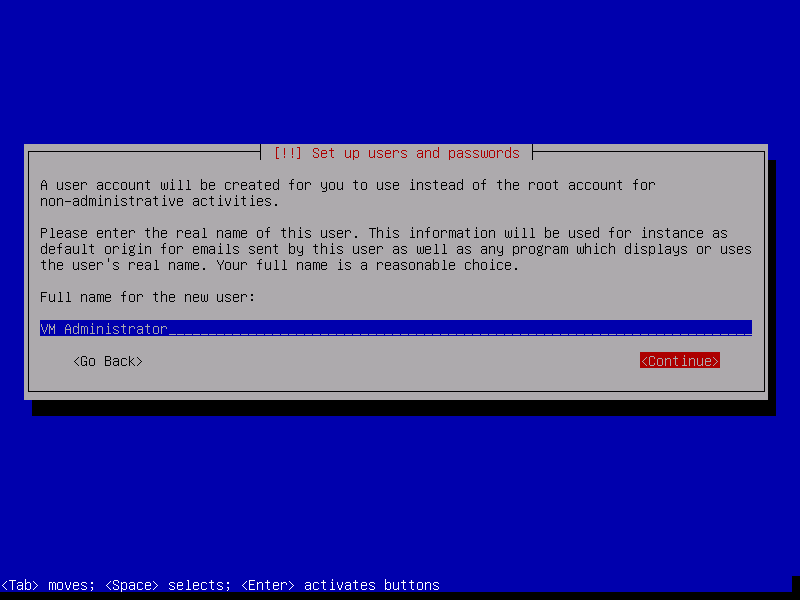
and press the Enter key.
I use "vmadm" for my user's name, but you can use whatever you
wish (I suspect "maint" could be a popular choice in some
circles even though it would be the name of a Linux account,
not a VM/370::z/VM virtual machine) but remember to change
occurances of "vmadm" in this cookbook to that name.
Since the installer guessed I would call the account "vm", all
I need to type in is "adm", then tab to the <Contnue> button:
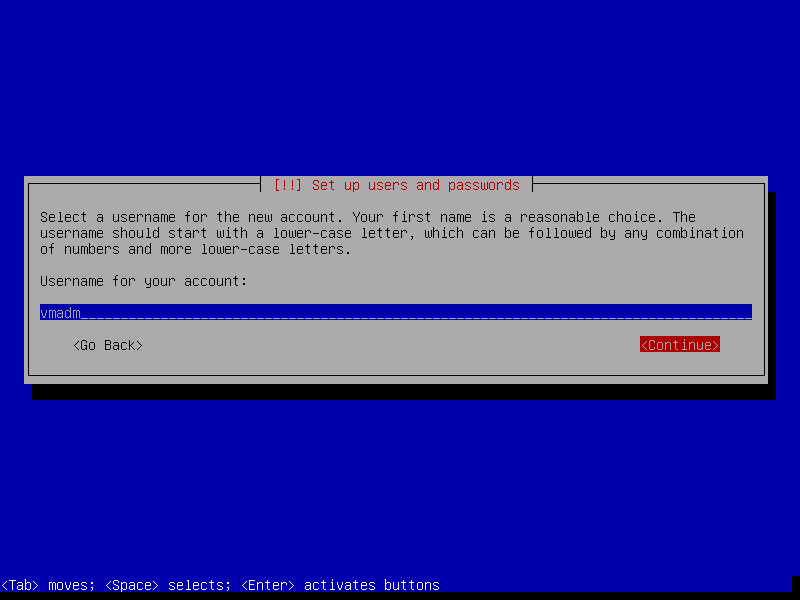
and press the Enter key.
Key in the password you will use for this account, tab to the
<Contnue> button:
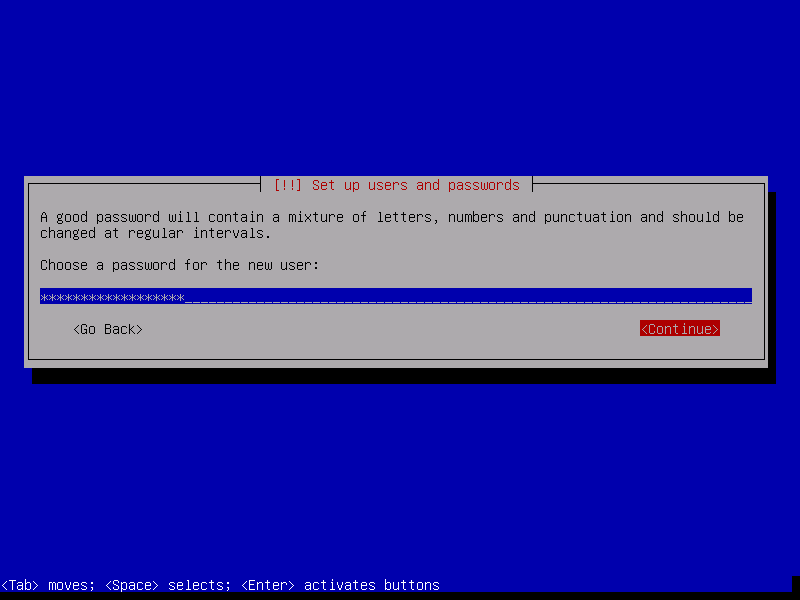
and press the Enter key.
Key in the password again, tab to the <Contnue> button:
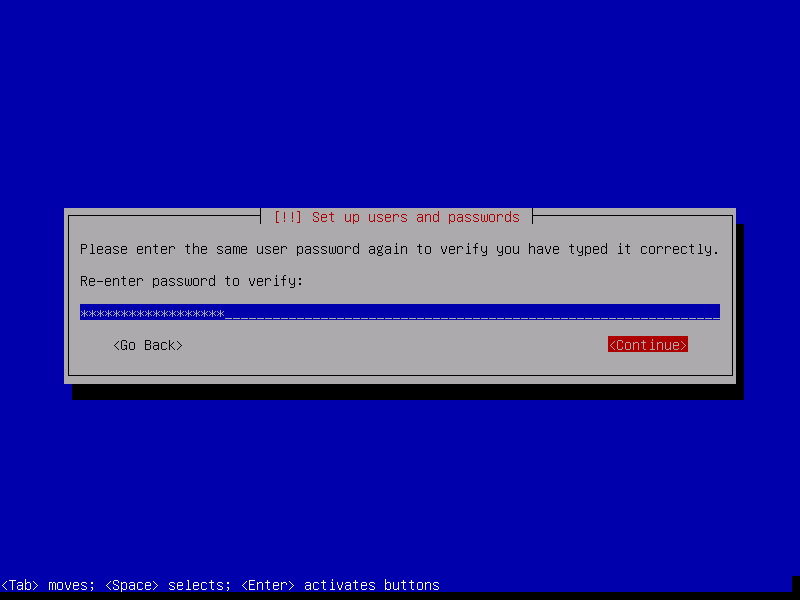
and press the Enter key, which returns us to the main menu again.
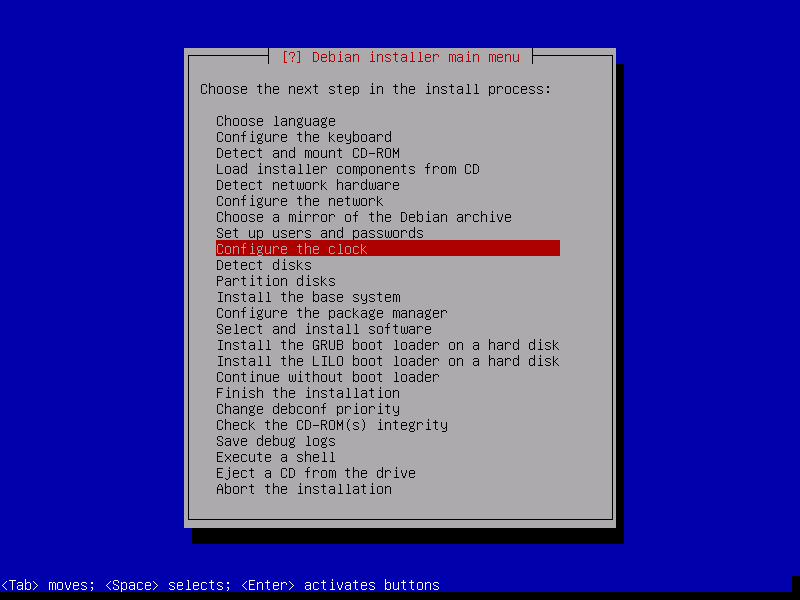
Press the Enter key to start configuring the hardware clock:
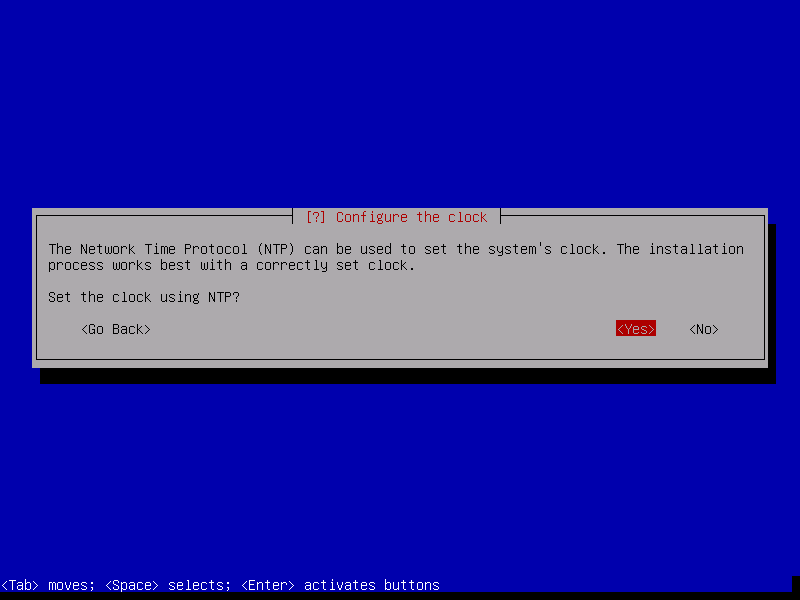
The only reasons I can think of to not use NTP (or something
better) to maintain the hardware and system clocks is the host
cannot network to any NTP servers or will be running in a
virtual machine that will be hosted by an OS that IS using NTP
(or something better) to manage the clocks.
I simply press the Enter key and am presented with the opportunity
to change the default NTP server.
Having no need to do so, I merely tab to the <Contnue> button:
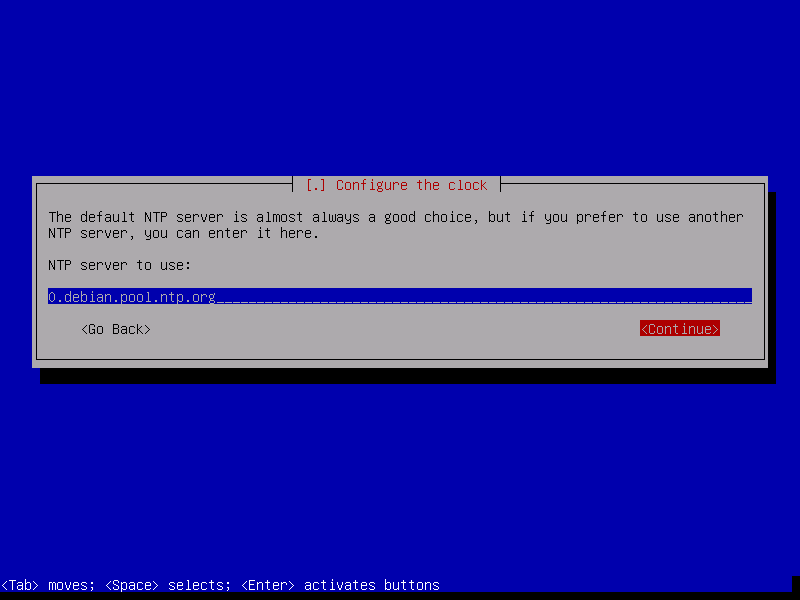
and press the Enter key, bringing up:

Once you have the default system time zone you want highlighted,
press the Enter key to return to the main menu.
Step 2-2-12: Detect Disks
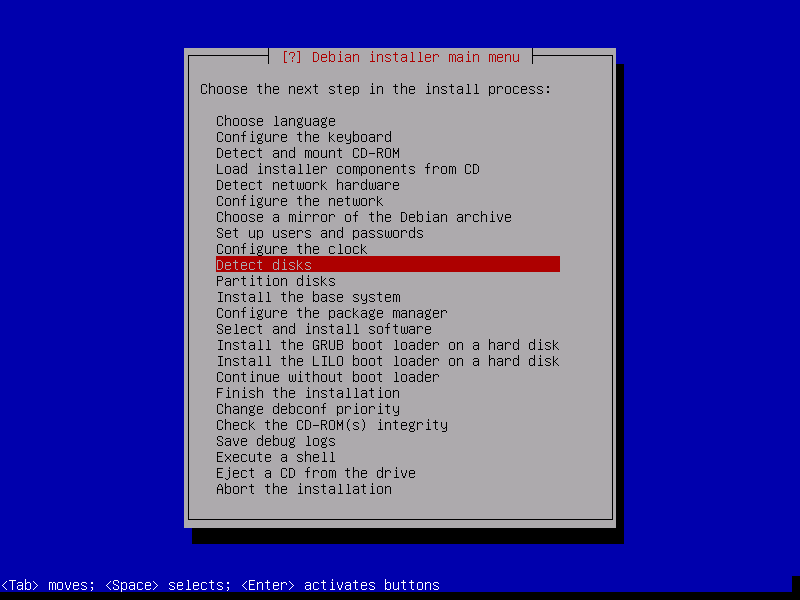
This step involves no iteraction with you and should take a very
short time to return after you press the Enter key, returning you
to the main menu again.
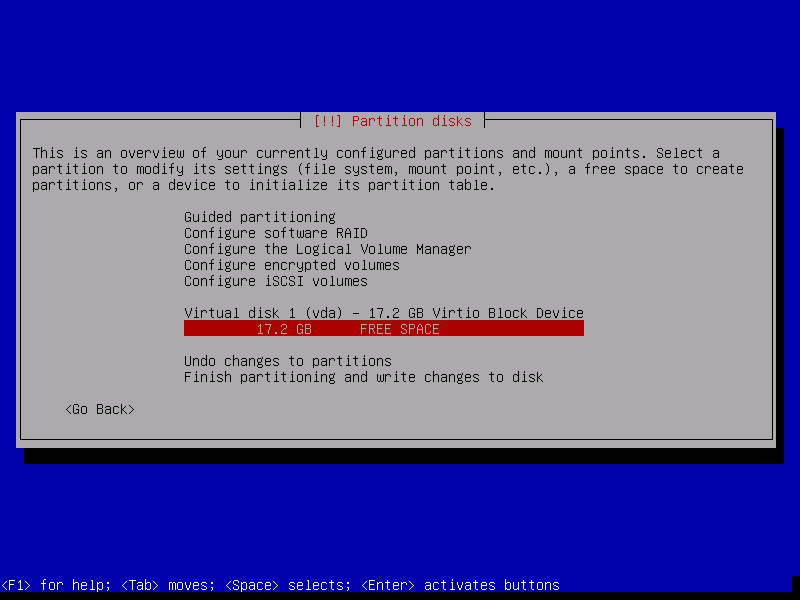
Step 2-2-13: Partition Disks
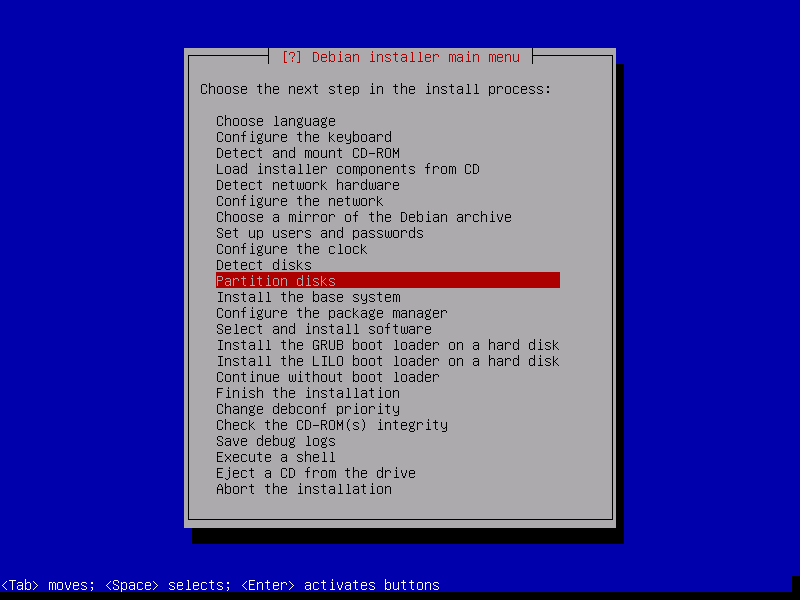
After the installer loads some modules and attends to other
house-keeping for a couple seconds, you are presented with the
choice of how automagically to mess with the project platform's
non-volatile storage.
This recipe takes the hands-on approach, so I arrow down to the
Manual option:
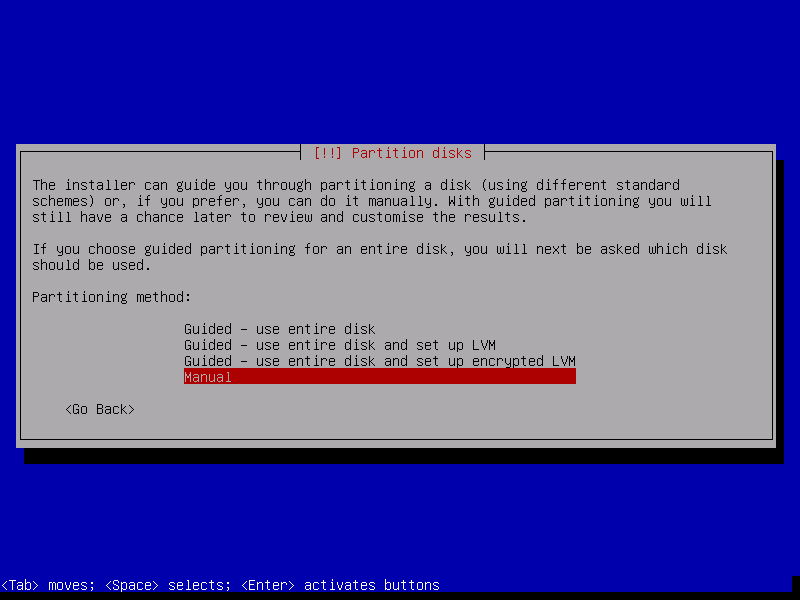 and press the Enter key, bringing up:
and here my deception is revealed: I am actually running this
install in a virtual machine, not on the bare project hardware!
This is how I am able to capture these screenshots.
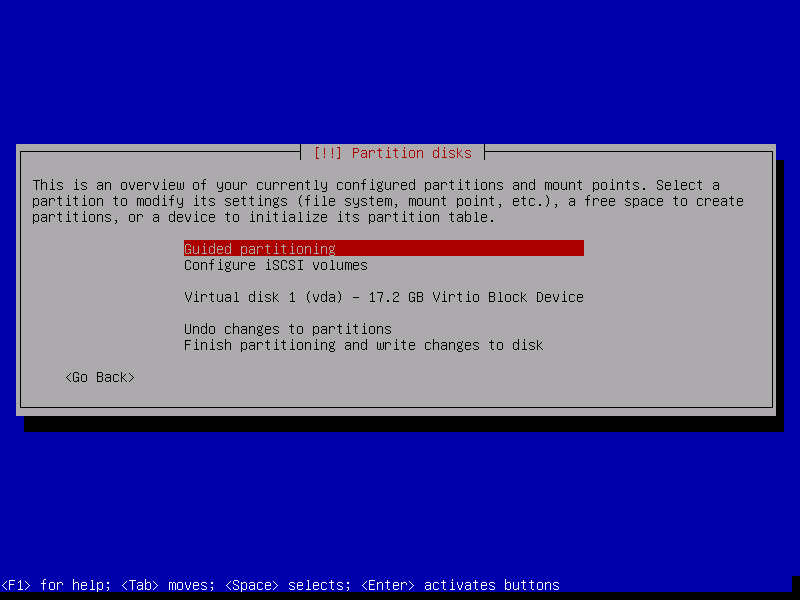
However, I do not define the platform's real disk drives to the
virtual machine, only the USB-stick and a blank virtual drive
that is shown here.
If you want to see how I configured the actual disks, refer to
the partitioning I did a week ago using the installer application
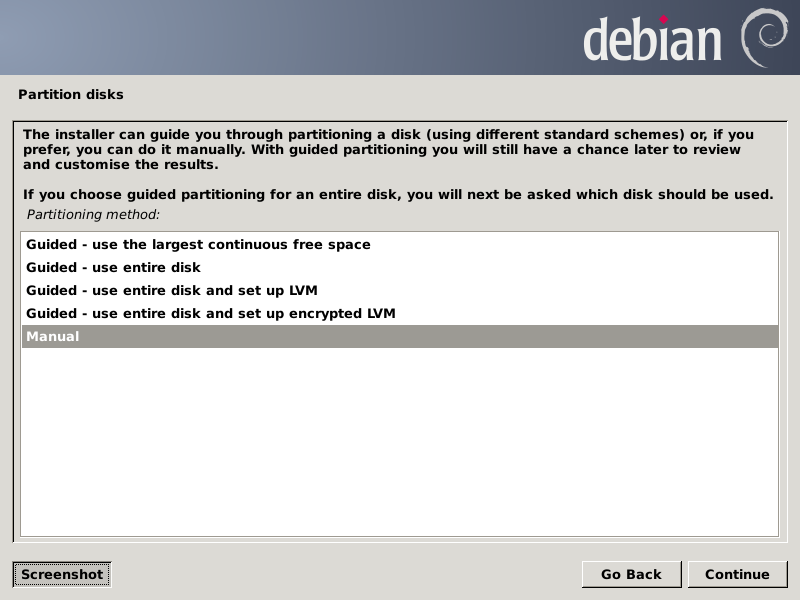
of Debian Live which follows.
This is recommended if you have never manually partitioned disks
before.
Otherwise you can skip past the GUI screens to see how I set up
this virtual disk which will not be used in the project—it
exists only to capture the partitioning screenshots so you can
know what to expect when you carve up your project's real disks.
Note these GUI screens show the screen prior to clicking Continue.
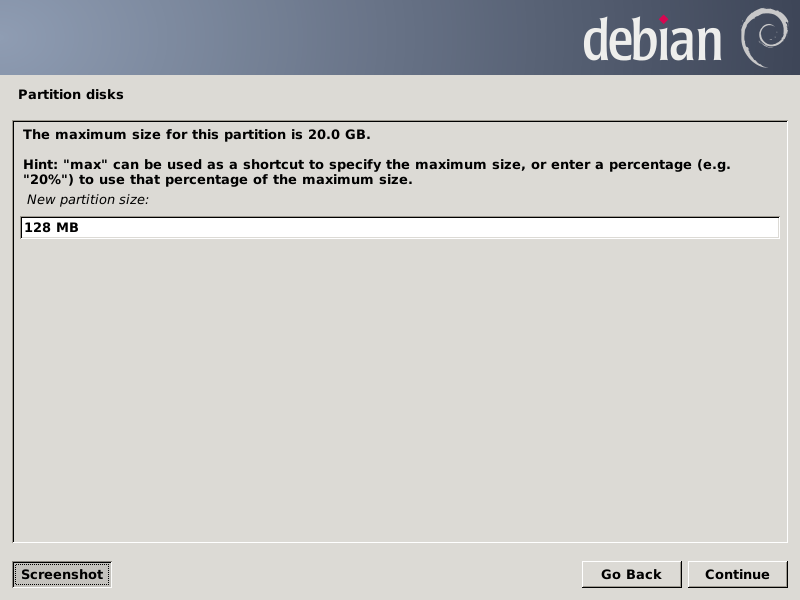
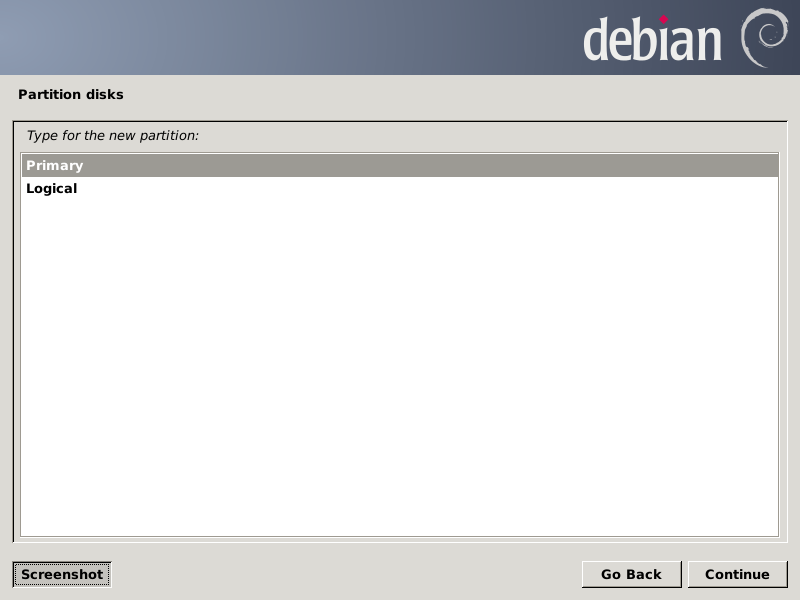
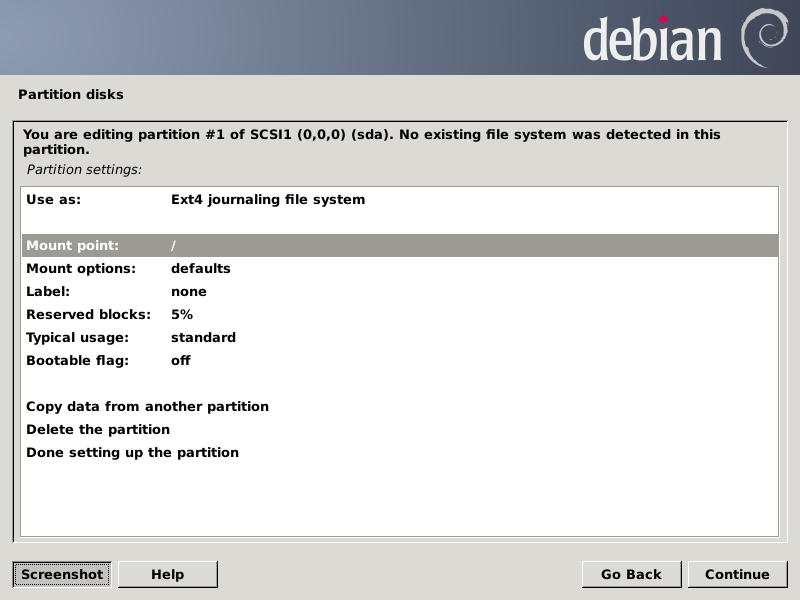
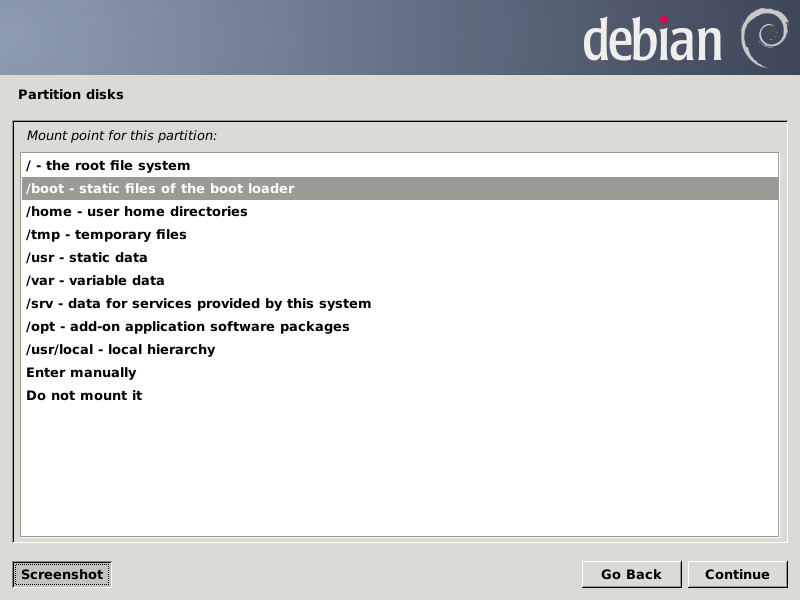
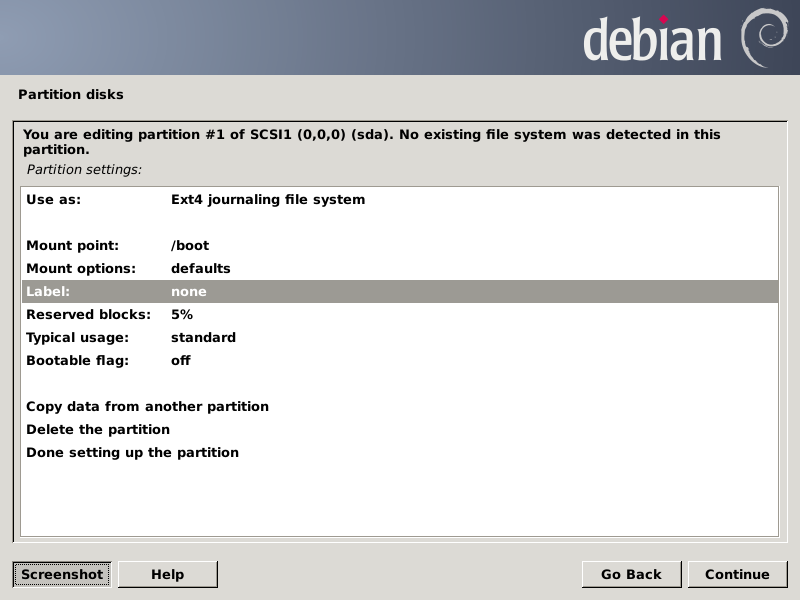
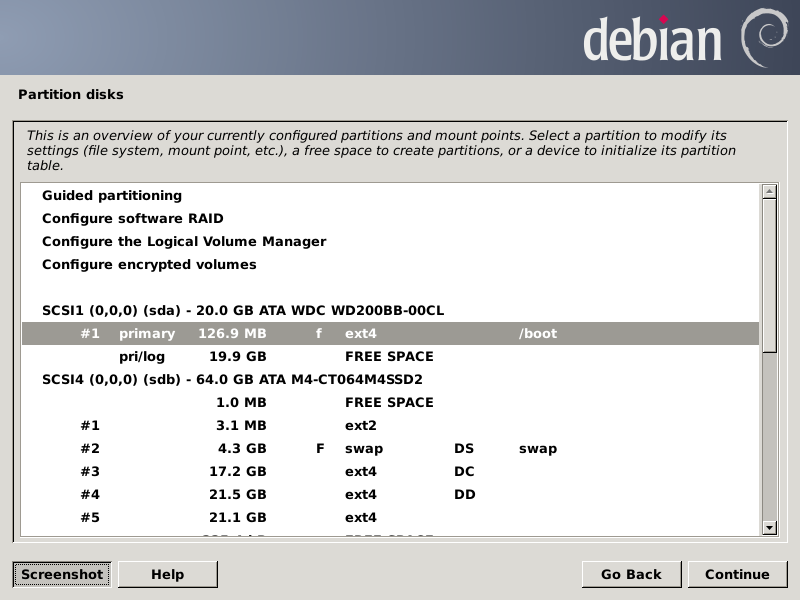
First up is the empty sda disk which gets a 128 MB /boot partition.
The remaining space (for the Bell Labs Plan 9 virtual machine) will
be allocated later in this section. Note that everything you change
is merely setting parameters for the actual operations that you will
be shown to review and confirm before the trigger is pulled.


The default is everything, so be sure this next screen defines what
you want:

After pressing Continue, the partition chooser screen should look
like this:
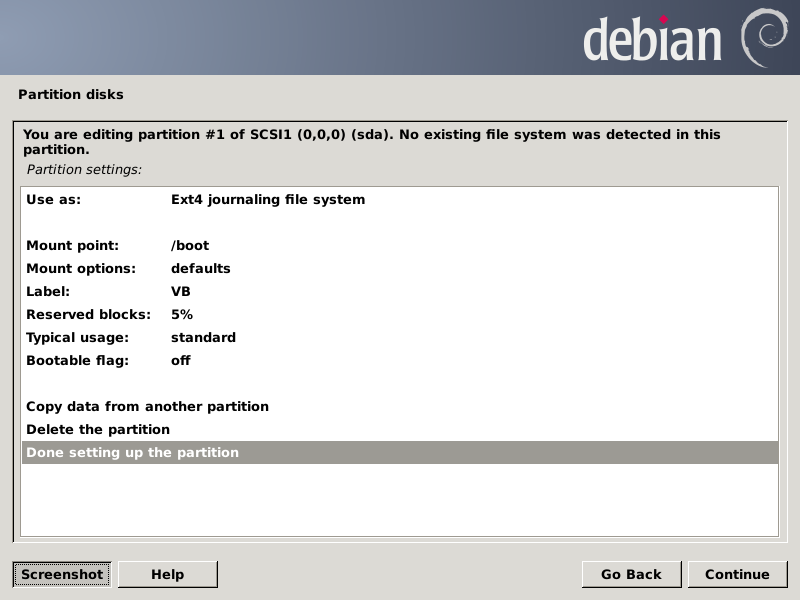
Note the "f" for the sda1 partition means it should be formatted.
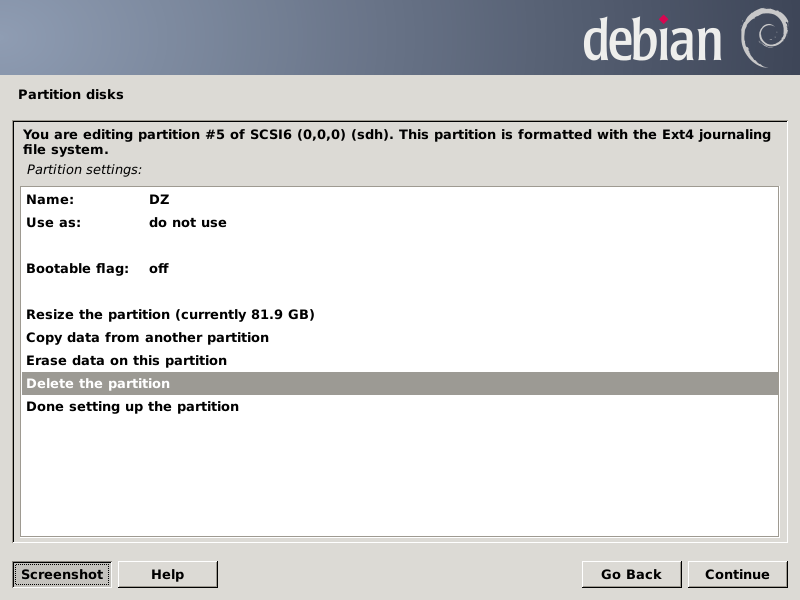
Now I have to scroll down to get to the sdh5 partition:
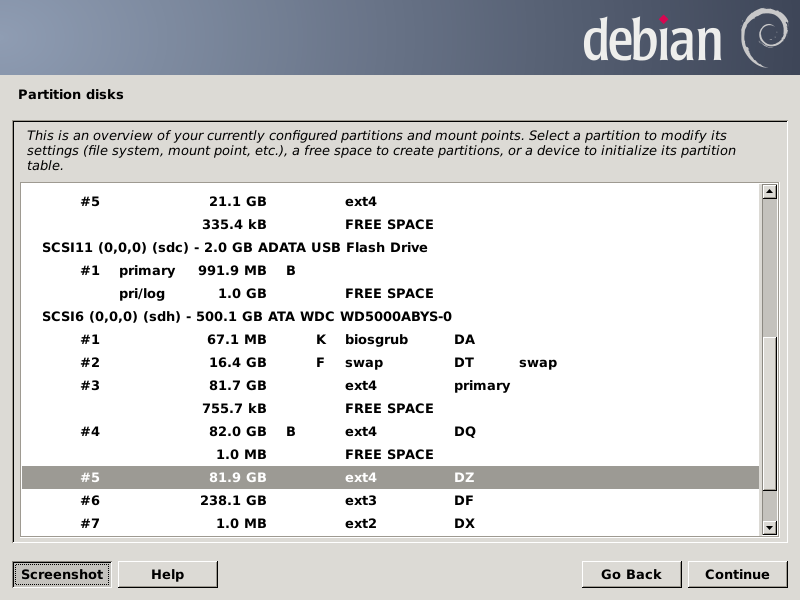
Now we delete the sdh5 partition and reallocate a much smaller
partition for the root (/) filesystem of the host, which will
contain everything beside /boot and swap space:
Scroll down again to get to the free space just made available:
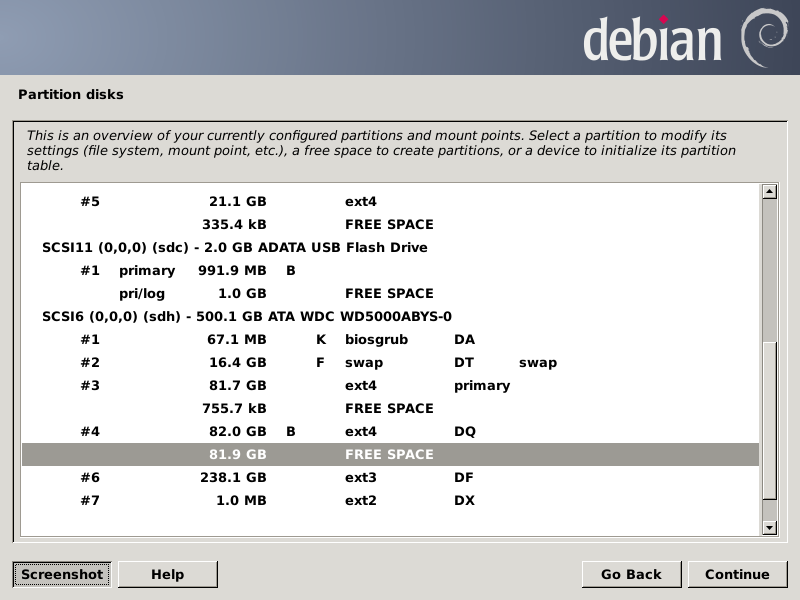
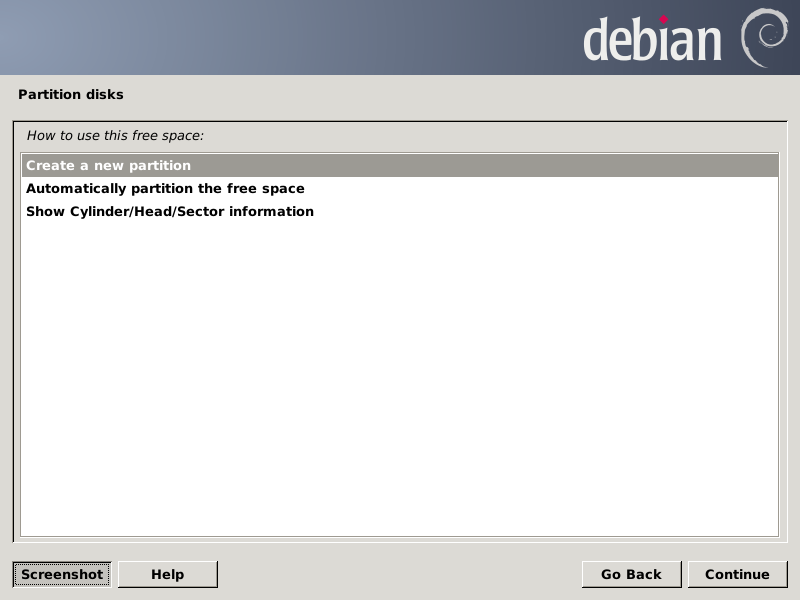


Here's the disk modifications plan.
Notice existing swap partitions will be reformatted but since we are
running the USB-stick system from a RAM-resident root filesystem
without any swapping activated, that will not cause a problem.
You must either punch the Yes radio button and Continue or Go Back:
Okay, back to the current recipe using the Debian Installer's non-GUI
expert mode on that purely pedagogic virtual disk (probably
more representative of your project platform, I'd reckon).
Here's where we left off again:
The space to be allocated will be a Linux swap partition, a Linux
root partition (which will include everything but swap), and the
MBR to receive the GRUB boot loader.
You would leave at least 20 GB free for Plan 9 but this demonstration
ignores that requirement.
We press ArrowDown three times to highlight the virtual disk and Press
the Enter key, taking us to:
The installer sees a hard drive that doesn't even have a partition table.
It is unaware how that drive is really provisioned—it (and the system
to be installed on it) will interact with it no differently than with
a real physical hard drive.
This is according to expectation, so we tab to the <Yes> button
and press the Enter key, bringing up:
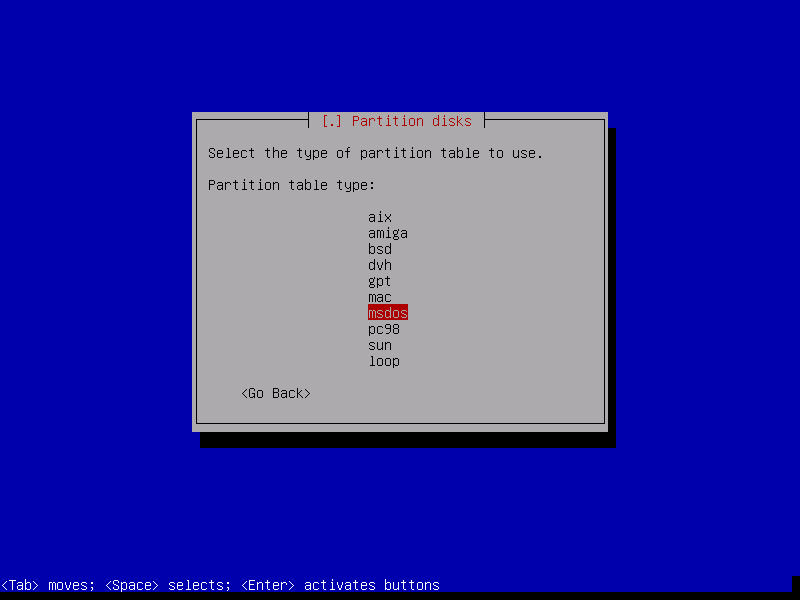
No Redmond OS has been invited to this party, so we press UpArrow twice
to specify we want GPT-orgnization and press the Enter key, leading to
the partition management screen.
We press DownArrow to highlight the Free Space line:
and press the Enter key which brings forth:
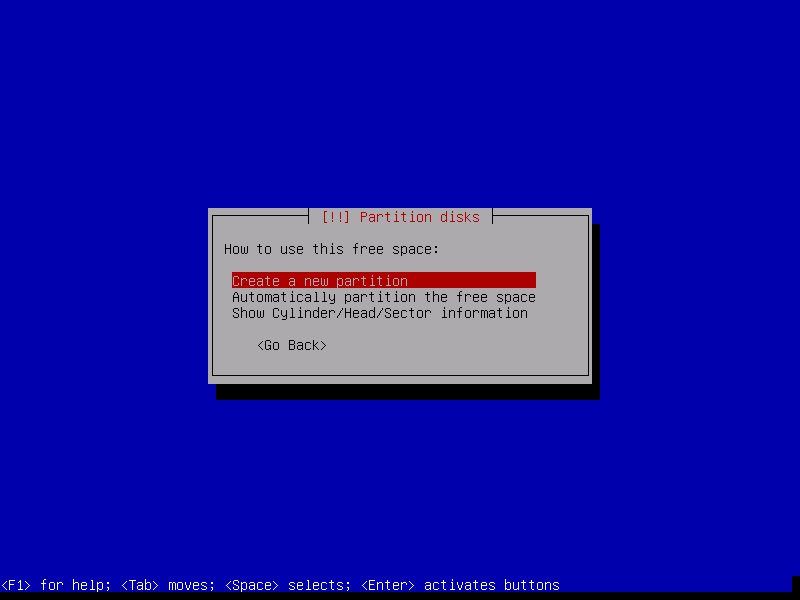
We want to carve it up ourselves so we simply press the Enter key, getting:
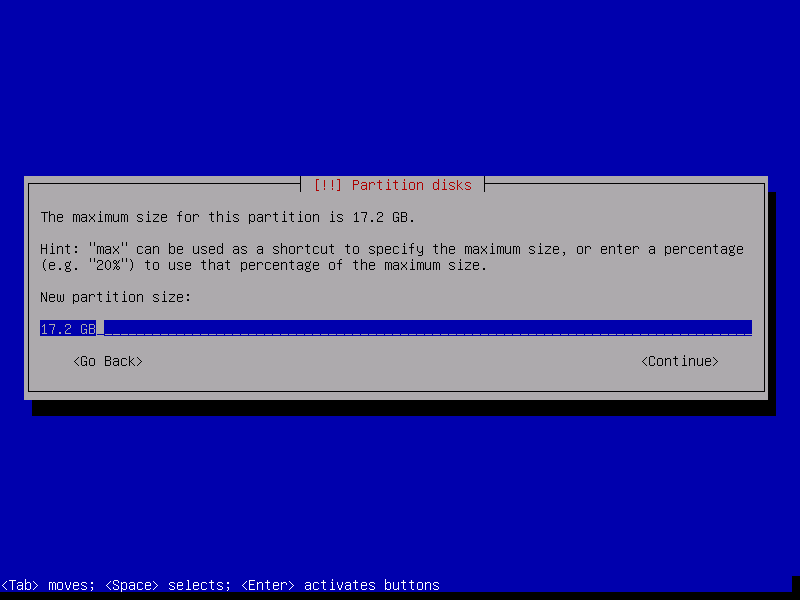
The default is everything, but we want an unreasonably small swap partition,
so we press LeftArrow three times, Backspace three times, tab to the
<Continue> button:
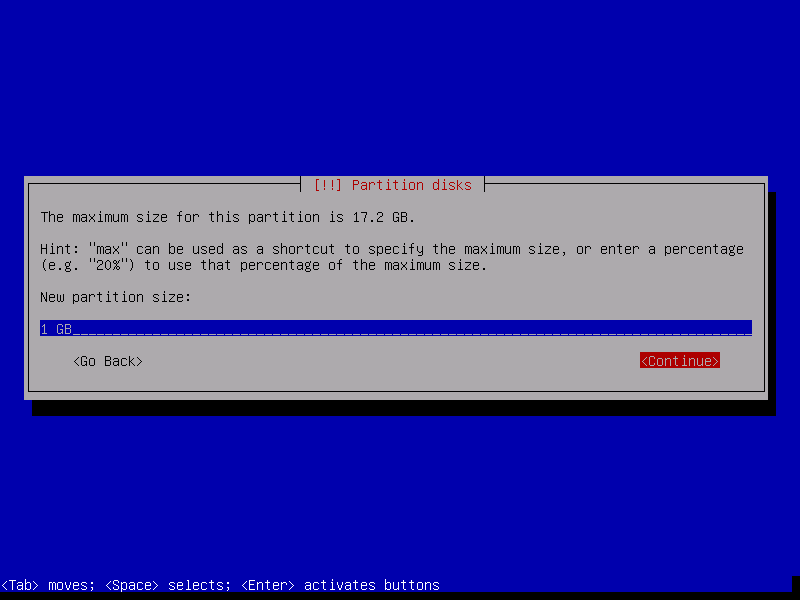
and press the Enter key, producing:
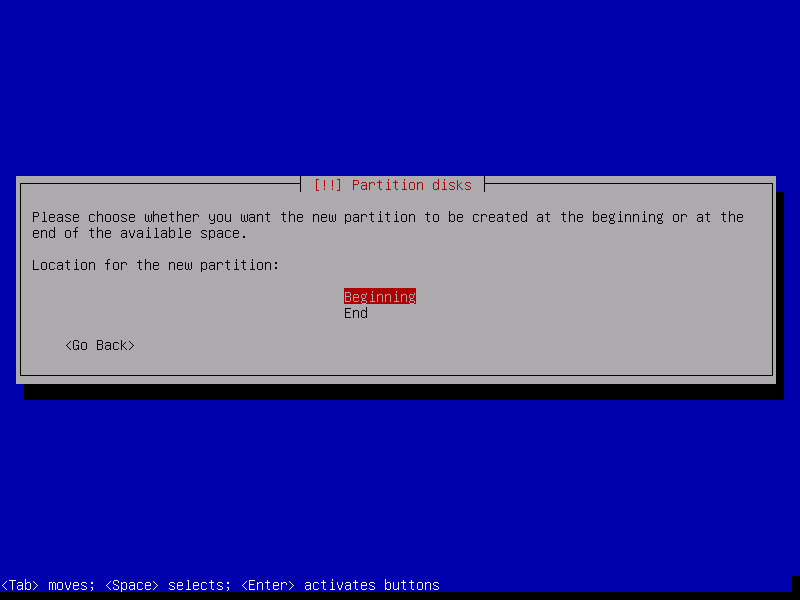
We accept the default location at the beginning of the drive by pressing the
Enter key, followed by a brief flurry of activity ending with:
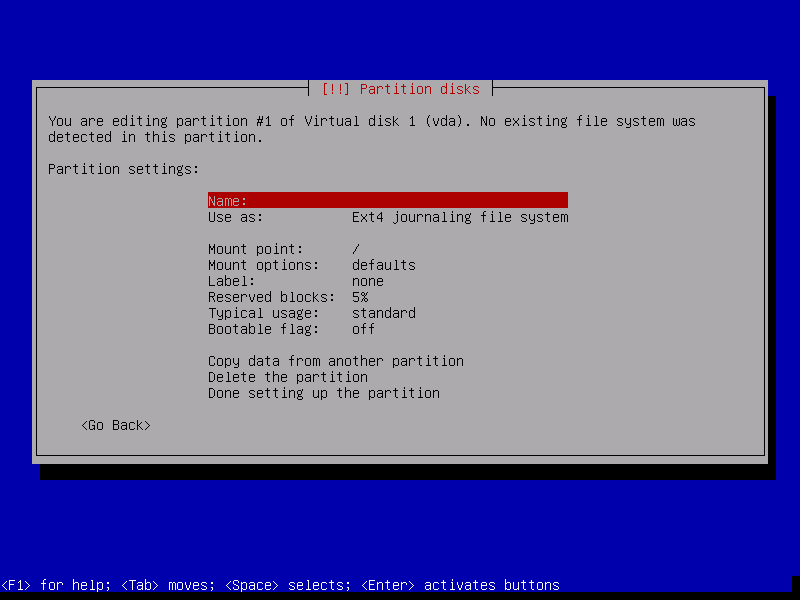
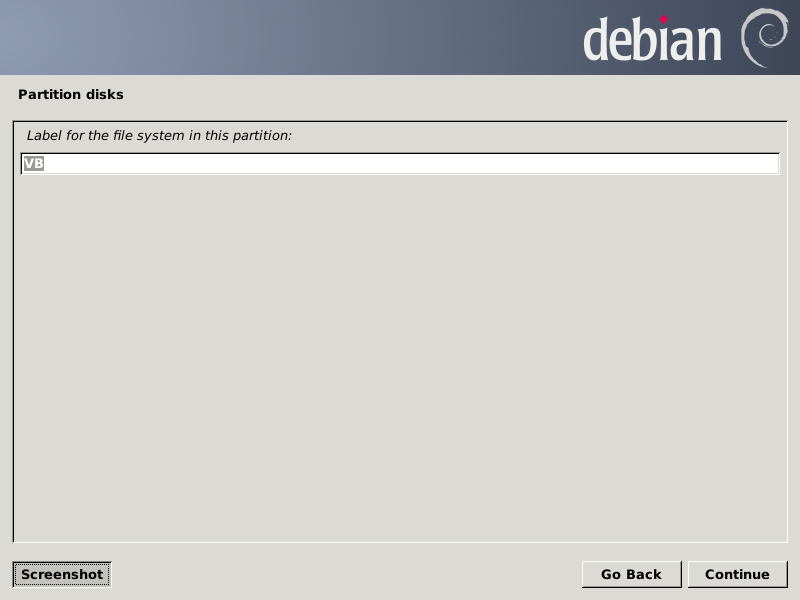
Since Name is already highlighted and showing blank, we press Enter to
supply a name.
I type "VS" (for virtual swap—call yours what you like), tab to the
<Continue> button:
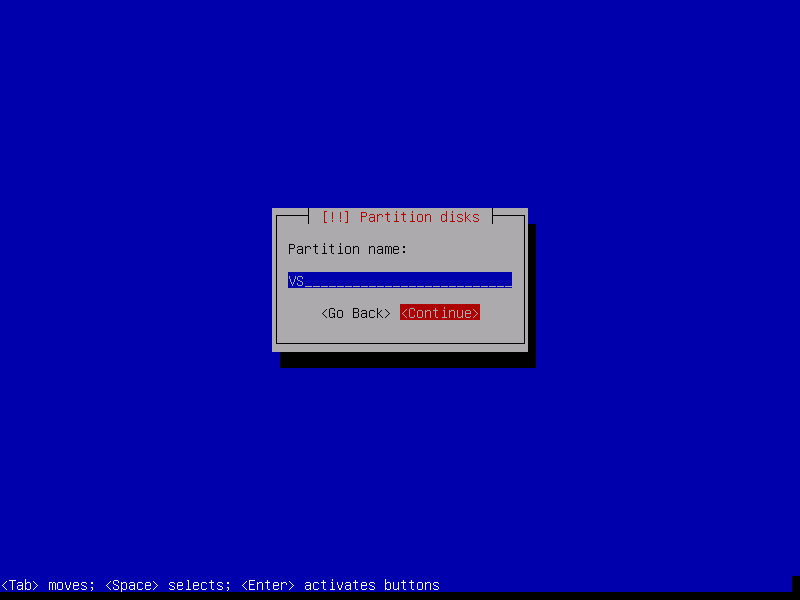
and press the Enter key, producing:

Now we press DownArrow once and then the Enter key to change the default
filesystem type (EXT4), bringing up:
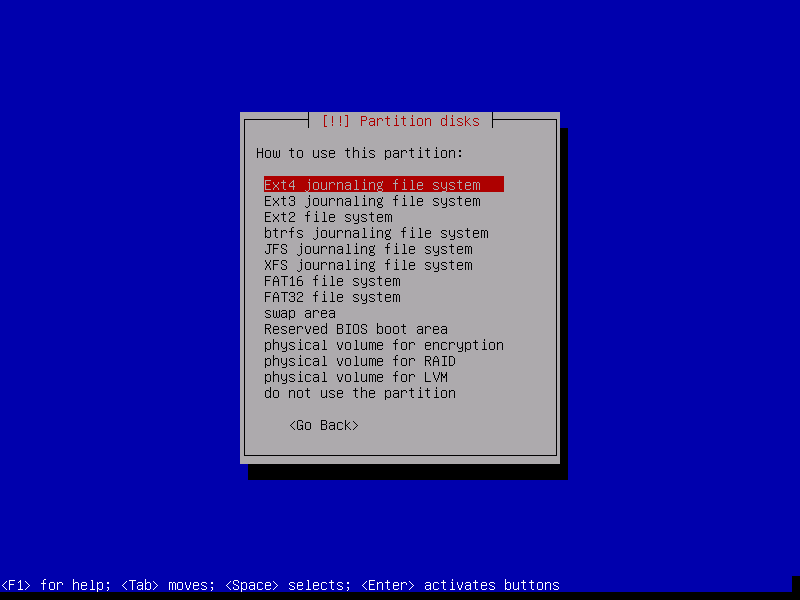
We press DownArrow eight times to highlight "swap area" and press the
Enter key, which returns us the the partition definition screen.
It has changed as a result of the updated usage, leaving us nothing
more to do with the definition.
So we use DownArrow to get us to the bottom:
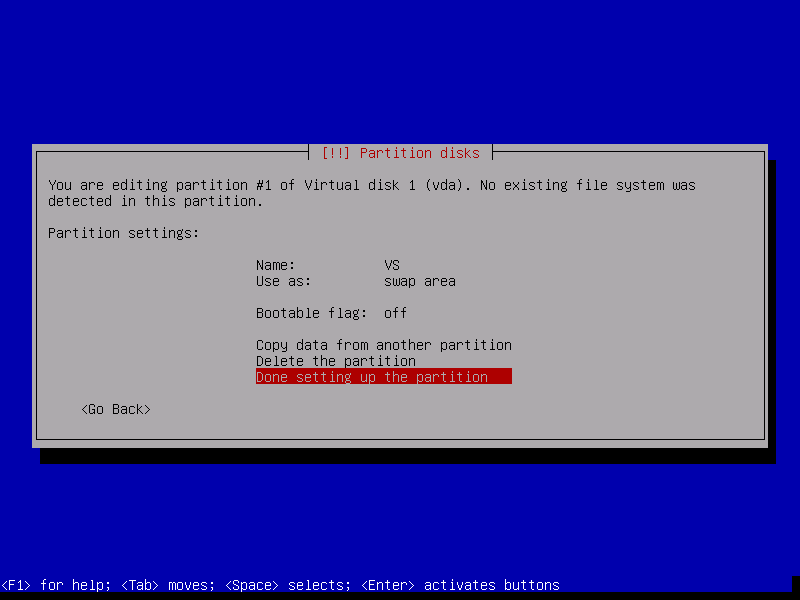
and press the Enter key, which returns us to the disks definition
screen, wherein we press DownArrow once to carve up the remaining free
space:
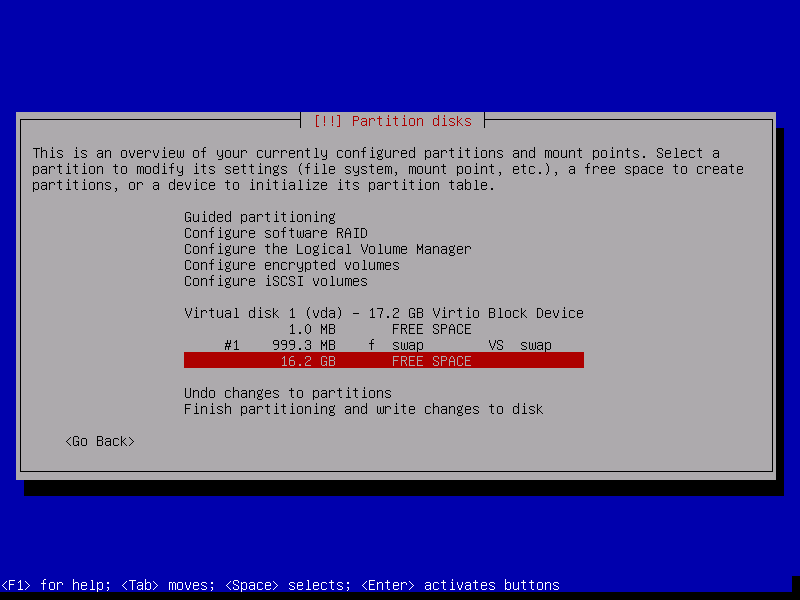
and press the Enter key.

Again we want to define it ourselves so we simply press the Enter key,
leading to another partition size definition screen, which this time
we want to default to taking all the available space, so we tab to the
<Continue> button:

and press the Enter key.
As there is no need for location information this time, we are not
asked, the installer goes straight into the short flurry of activity
prior to starting another partition definition dialog.
This time (not shown—you can do it without help) we define the
Name and Label both as "VV" and let the other options default, so that
when we're ready to return to the disks definition menu, it looks
like this:
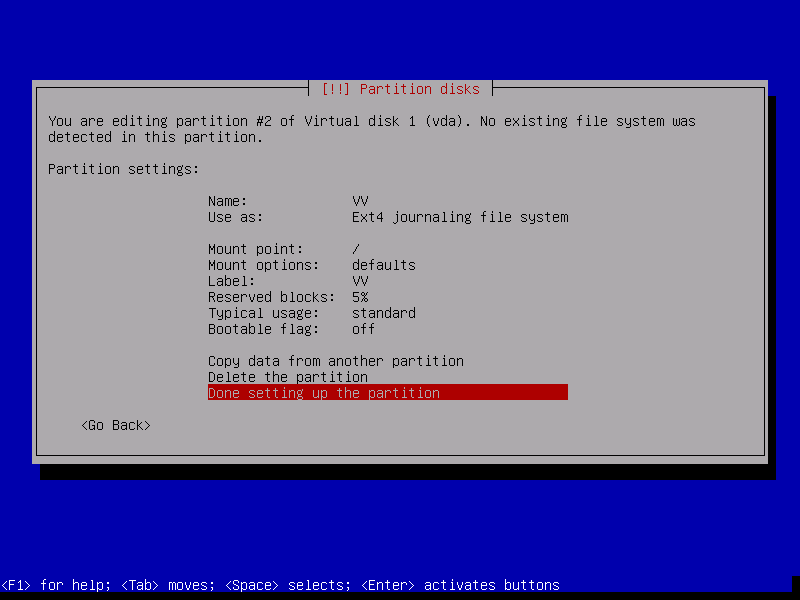
and we press the Enter key, which shows our handiwork.
Since it appears as it ought to (those two lowercase "f" characters
indicate the partitions will be formated), we ArrowDown to the bottom:
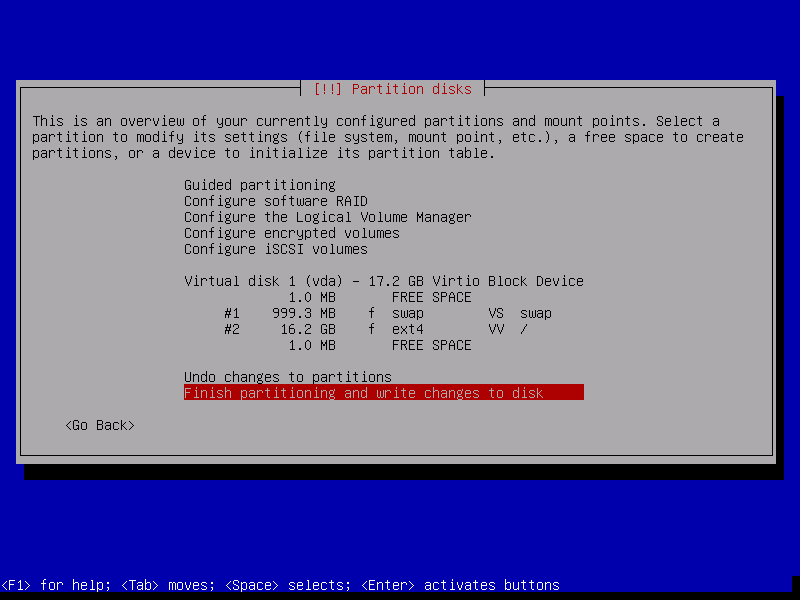
and press the Enter key.
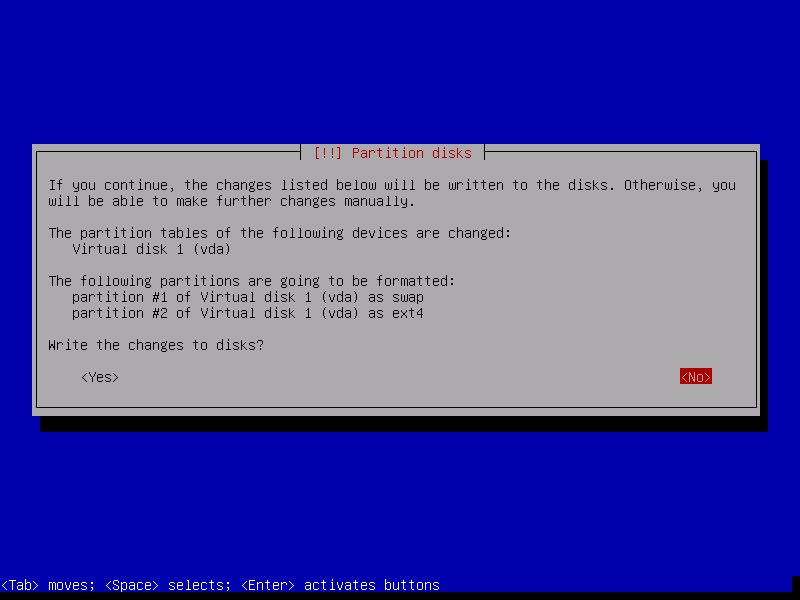
Here is our final chance to change the plan.
If what you see it what you want, tab to the <Yes> button and
press Enter to chage the disk.
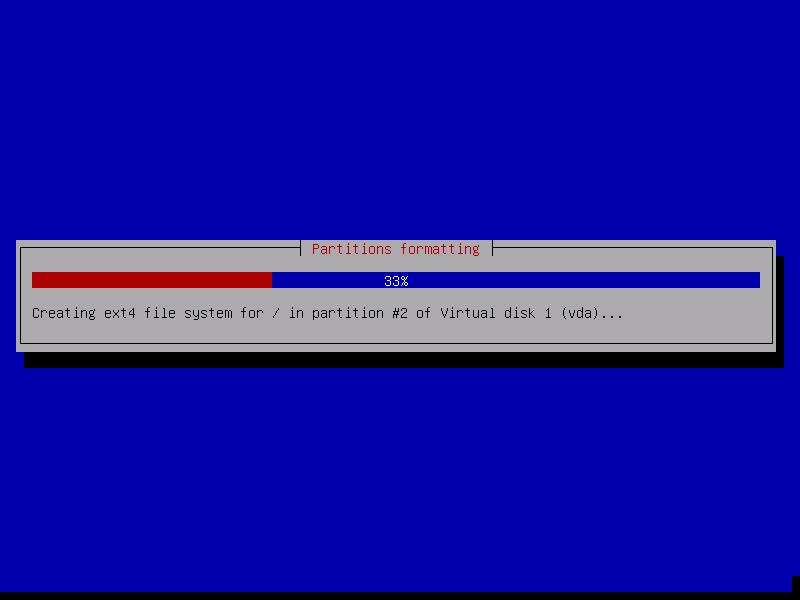
When the installer stops showing you stuff like this:
we are finally returned to the main menu:
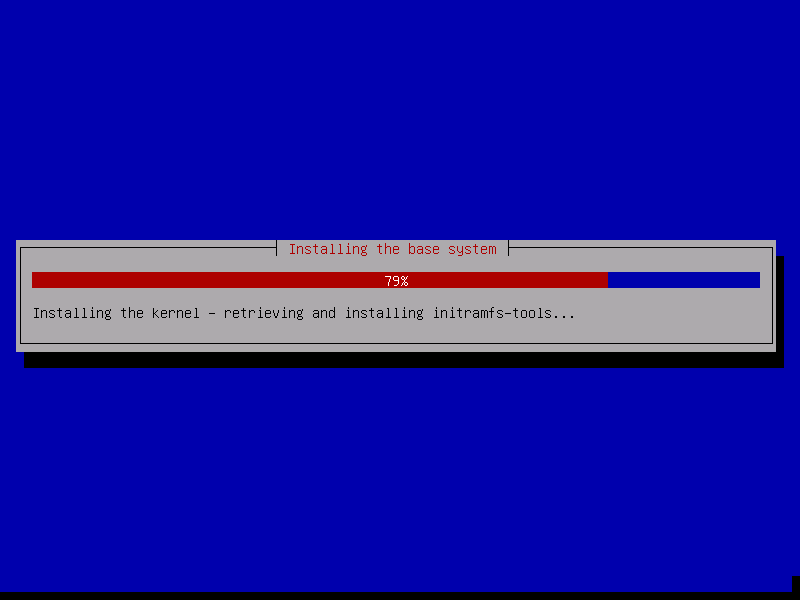
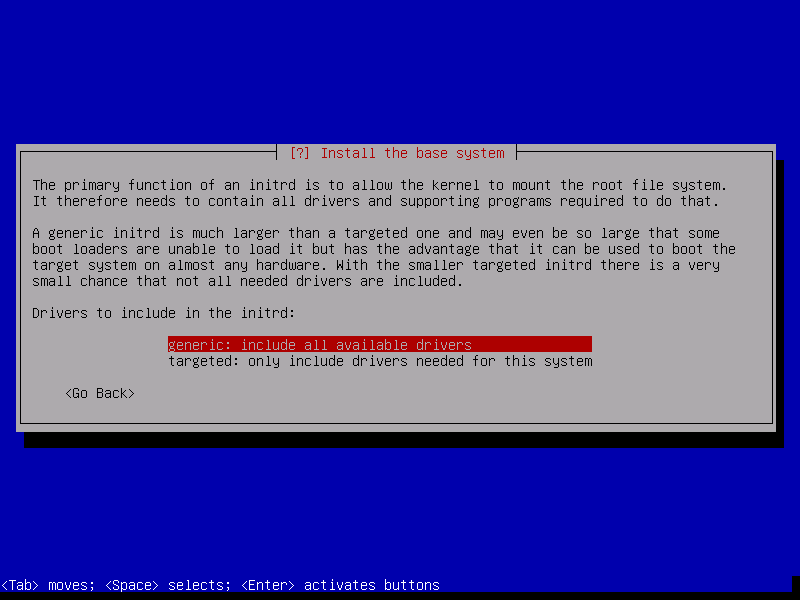
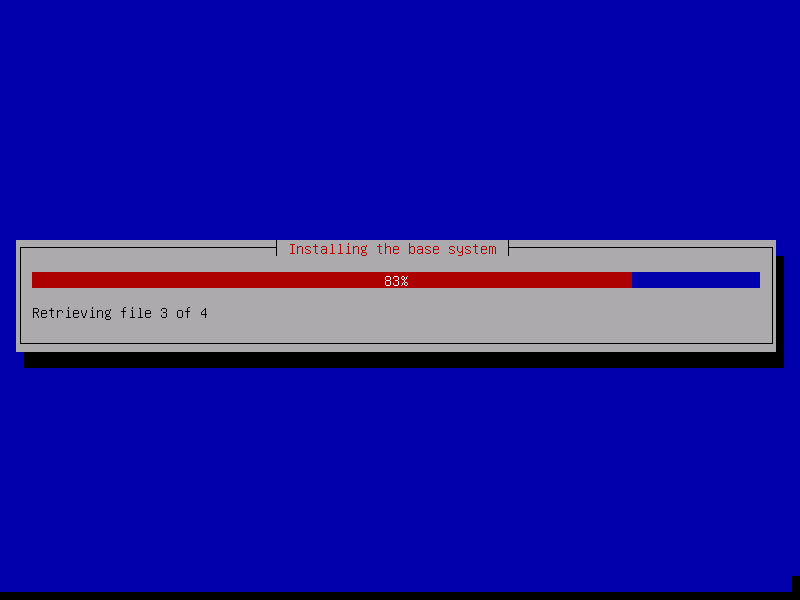
Step 2-2-14: Install the Base System
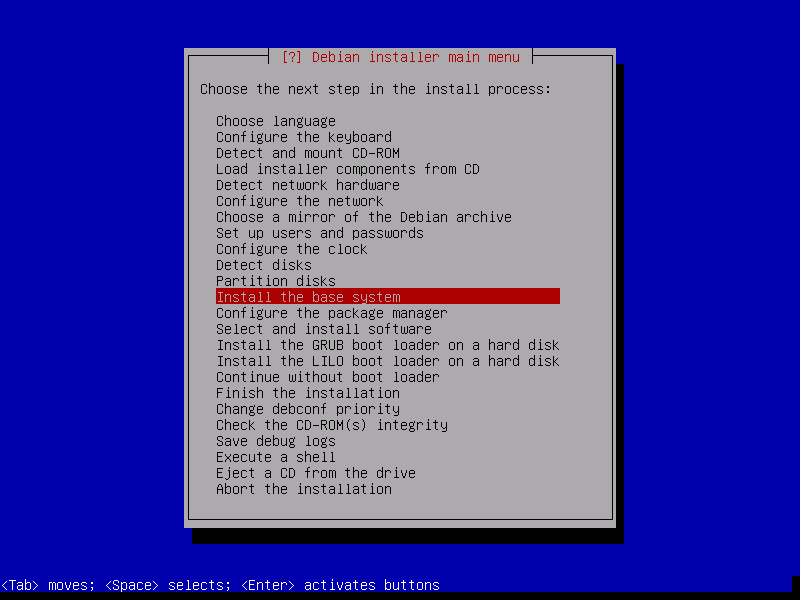
Press the Enter key to allow the installer to begin installing
the base system.
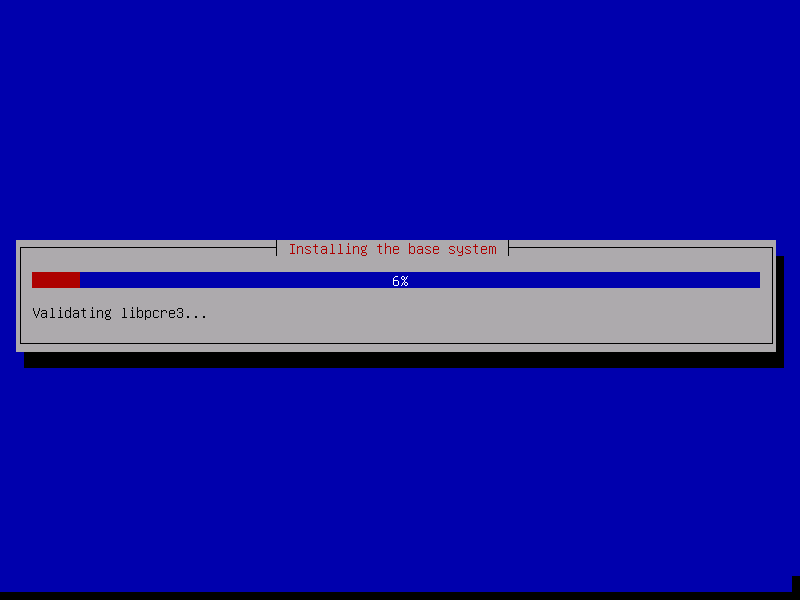
This will take some time, but you don't need to watch it like a hawk.
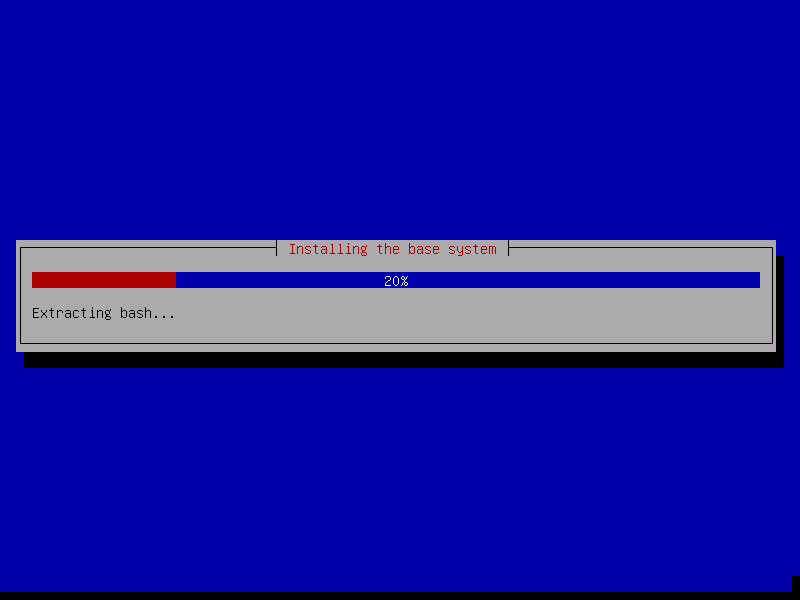
Eventually it will bring you here:
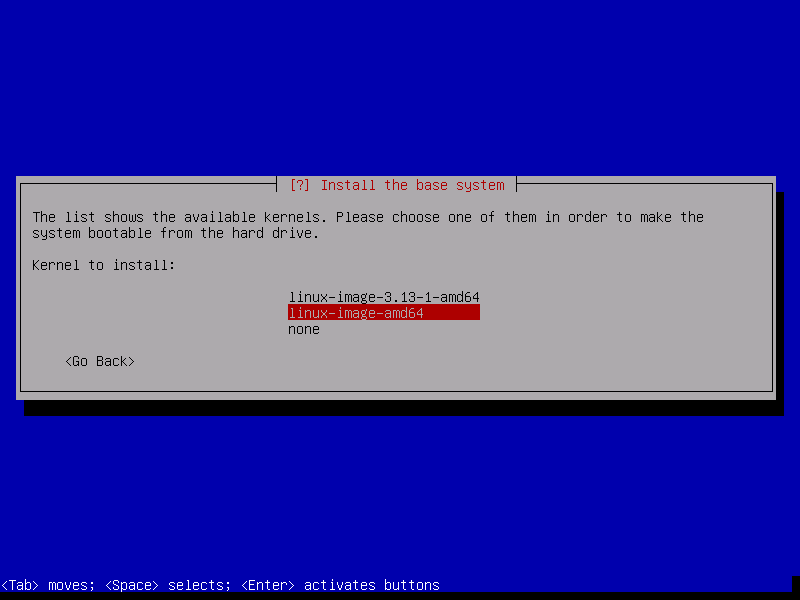
Unless you have a good reason not to, take the default by pressing
the Enter key:
After a little of that, you will get to the next question, and, again,
the Enter key:
unless you have a good reason not to, take the default
by pressing the Enter key.
This, too, will take some unattended time, but when it's done, you will
be back at the main menu:
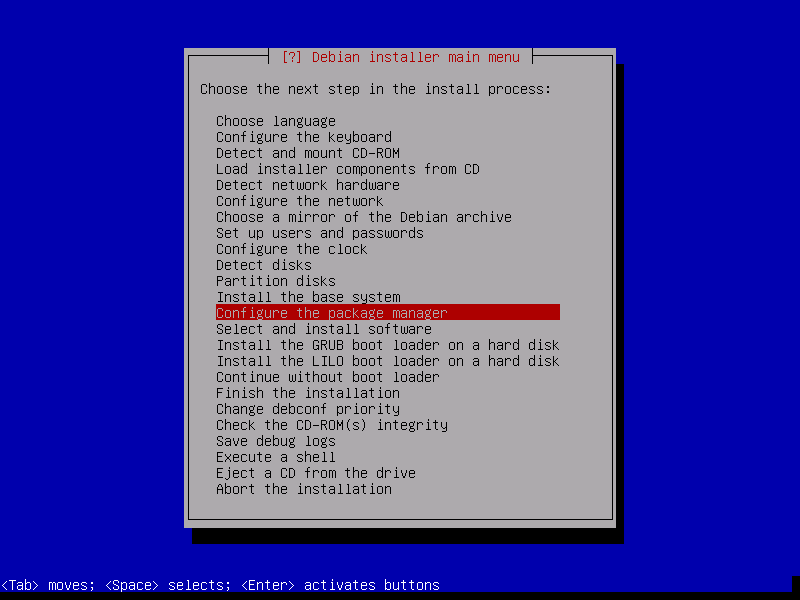
Press the Enter key to allow the installer to begin configuring
the package manager (dpkg and apt).
After a little activity, it will pop-up this question:
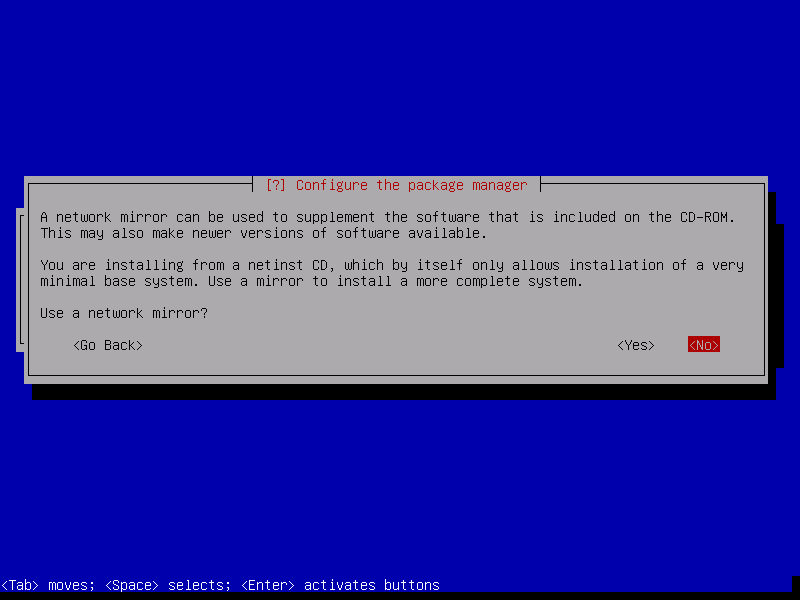
In this case, we are only using the Jessie installer to enable us
to get enough on the hard drive to be upgradable to Sid, thus we
would like to avoid double-installations of packages.
So we ensure the <No> button is highlighted before pressing
the Enter key, leading to the next question:
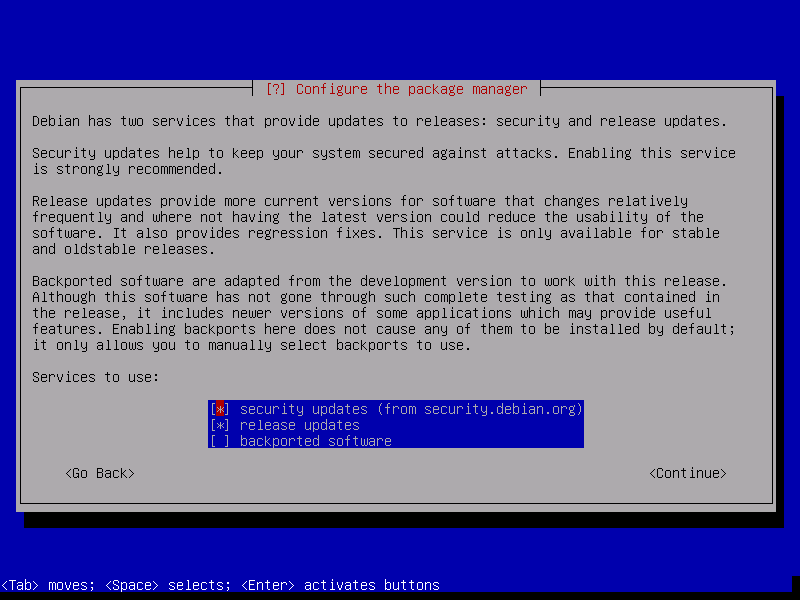
Again, as we are only using the Jessie installer to enable us
to upgrade to Sid that does not use either of the repositories
selected by default, we hit the space bar, then DownArrow, then
the space bar again, and tab to the <Continue> button:
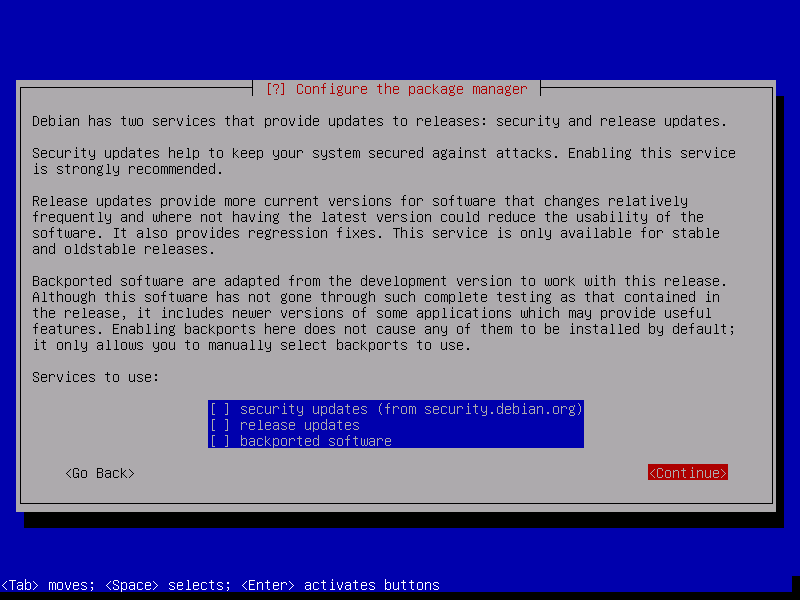
and press the Enter key to finish configuring the package manager
and return to the main menu:
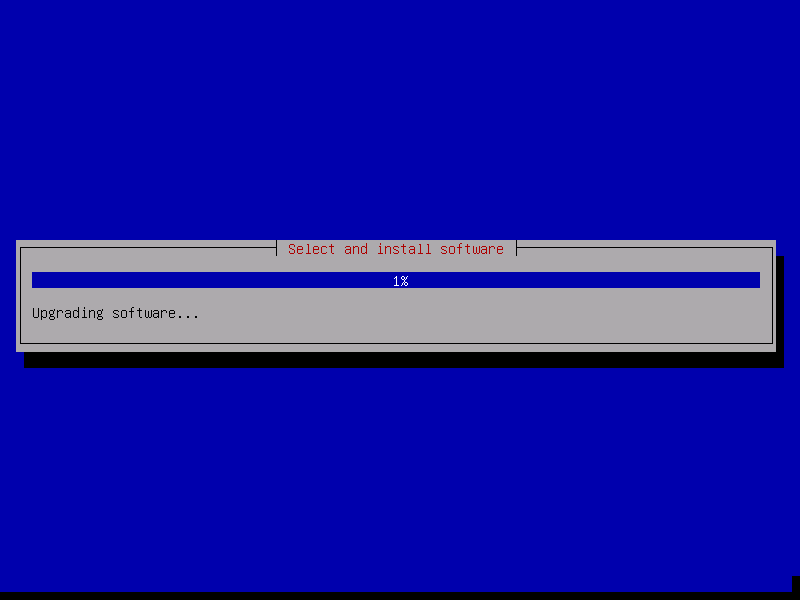
Step 2-2-16: Select and Install Software
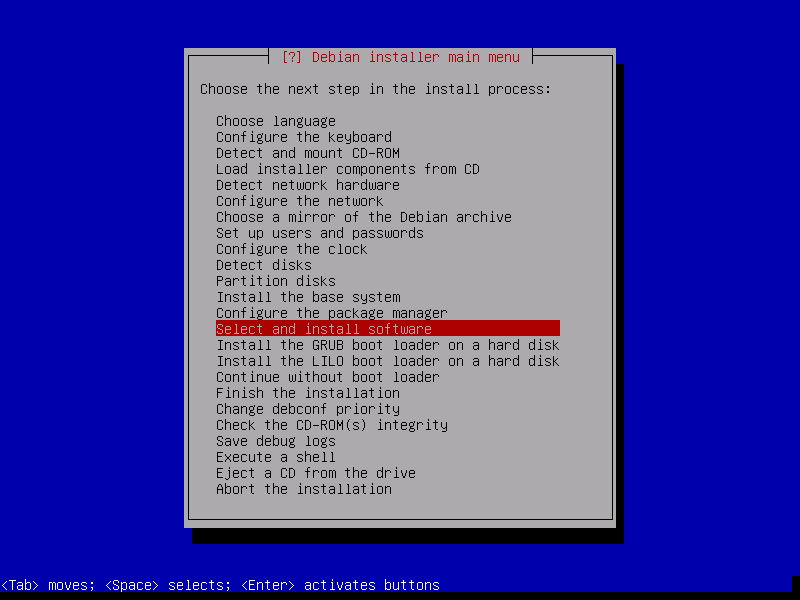
Press the Enter key to allow the installer to begin selecting
and installing additional software.
After a little activity:
it will pop-up this question:
This can be done, if you wish, after Sid is installed, so take
the default by pressing the Enter key, which continues to (after
a little activity) to this question:
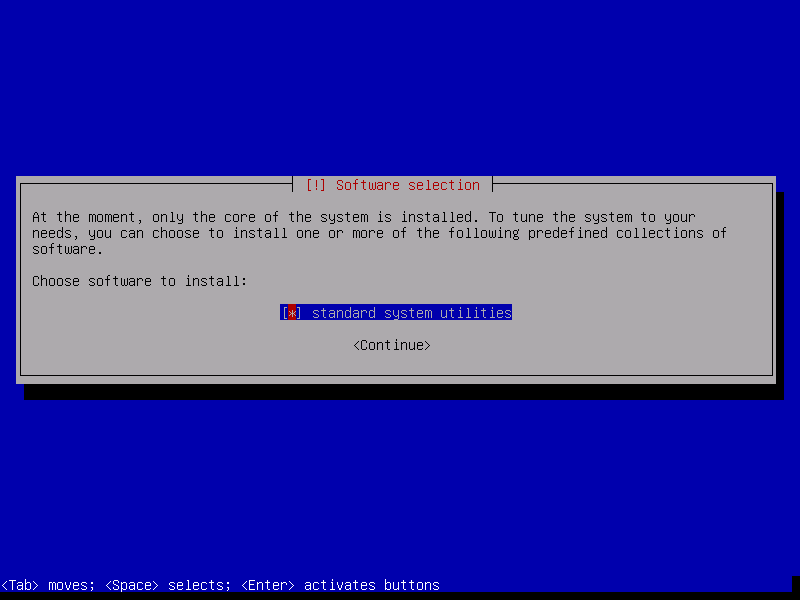
This group of packages is not necessary to upgrade to Sid, so
press the space bar to unselect it, tab to the <Continue> button,
and press the Enter key, causing return to the main menu after a
slight delay:
Step 2-2-17: Install the GRUB Boot Loader on the Hard Disk
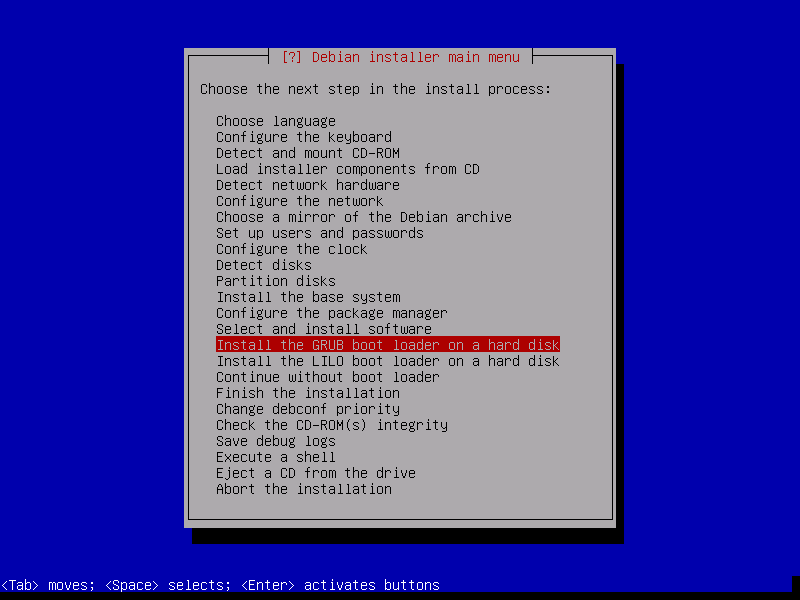
If "Install the LILO boot loader on the hard drive" option is
highlighted instead of "Install the GRUB boot loader on the hard
drive" option, you're on your own for this task.
Press the Enter key to begin installing GRUB, which will cause some
processing, sometimes without visual feedback, including at the end
searching all disk areas for bootable systems, before it finally
asks a question:
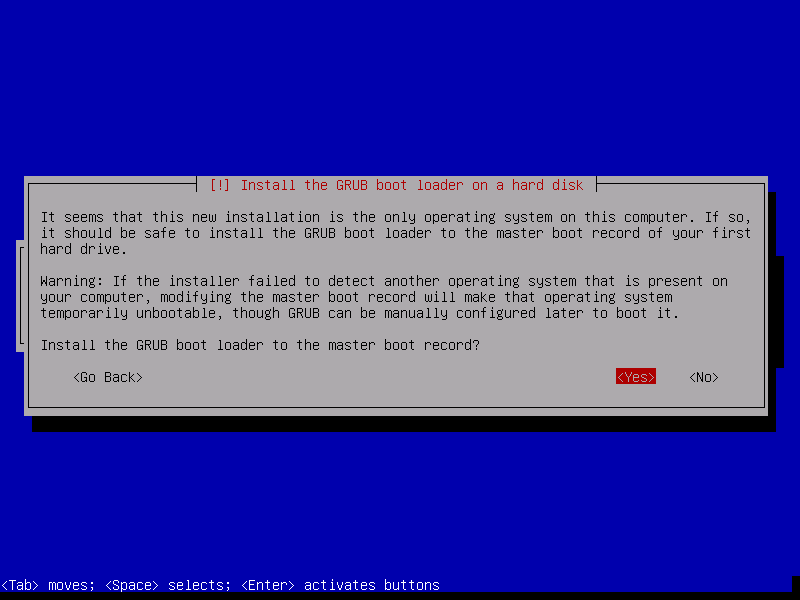
Your text may vary from this, especially if you have other bootable
systems on your project computer.
This dialog needs to determine where to install the bootstrap for
GRUB and it does its level best to figure out the most useful and
least disruptive place.
It's up to you, however, to know where it needs to be installed.
Tab to the <No> button if the MBR of what GRUB believes to be
the "first" hard drive is wrong before pressing the Enter key, thus
indicating the installer needs to ask you where to park it.
Since the installer's guess is correct for both my true project
computer and this virtual demonstrator, I simply ensure <Yes>
is highlighted before I press the Enter key.
If the installer wants to have you decide where to install the
bootstrap, the question will look like this—reply appropriately.
If not, you will not see the following screen:
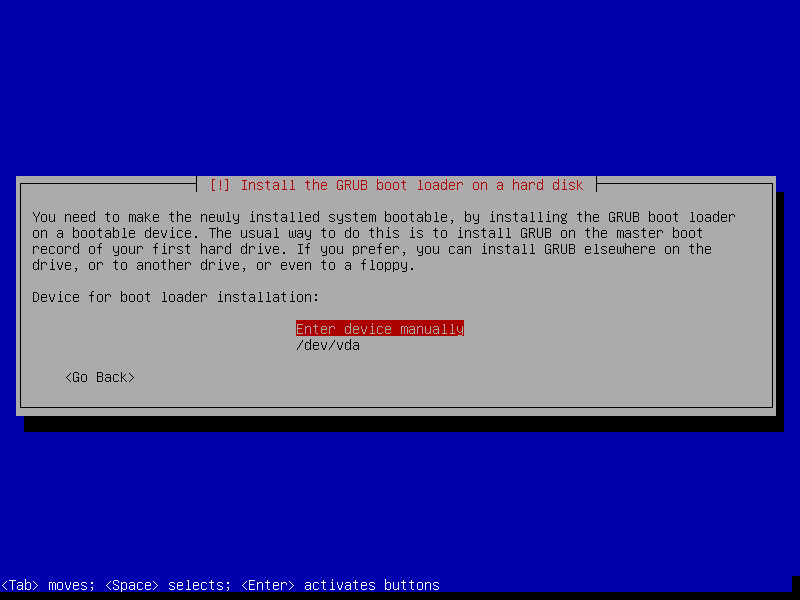
Regardless if the previous screen is displayed, the installer will
finish installing GRUB in short order and return to the main menu:
Step 2-2-18: Finish the Installation
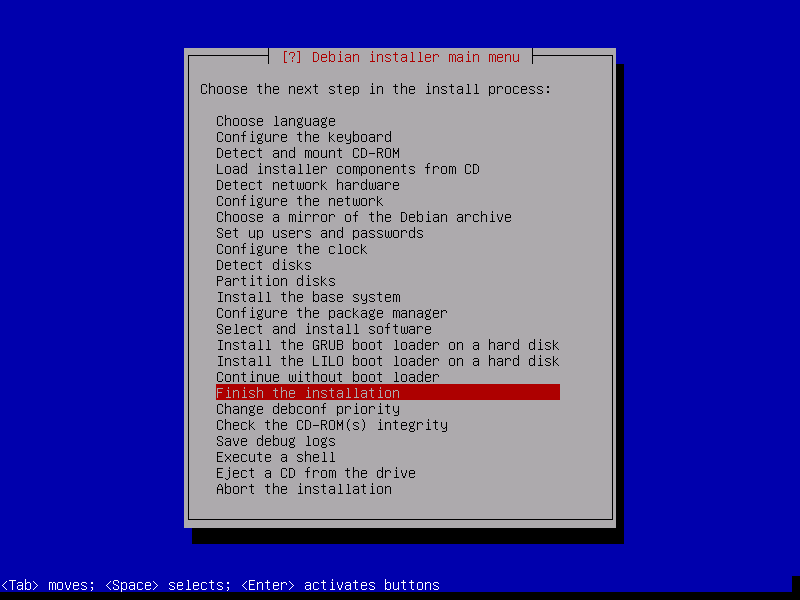
Press the Enter key to allow the installer to begin preparing to
reboot the system using the newly installed system.
After some processing that includes this:

the installer will inquire about:

Again, there being nothing from Redmond in the vicinity, we do the
sensible approach of keeping the hardware and system clocks at
timezone-immune UTC by pressing the Enter key to default to Yes.
A little more processing and it is complete:
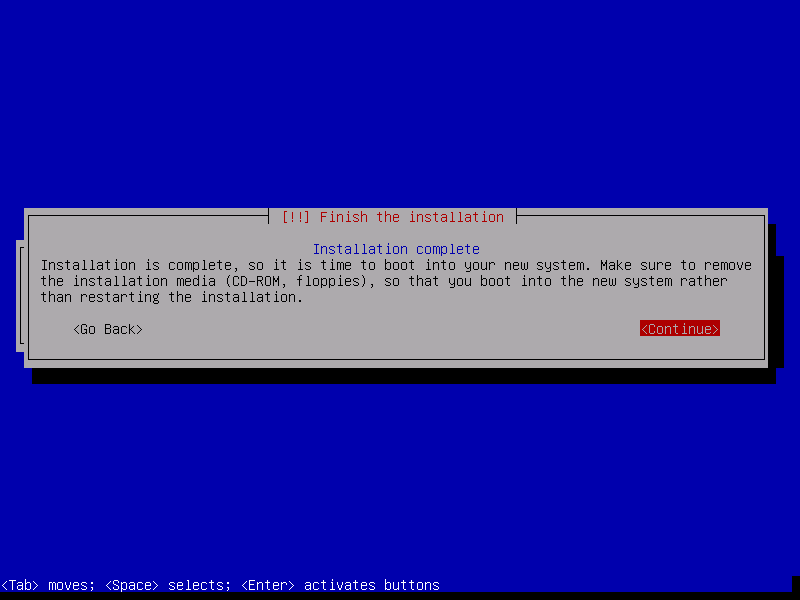
Press the Enter key, remove the USB-stick, and cross your fingers.
Subsection 2-3: Upgrade the New Host System to Sid
[Note these screenshots were taken from the reboot of the same
virtual system used in the previous subsection, not the bare
project computer, again, to enable capturing screenshots until
the XFCE environment of the project system is available.]
After getting your project computer to begin booting up,
interact with your BIOS/boot loader as needed to get your system
to use sda as the boot device.
When the GRUB menu appears, make sure it advertises the system
you installed in the previous subsection:
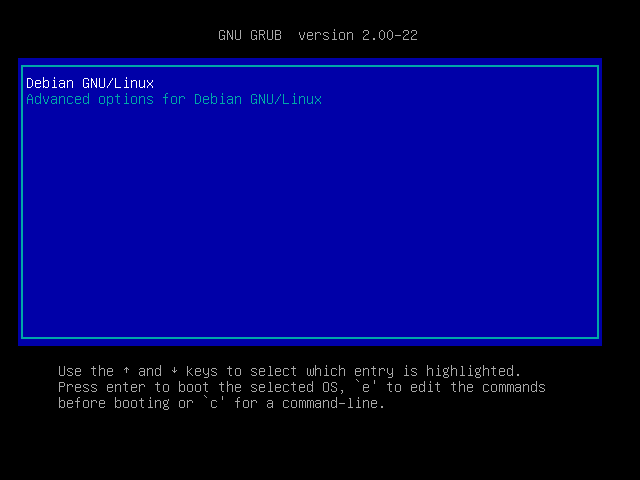
If it does, you can let it default to a normal boot, or you can
you the Up|Down Arrow keys to explore and test the other boot
options.
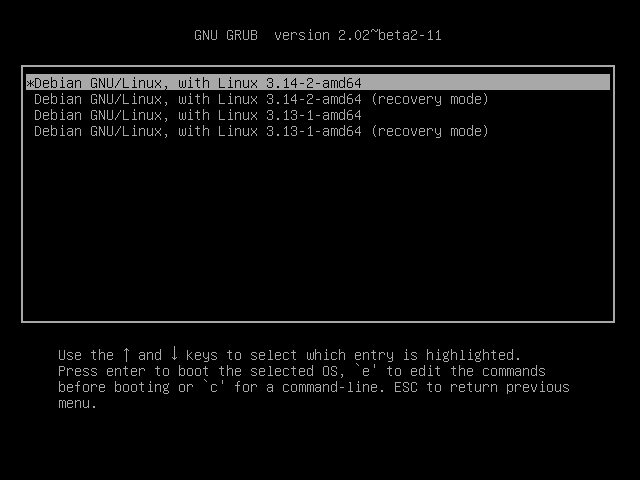
To demonstrate, I press the DownArrow key once and the Enter key
to examine the advertised Advanced options:
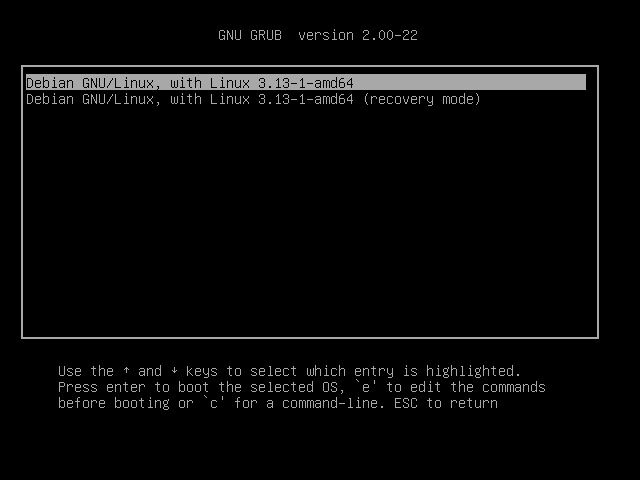
After you get it doing a normal boot (in this case by simply
pressing the Enter key), it should display a bit of activity, but
before too long a non-GUI logon identifying the hostname you
installed should manifest:

That being so, login to the vmadm account specifying the password
your defined during the installation dialogs.
If that goes according to plan, you should shortly see a non-root
user command prompt:
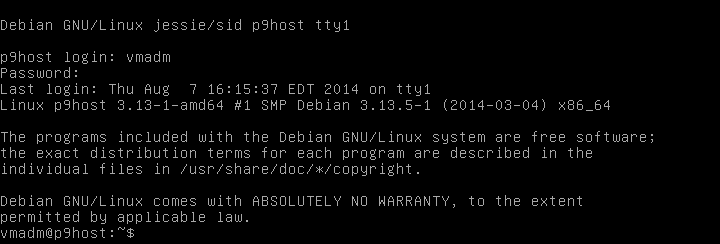
Now enter an "su -l" command and offer the root password you
defined during the installation.
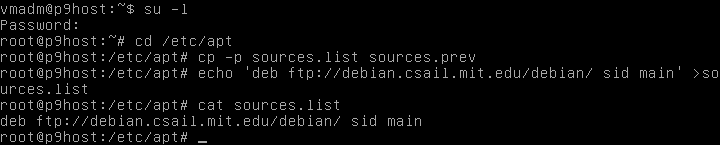
You should be rewarded with a root user command prompt.
If so, we are ready to tell the package manager to stop using the
Jessie package repositories and start using Sid's.
Enter the following commands:
cd /etc/apt
cp -p sources.list sources.prev
echo 'deb ftp://debian.csail.mit.edu/debian sid main' >sources.list
cat sources.list
Now verify the cat command output matches this:
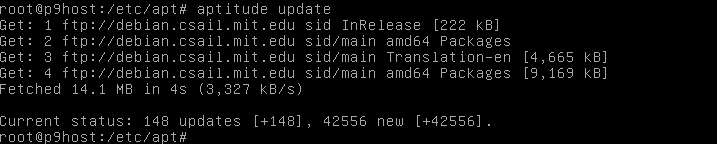
The next step is to update what the package manager knows about
the state of the repositories it is using.
This can be accomplished using the "aptitude update" command,
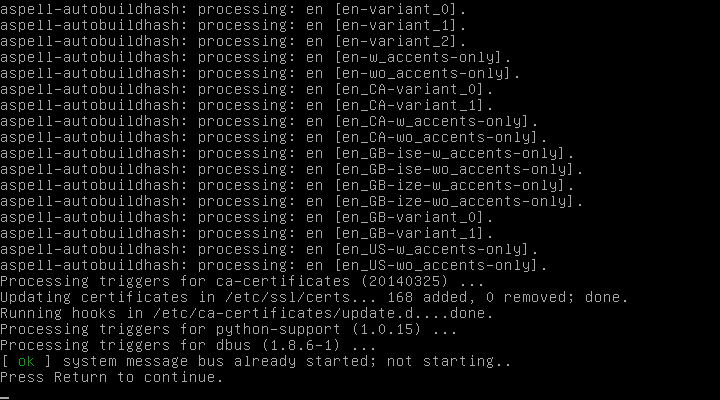
which should produce error-free results like this:
The next step is huge: upgrade the system to the Sid level.
This can be accomplished using the "aptitude dist-upgrade" command,
which should produce lots of messages after a little dialog with
you, starting with:
You can scroll back and forth through the session log using the
Ctrl-PageUp and Ctrl-PageDown key combos.
First note your display will likely differ from this because Sid is
always changing, so what needs to be upgraded will often differ from
any other upgrade.
Next notice that because we skipped additional package installations
before, not that many packages need to be modified in some way.
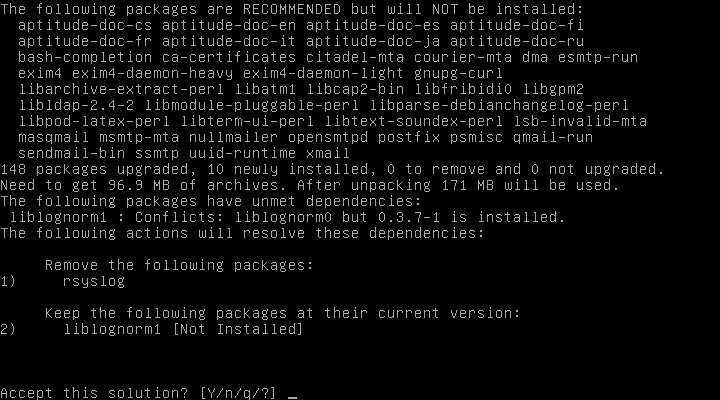
Now the suggested conflict resolution is almost always the way to go,
because you're not really running this system yet, so if it does
break something, it won't be a major problem.
Thus, we press the Enter key to accept the Y default answer.
This leads to...
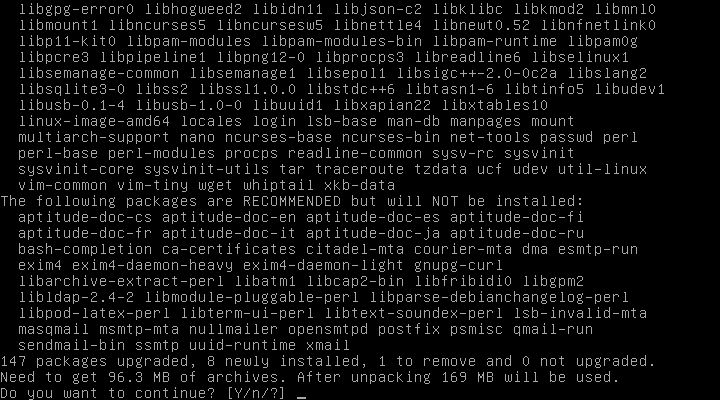
Less that 100 MB download to upgrade a whole distribution?
Such a deal!
Thus, we press the Enter key to once again accept the Y default
answer.
This leads to downloading those packages.
One of mine timed out so we'll get to see how to deal with that.
The upgrade seems to take it in stride so far, continuing to do
what it can.
After the downloads are over, we start getting some action
requests again:
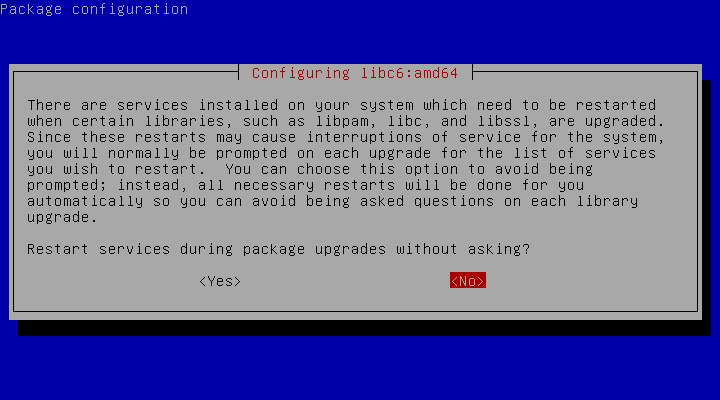
As we're effectively in single user mode, this is not a concern,
so we tab to <Yes> and press the Enter key.
We get no more interaction at this point, aptitude does lots of
unpacking and setting up, and finally we get a command prompt:
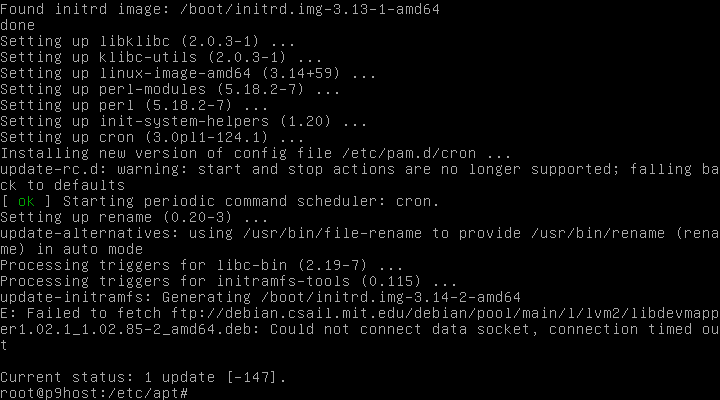
Since we know a package didn't download, we are confident as we
start the normal problem resolution procedure: rerun the command.

You know what to do.
The installer knew what to do, too:
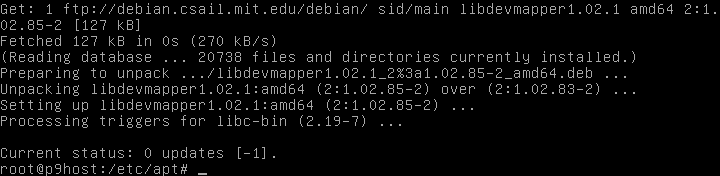
It looks good, so we run the command once more to be sure nothing
remains:

Okay, since a new kernel has been installed, we need to reboot to
load it, so we issue the "telinit 6" command:
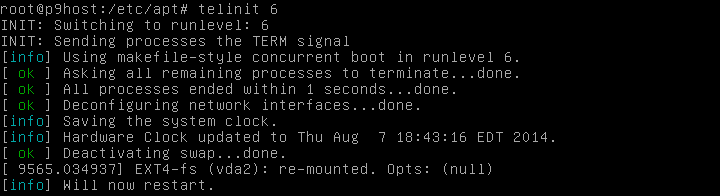
And up it comes:
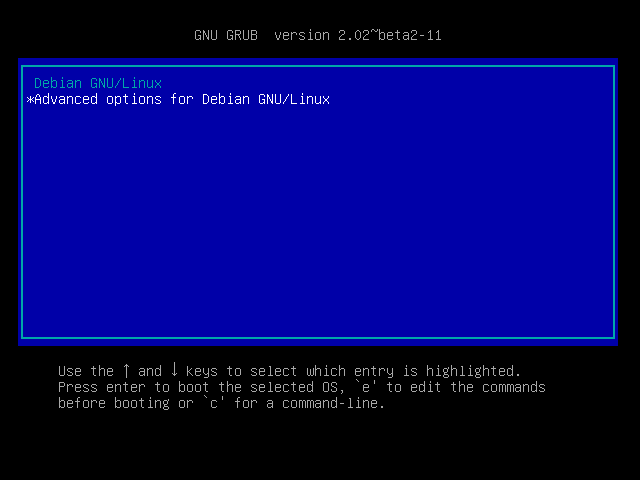
with another kernel as the new default:
so we let 'er rip and:
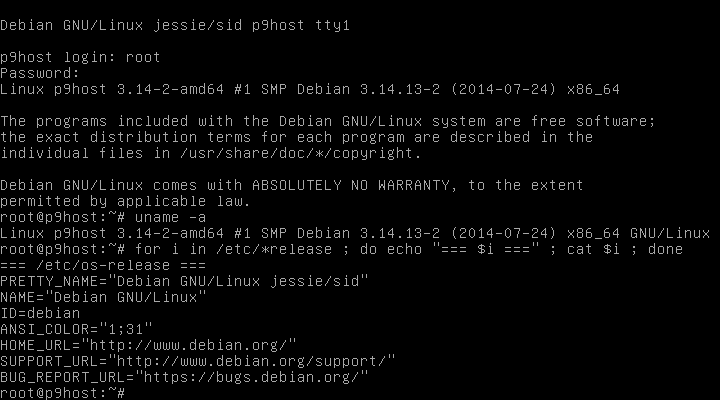
It's official—we're running Debian Unstable now.
Subsection 2-4: Install Needed Packages (and aptitude Tutorial)
It's time to get interactive with package selection again,
but this time we will do it using aptitude instead of the
Debian Installer.
The first thing to do with aptitude is adjust its settings.
This is done after firing it up with a plain "aptitude"
command by going to the menu bar via a Ctrl-C key combo
followed by five RightArrows and the Enter key, producing
the options list:
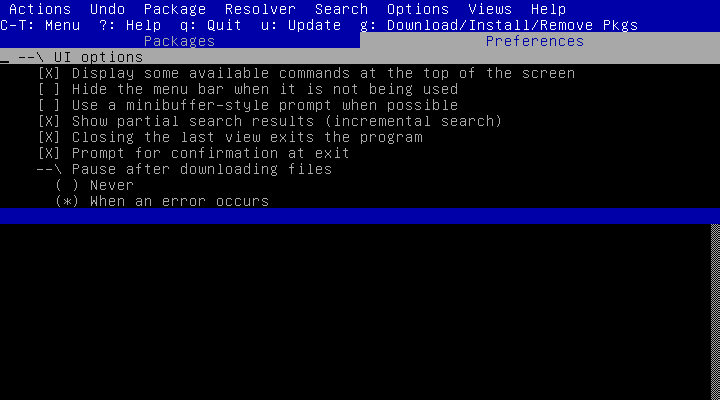
The display will change as we modify many of these options.
You may tailor them as you like but what you see may start
varying with what will be in this cookbook.
My choices eliminate unnecessary characters in the interest
of putting more useful data on a screen and help the work
flow.
Some will be toggled as we go when that is helpful.
This is what I change at this time:
-
Press the DownArrow then the space bar to turn off the
display of some available commands at the top of the screen.
-
Press the DownArrow then the space bar to turn on the
hide display of the menu bar at the top of the screen
(pressing the Ctrl-T key combo brings it back when needed).
-
Press the DownArrow twice then the space bar to turn off the
incremental search feature.
-
Press the DownArrow twice then the space bar to turn off the
exit confirmation dialog feature but don't do this is your
Caps Lock ever gets set without your awareness since the
shifted "Q" commands exits aptitude even from subordinate
tabs.
-
Press the DownArrow three times then the space bar to have
aptitude always pause with a display of download throughput
statistics at the end of downloading files with the option
to proceed with installation or not.
If you want to be able to go out to eat after you start the
download and installation of hundreds of megabytes of
packages, don't change this option unless your bandwidth is
challenging (in which case a good night's sleep may be
indicated instead).
-
Press the DownArrow twice then the space bar to turn off the
automatic display of the information area (this does not take
effect until the next time aptitude is invoked.
-
Press the DownArrow then the space bar to turn off the
display of available views tab names at the top of the screen.
Now we exit the Preferences list by typing a lowercase "q",
then another to exit this invocation of aptitude.
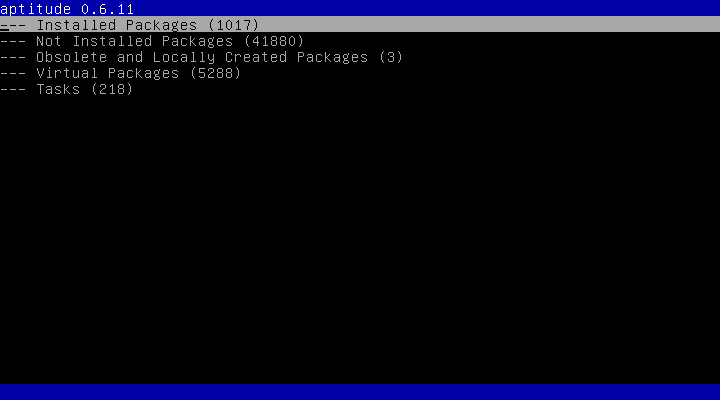
Now run the "aptitude" command again and the screen should
look pretty close to this:

After a distribution upgrade, just about every package is "new"
to the package manager, an unhelpful state, but typing a
lowercase "f" tells aptitude to forget the newness of all
packages so marked.
It's been several hours since the repository status was
updated, so as I am about to start selecting packages to
install, I make certain the list is up-to-date by typing a
lowercase "u" command.
I can watch aptitude check for and download as necessary updated
repository metadata files, then pauses as I requested:
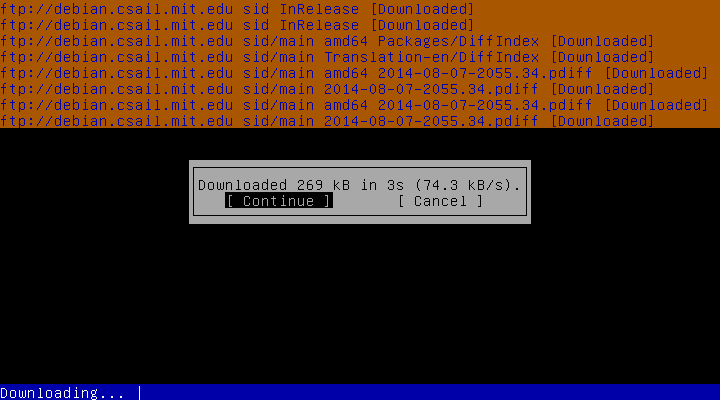
and I simply press the Enter key to return to the Packages
menu:
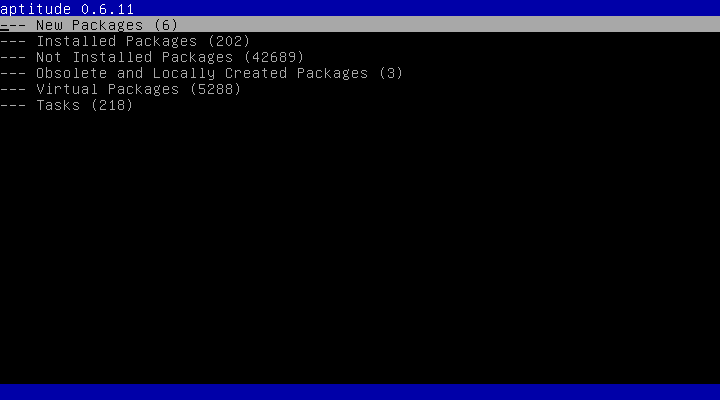
Hmmm... six new and no updated packages in a few
hours—that's Sid.
The new ones are highly unlikely to represent security patches,
but let's take a look at them to show you how to look at them.
All the lines currently showing in the Packages tab are collapsed
group markers with numbers in parentheses to indicate the
number of packages in the group.
To expand a group, make it the highlighted line using the UpArrow
and DownArrow keys, or (for the vi-users) the lowercase "j" and
"k" keys, then either press the space bar to expand the next
lower layer in the group or the unshifted "[" key to expand all
the lower layers.
To collapse a group, highlight the group line and press either
the space bar or the unshifted "]" key.
The shifted 6 "^" key will move to the line of the next higher
group from what is currently highlighted, helpful for setting up
collapses.
So, to see all the new packages, since its group line is already
highlighted, all we have to do is press the unshifted "[" key:
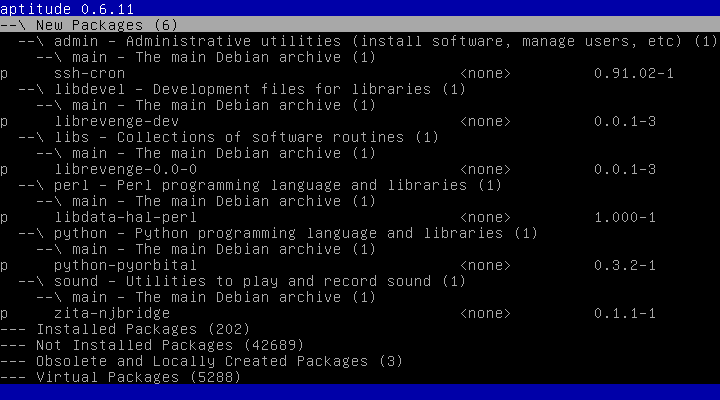
Three layers are revealed now.
The next lower level groups packages by similar function; e.g.,
admin, doc, editors.
Below that packages are grouped by license types, which are
main, contrib, and non-free, in decreasing quality of libre-ness.
At the bottom are the actual packages—each represents a
.deb file (of which there are probably many releases) or a
meta-package that forces inclusion of multiple packages.
This is probably a good time to mention the question mark "?"
command displays a scrollable list of key commands available
in various contexts as well as an explanation of the status codes
at the front of the package summary lines.
Of these new files, most are libraries (lib*) that will be
referenced by application packages that need them, so there is
no need to consider them for installation as a rule of thumb.
We arrow down to the ssh-cron package and notice the line next
to the bottom indicates a liitle description of the package.
We want to know more, so we press the Enter key to open a package
information tab which fills the screen:
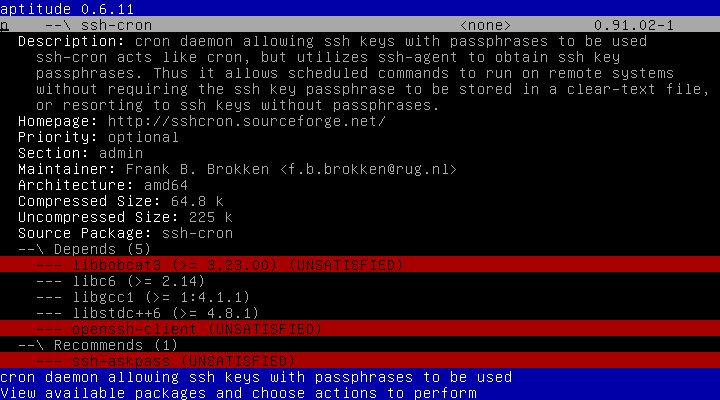
It seems to be a new application that requires two other packages
not already installed (under Depends) as well as another Recommended
package not already installed, all three being UNSATISFIED, meaning
they are available for installation as opposed to UNAVAILABLE.
Recommended packages are not required, but if they are installed,
the recommending package can make use of them.
Currently I have aptitude configured to automatically install
packages recommended by packages I have marked for installation.
Suggested packages are not automatically installable by aptitude,
and may not be especially useful to a package that suggests them,
but they certainly won't conflict with the suggesting package.
Conflicts are packages that may not normally be also installed
(no packages conflict with this one at the moment—that
could change in the future).
We page down (PageUp and PageDown work as expected, ditto for vi's
Ctrl-F and Ctrl-B key combos):
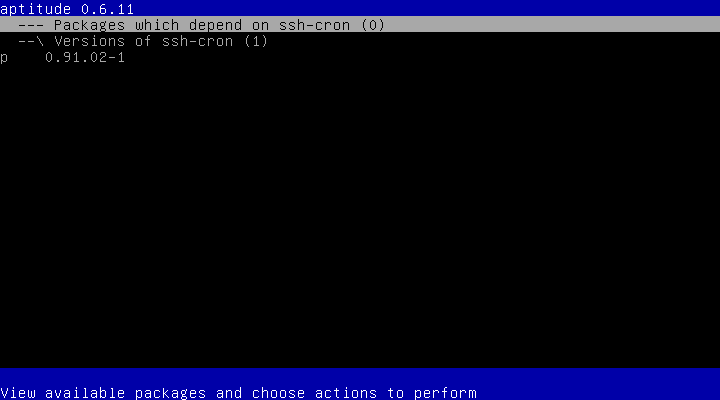
to see no other packages currently depend upon (or recommend or
suggest) this package.
Lastly, we see that, as expected for a new package, there is only
one version known to the package manager.
Well, that might be worth some research in the future, but it will
keep for now.
So I press the lowercase "q" key to exit this package information
tab and return to the Packages tab, where I ArrowDown to that
zita-njbridge package in sound:
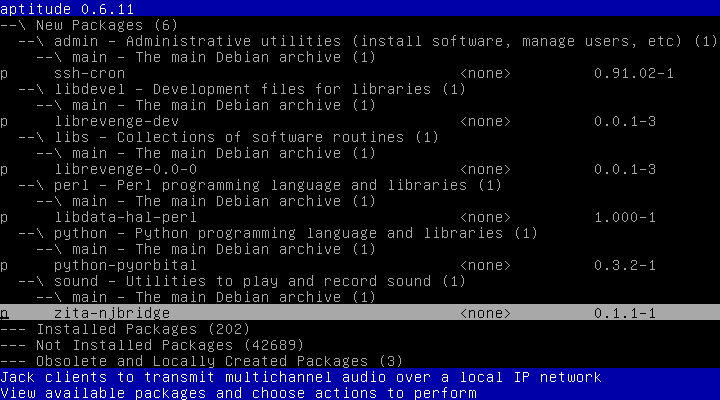
That is also worth some research in the future, not now.
Now I can press the lowercase "f" again so there are no new
packages again.
All right, time to fill the shopping cart with necessary packages
for this project.
We start with the tasks group at the bottom (press the End key
or the Ctrl-E key combo to go to the bottom—the Home key or
Ctrl-A key combo takes you to the other extreme) and expand the
next lower layer by pressing the Enter key, ArrowDown to the
End-user group and fully expand it by pressing the "[" key:
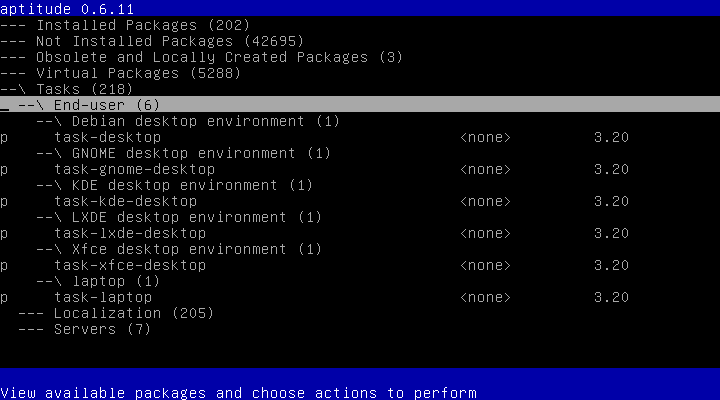
The tasks group contains metapackages at its bottom layer and
serve as a straight-forward approach to broadly tailoring the
system.
As you can see, there are several overlapping (but not mutually
exclusive) desktops.
My Gigabyte tower has no need for anything task-laptop but yours
might.
Let's look at the common task-desktop metapackage by pressing the
DownArrow key twice and the Enter key:
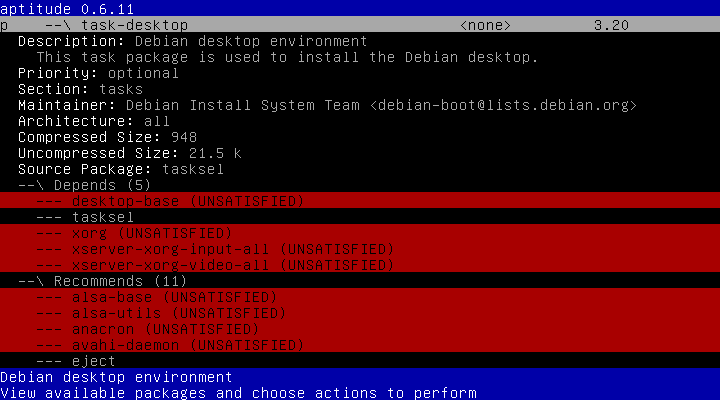
You can see what other packages will be marked for installation
if we mark task-desktop for installation (remember aptitude is
currently configured to mark recommended packages for installation
in addition to the required Depends packages).
Press the PageDown key to see the next page, then ArrowDown to the
"Packages which depend on" group line and fully expand it:
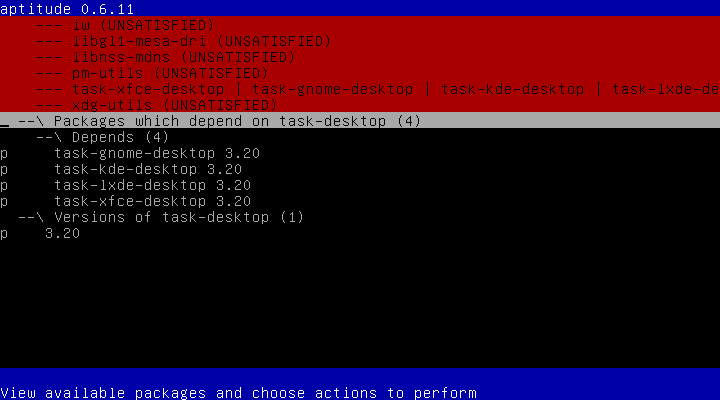
Notice that this package will always be automatically marked for
installation if any of those four packages are marked for
installation.
Now press the UpArrow key twice and the Enter key to expand that
Depends group line with the pipe "|" characters:
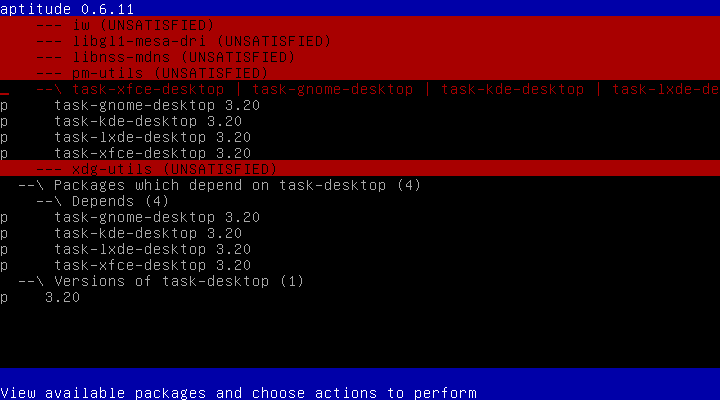
It contains the same list as the "Packages which depend on"
group—the pipe characters separate options that meet the
requirement represented by the group line in which they appear.
For this recipe we will use task-xfce-desktop flavor of the
common task-desktop install.
But choose what suits you and be prepared how those inclusions
cause your results to differ from those in this recipe.
To mark an uninstalled (the first character of the status is "p")
package for installation, apply the plus sign "+" command to it,
either directly by highlighting its package summary line first,
or as part of an entire group by highlighting the group line
first.
So we begin by pressing DownArrow four times to highlight a
task-xfce-desktop package summary line and mark it for
installation by pressing the "+" key:
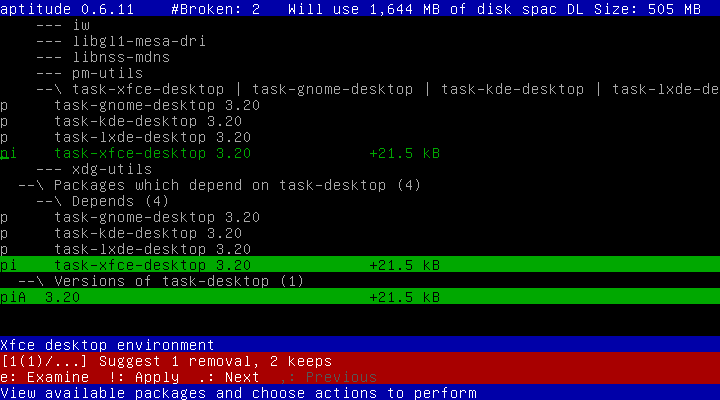
Dem changes!
Okay, what just happened?
First, notice the current line has changed color (green on black)
and has replaced the space to the right of the "p" (uninstalled)
status character with a lowercase "i" (marked for installation).
Next, notice the task-xfce-desktop package summary line in the
"Packages which depend on" group has changed identically except
it is black on green—reversed video is how you can see
which line is current on the display.
Third, the package summary line for the only known version of the
task-desktop package (at the end of the list) is now marked for
installation but it sports an uppercase "A" in the third byte of
its status—it is now marked for automatic uninstallation
(removal) if all packages which depend upon (or recommend or
suggest) it are removed.
Lastly, the two blue lines at the bottom of the screen have
expanded into four lines with the two in the middle backed in red.
This area now represents a conflict resolution dialog.
It does not require immediate attention, but serves to warn you
there is at least one problem with the current set of marked
actions aptitude is slated to perform that will have to be
resolved before you tell aptitude to carry those actions out.
The first red line summarizes the solution set aptitude has
calculated can resolve the problem(s) and the second tells what
additional commands are now enabled to aid you in resolving the
problems.
Press the lowercase "e" key to open the full conflict resolution
tab:
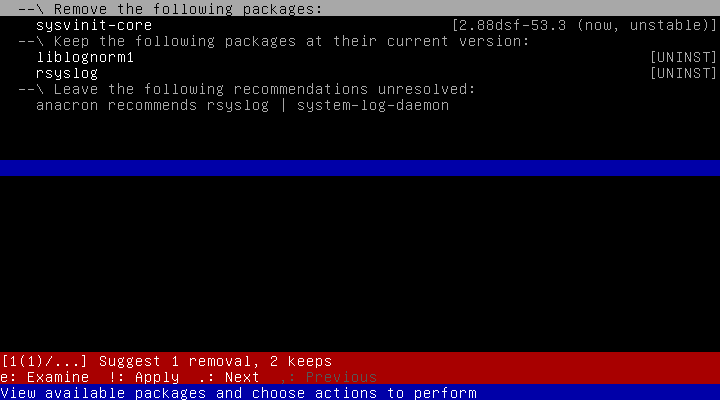
The solution requires removal of the core of the traditional
UNIX System V init facility?
We press the ArrowDown key to highlight the sysvinit-core
package summary line and see:

Debian is changing the default init facility for Stable from
sysvinit to systemd, so even though the early version of the
Debian Installer still installs the old, tried-and-true
default, at this juncture aptitude wants to switch to the new
default.
It is your choice but this recipe will permit systemd to take
over, so be prepared to deal with any differing results.
You should know there has been a significant and emotional
discussion about this policy change on the
Debian Developers [archive]
mailing list, and you really should subscribe to debian-devel,
debian-devel-announce, and debian-user (visit
this link
to learn how to subscribe) while you're running Sid.
Having decided this proposed solution is acceptable, we press
the shifted one ("!", aka bang) key to inform aptitude of the
decision:
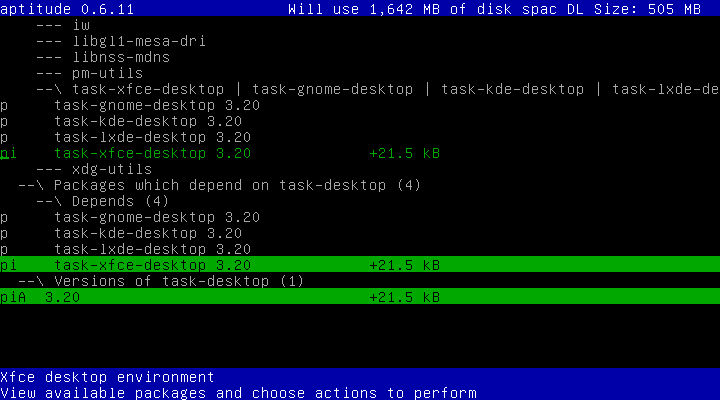
which returns us to the Package tab with everything resolved.
Continuing on in our shopping expedition, we press the lowercase
"q" key to return to the Package tab, press the shifted 6 ("^"
aka hat) key twice to highlight the End-user group line, press
the space bar to collapse it again, press the End key to move
down to the Servers group line, and press the Enter key to expand
its next lower level:
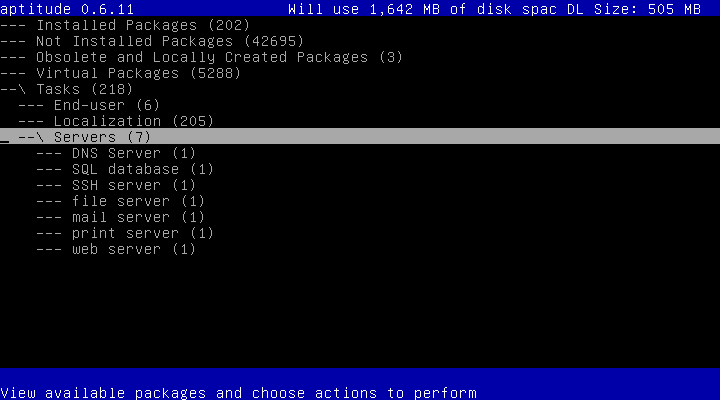
While none of these services are essential for this project, you
may want to install one or more of them depending upon your set
of objectives for building this project platform.
For instance, if you want to be able to use ssh or scp on this
system remotely, you should install the SSH server package.
By now you should be able to figure for yourself how to mark any
package and its dependencies for installation.
The next metapackage does require is virt-man, which I'll show you
how to find when you don't know where exactly to look.
We start by collapsing the Tasks group line to clean up the
Packages tab, press UpArrow once to highlight the Virtual packages
group line (the search starts at the current line), and press the
"/" key, which opens a search pop-up dialog, then type "virt-man",
tab to the <OK> button:
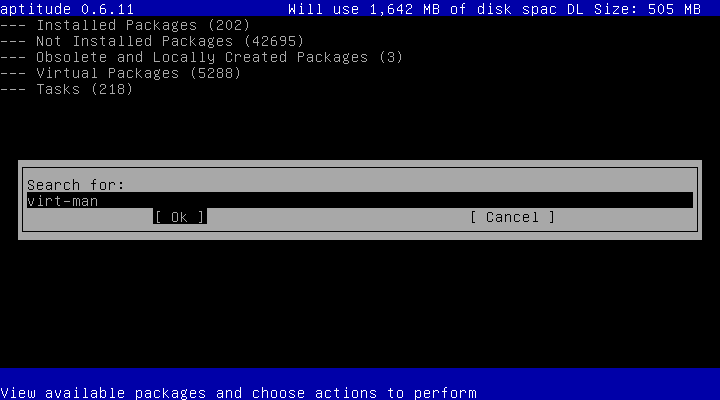
and press the Enter key, displaying as the current line and at the
top of the screen the first line that contains that string (by the
way, you can press the lowercase "n" key to search for the next
line containing the current search string and shifted "N" to search
backwards).
Indeed, virt-manager is the megapackage we need.
We press the Enter key to check it out:

While this GUI interface IS experimental, the underlying virtualization
this package depends upon is not.
If you want to be a purist and avail yourself of the virsh CLI, fine.
Perhaps future editions of this cookbook will provide the precise
incantations you will require in addition to the GUI screenshots.
We PageDown to examine the dependencies:
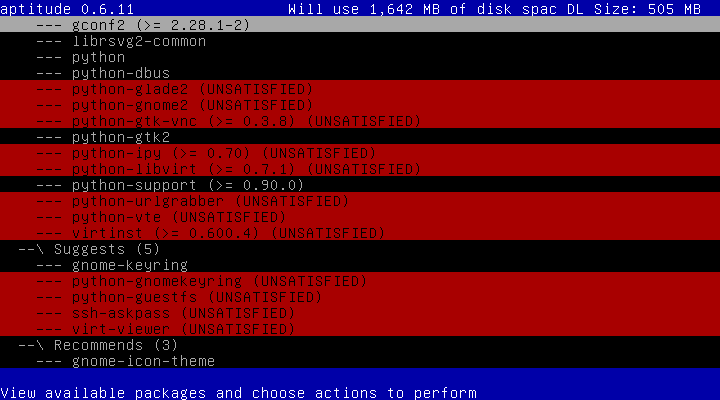
We can pass on all the suggested packages for this recipe.
Again we PageDown:

There being no known UNAVAILABLE dependencies, we press the End key
and the "+" key to mark it for installation, bracing for the flash
of red:
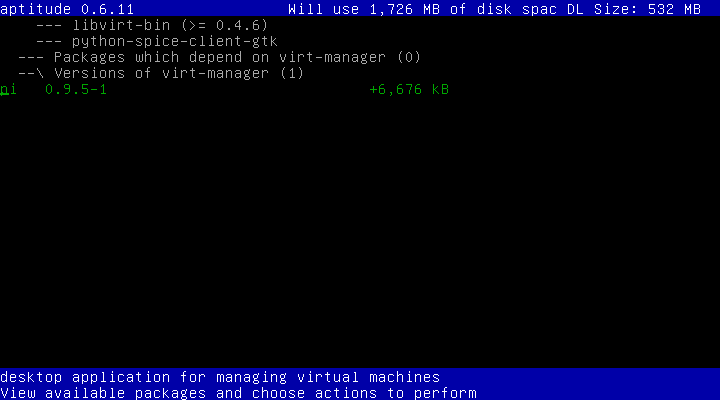
Would that it always turned out like this!
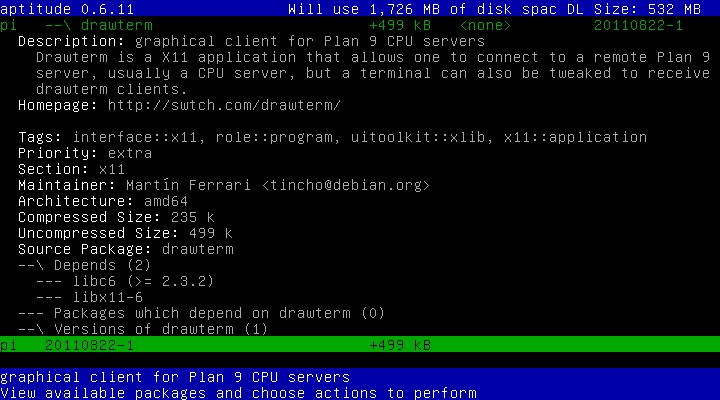
The next package this project needs is drawterm, which you should
be able to go find and mark for installation without any handholding:
The last package this project needs is the only text editor that is
distributed in both GNU/Linux and Plan 9: ed—the venerable
tool in which much of UNIX and C was developed, where grep began as
a subcommand and became a verb before it became a stand-alone
program, and is still supported by the patch program:
If you need to install any other packages, it is your responsibility
to make certain nothing you add will interfere with the cookbook
project.
This especially applies to the network-manager and resolvconf
packages—DO NOT USE EITHER (unless you can get them to play
nicely with the virtual bridge, in which case you need to share
how to get them working so that can be added to this document for
the benefit of others).
It's time to checkout, to instruct aptitude to "make it so".
First we collapse everything in the Packages tab so we have a
clean screen to come back to:
then we press the lowercase "g" key to go to the Preview tab:
Here we see all the packages that will be processed if we do not
modify this list before we press the lowercase "g" key while in
this Preview tab (note the Preview display can be toggled off in
the Preferences list, in which case, go does not pass Go, it
proceeds directly to downloading the needed packages).
The list groups the packages in colating sequence within similar
activity types.
As you scroll through, marvel at all the packages that are being
automatically installed, and look for omissions or inclusions
that might be problematic for your project, and make adjustments
as needed, if possible.
For example, if you won't need the gimp package and don't want to
wait for it to download, use the minus "-" key to remove its
mark for installation:
Hey, no problems—great!
Not so fast.
Right below it, gimp-data, all 43 megabytes of it, is still marked
for installation.
But don't hit that "-" key just yet; rather, open its package
information tab and expand its "Packages which depend upon" group:
Aha!
Two packages to be installed recommend it.
What packages depend upon those two and how?
Even though we are in a package information tab already, we can
open another as a subtab of the first (which is a subtab of the
Preview tab), scroll to its "Packages which depend upon" line,
fully expand that, and scroll through to learn the only package
therein installed or marked for install is xsane.
That is not necessary for this project either, so unless you need
it for your own reasons, unmark it for installation now:
Again there are no red lines.
So we press the lowercase "q" key to return to the gimp-data
information tab:
All right!
Not only are both depending packages unmarked for installation,
gimp-data is, too.
We just needed to identify the right packages to unmark.
We press the lowercase "q" key once more to return to the
Preview tab:
Notice in the top right corner of the screen the download
size for all the packages that will be needed has shrunk to
514 MB.
Scrolling down in our review of the Preview we notice
libreoffice-core is 127 MB!
The project does not need LibreOffice.
The fast way to unmark it is to just unmark everything
libreoffice and anything that gets broken as a result (making
sure you do not need anything unmarked for your own reasons).
You should never need to use the lowercase "e" command.
This will reduce the download size to 372 MB.
When you're finished with changes to the Preview tab, press
the lowercase "g" key to start the downloads and installation.
This is a great time to eat a big meal.
Eventually it will finish installing:
Press the Enter key to return to aptitude's Packages tab:
Now ArrowDown to the "Obsolete and Locally Created Packages"
group line and fully expand it:

With the group line still highlighted, we mark for purge
everything in this group by pressing the shifted minus
("_" aka underscore) key:
press the lowercase "g" key to open the Preview tab:
then press the lowercase "g" key again to start the purging
(there won't be anything to download this time):
Press the Enter key to return to aptitude's Packages tab:
Press the Ctrl-T key combo to open the menu bar:
and press the lowercase "c" key to request the package cache
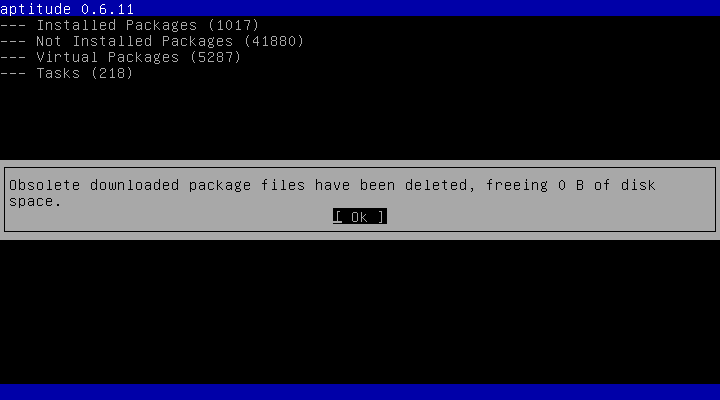
be cleaned of the downloaded packages:
Press the Enter key to acknowledge the pop-up message, then
press the Ctrl-T key combo and the lowercase "o" key to
tidy up obsolete files, if any:
Press the Enter key to acknowledge the pop-up message, then
press the lowercase "q" key to exit aptitude.
The final step in installing the needed software is to make
the vmadm user (or whatever you named the account) a member
of the libvirt group that was created when the software was
being installed.
Run the command "adduser vmadm libvirt" (user modified as
needed from the root session.

Subsection 2-5: Reboot and Verify Virt-Manager Setup
The time has come to test the installed packages, especially the GUI
and virtual management/infrastructure packages.
This begins with rebooting the system although technically it
shouldn't be necessary to reload the kernel (but it may simplify
any trouble-shooting that is needed).
Run the command "telinit 6" from the root terminal session.
The system should shutdown in short order and begin rebooting.
Let it invoke the default kernel without interference.
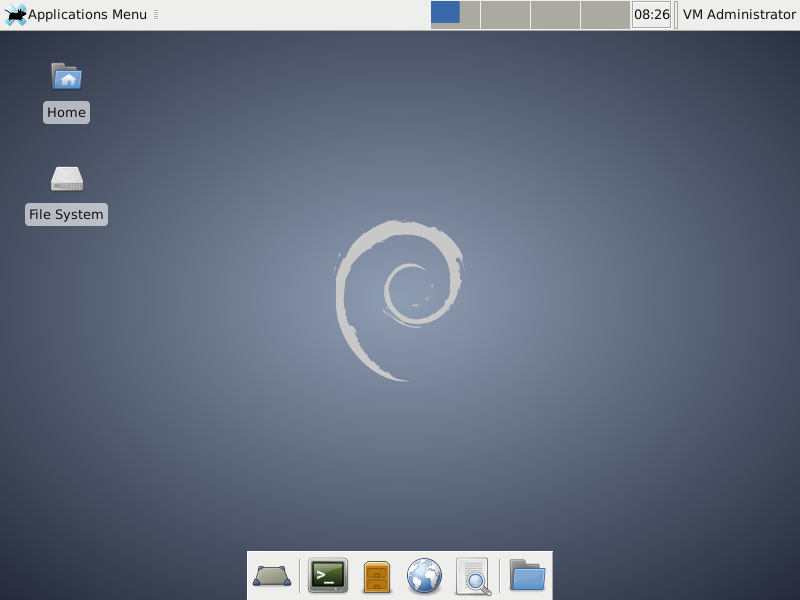
If XFCE was installed properly, a GUI login screen should
presently materialize much like this:
Logon to the vmadm account you created.
When asked about the desktop panel configuration:
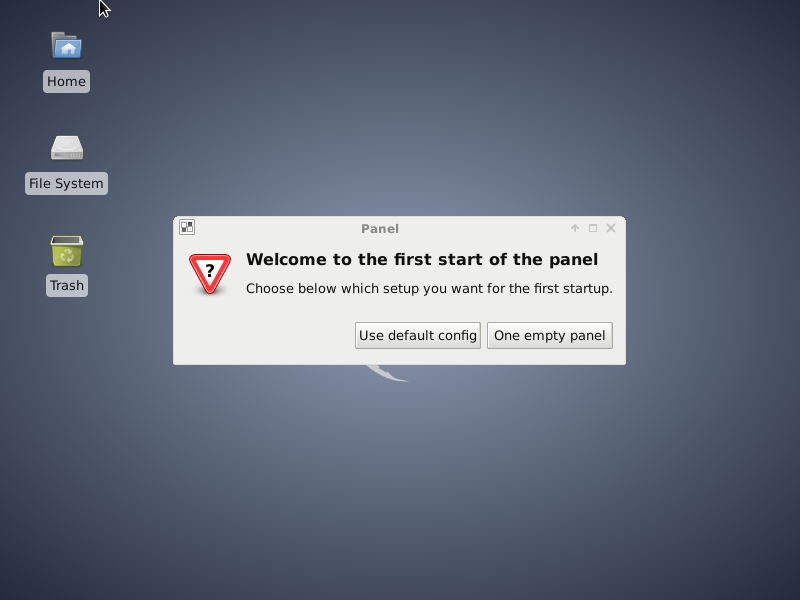
opt for the default:
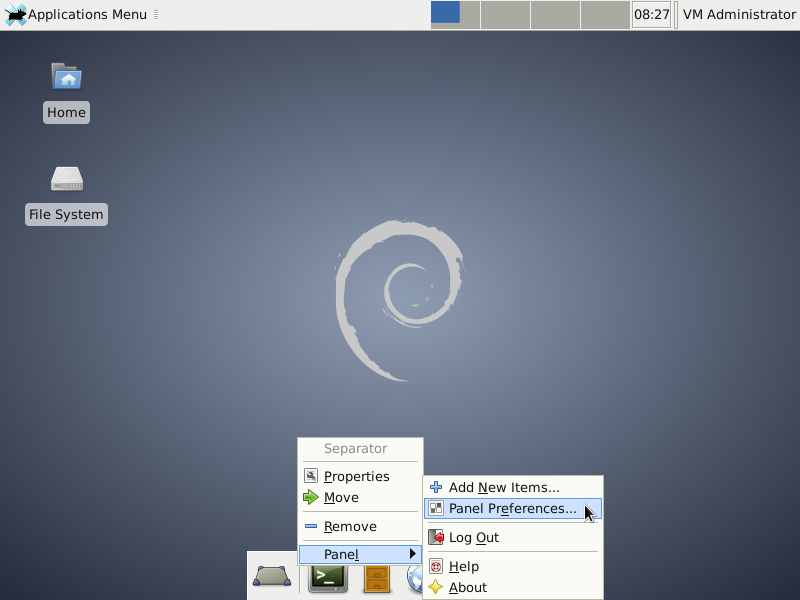
If that bottom panel annoys you as it does me, get rid of it
by right-clicking on the vertical bar between its two left-most
icons (neither icon can be highlighted), mouse-over the Panel
menu item that pops up, and left-click on the Panel Preferences
that pops up:
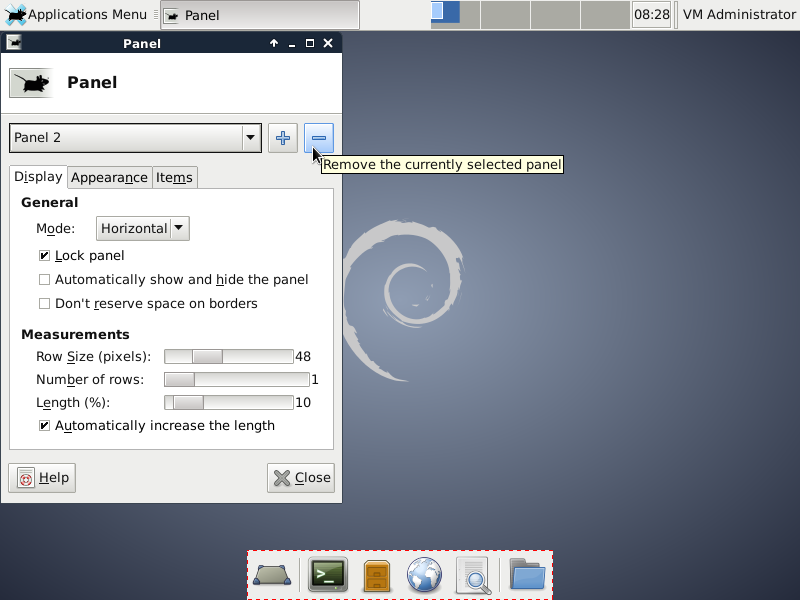
In the Panel dialog that opens, ensure "Panel 2" is selected
and click on the minus sign icon item therein:
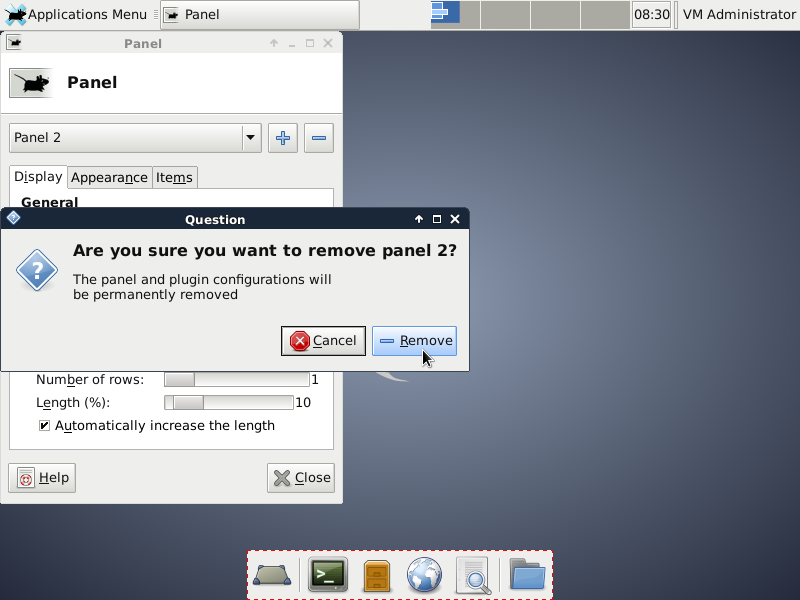
Left-click on the "Remove" button of the confirmation dialog that
pops up:
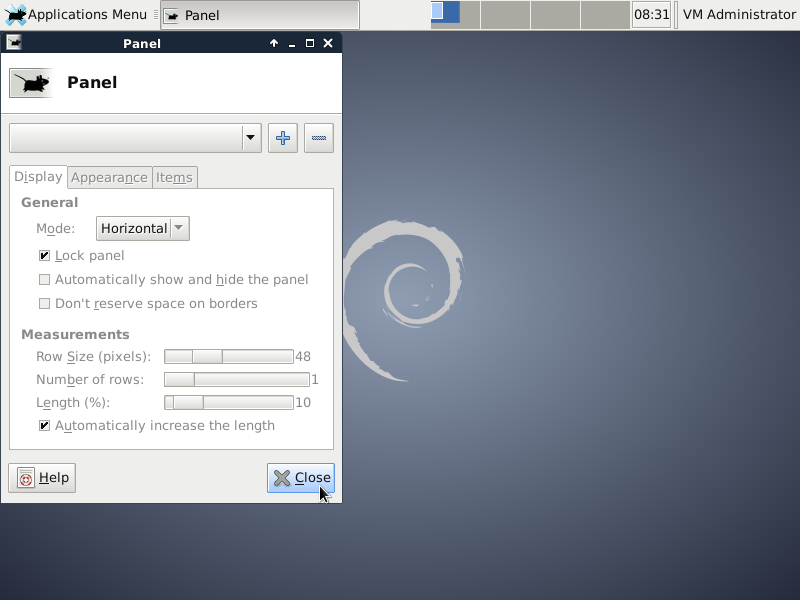
and close the Panel pop-up.
The icon in the top right corner of the screen should contain
the full name of your vmadm user.
If you left-click on it, various session management options
drop down (this is how to log off):
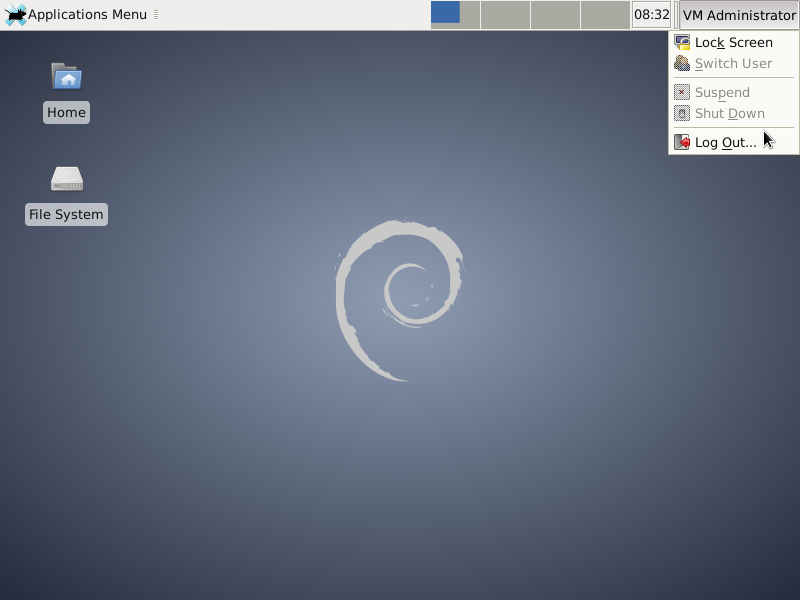
Don't do that now, instead press the Esc key or just left-click
someplace other than inside the drop-down window.
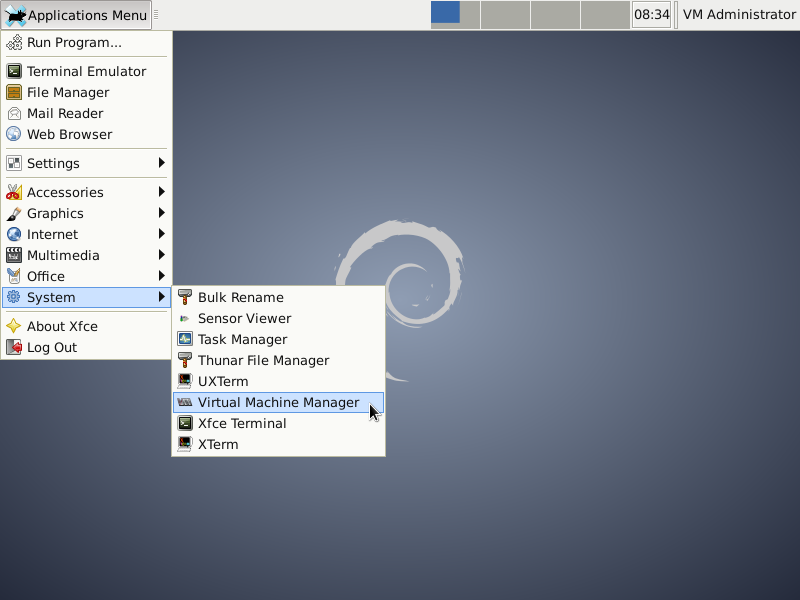
Now left-click on the Applications Menu -> System ->
Virtual Machine Manager menu item:
and verify the Virtual Machine Manager window opens and its
"localhost (QEMU)" line displays as shown:
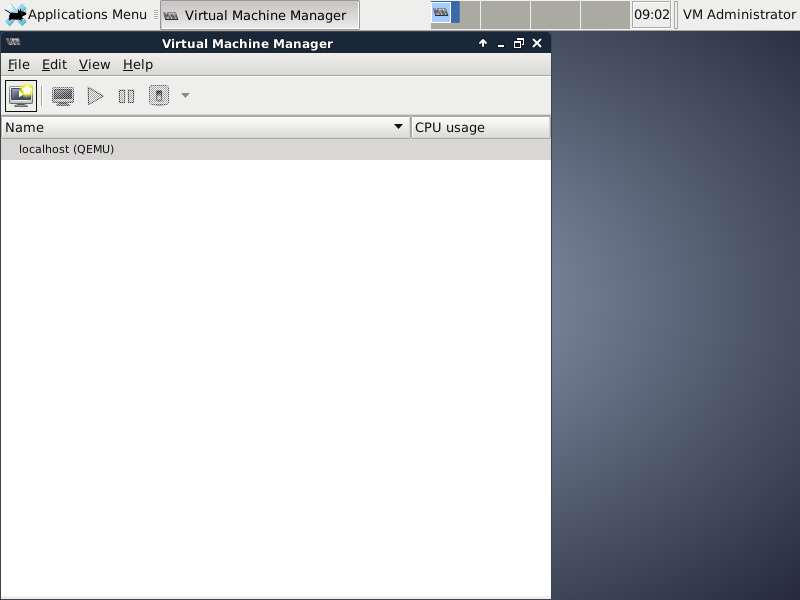
If it instead looks like this:

make certain your vmadm user was added to the
libvirt group.
If that doesn't cause the Virtual Machine Manager
to successfully open, or you see something different from
either screenshot, undertake trouble-shooting to resolve
the problem.
Once it has opened successfully, close it again—we
will hopefully be back to it very soon.
It is time to convert the eth0 wired LAN interface dedicated
to the p9host system into the LAN side of a virtual bridge
provisioned by the p9host system into which guest operating
systems may be connected, thus appearing to the LAN as real
computers physically connected to the same IPv4 subnet.
This cookbook recipe provides a magical incantation to make
this change.
For understanding study:
http://wiki.debian.org/BridgeNetworkConnections
http://wiki.libvirt.org/page/Networking#Debian.2FUbuntu_Bridging
http://backreference.org/2010/03/26/tuntap-interface-tutorial/
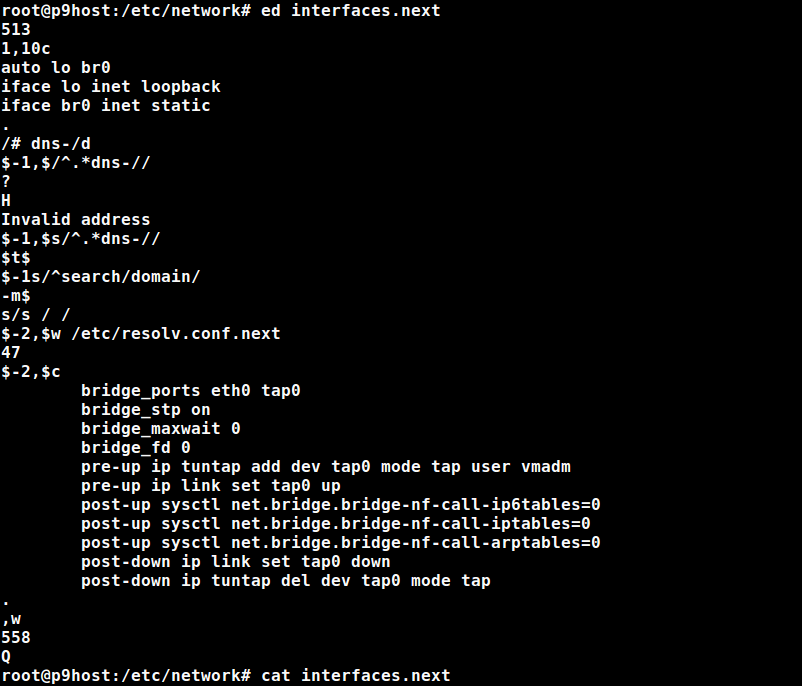
Step 2-6-1: Create Replacement Configuration Files (and ed Tutorial)
We need to edit the Debian network configuration files
/etc/network/interfaces and /etc/resolv.conf to redefine
the eth0 interface as the br0 interface and ensure DNS
resolution is set up properly.
We will use the ed command to familiarize you with this tool
that will work on the Plan 9 system we will build in the next
section.
The "man ed" and "info ed" commands will provide you with the
references you might need to fully understand this tool (if you
need help using man and info, there are "man man" and "man info"
commands for that).
As installed into your system (presuming you are using the wired
eth0 interface this recipe expects), the /etc/network/interfaces
file should have the following format:

This will be edited into the following formats of the file
/etc/network/interfaces.next:
and file /etc/resolv.conf:

In a root terminal session, we will cd to the /etc/network directory,
create copies of the current files, edit them, and display the
results as shown by the following, beginning with the cd /etc/network
command and the two commands to create copies of the existing files
to be edited:
cd /etc/network
cat interfaces
cat /etc/resolv.conf
cp -p interfaces interfaces.next
cp -p /etc/resolv.conf /etc/resolv.conf.next
Next we start the ed command, which reads the new interfaces file
into ed's editing buffer in RAM and begins reading ed subcommands
from the current stdin file of the shell:
ed interfaces.next
The first ed subcommand changes the first ten lines in the buffer
to the literal lines following the subcommand up to but not
including an input line that contains just a single period:
1,10c
auto lo br0
iface lo inet loopback
iface br0 inet static
.
The next subcommand searches down from the current line in the
buffer (called "dot" in ed
parlance) to the first line that contains the regular expression
"# dns-", which in this case means that exact sequence of characters
(since no regular expression metacharacters are in that regular
expression—well, "-" can be but in this context it is not).
To that line ("target" in ed parlance) the "d" subcommand is applied,
causing that target to be deleted from the file.
The line immediately preceding it becomes dot:
/# dns-/d
The substitute subcommand that follows identifies an inclusive
range of lines to be edited by the subcommand,
starting with the last line in the buffer minus 1 (the next to last
line) and ending with the last line in the buffer; thus, two lines.
Substitute finds the substring in the target lines that matches the
regular expression delimited by the first and second forward slash
characters ("/").
That regular expression ("regex" for short) begins with the "^"
(hat) metacharacter that, as the first character of the regex, is taken
to mean the beginning of the line—this is called an "anchor"
in regex parlance as it does not match a character, but rather a
location.
The next character in the regex is ".", another metacharacter that
matches any character in its position in the regex (in this case,
the first character of the line) except the non-printing
end-of-line character, LineFeed or LF, which is also associated
with the Ctrl-J key combo.
Thus, so far this regex will match any line that is not empty or
null, that has at least one non-LF character (contiguous LFs
define a null line).
The dot metacharacter is connected to the asterisk ("*" aka star)
metacharacter after it.
The effect is to match zero or more contiguous occurrances of
the preceding pattern (in this case, a single non-LF character).
The extent of the target substring matched by the ".*" expression
is limited by a match of the next expression in the regex.
That would be the "dns-" sequence which completes this regex,
which, as was true of the previous delete subcommand's regex,
matches that exact sequence of characters anywhere in the rest
of the line (again, the "-" in this context is not interpreted
as a metacharacter).
Thus it has been shown that what will be substituted for in each
target line is the substring starting with the first character and
ending immediately after the (last or only) "dsn-" substring.
If there is no "dns-" substring in a target line to match, the
entire regex does not match—the substring to be replaced
is null, and no substitution is performed for that target line,
and is not considered an error (errors are signified by the
display of a line containing a single question mark ("?")—if
that's too terse, the shifted "H" subcommand toggles the display
of somewhat more helpful feedback).
The second and third "/" characters in the substitute subcommand
delimit the string that is to replace the matched substring in
the target line.
In this case, it is null, so the matched substring is simply
removed from the target line—the character (if any) after
the matched substring becomes the first character in the line.
Dot is set to the last line that was modified or left alone:
$-1,$s/^.*dns-//
This copy subcommand duplicates the last line, setting dot to
the new last line:
$t$
The next subcommand changes the "search" substring in the
next-to-last line to "domain" and sets dot to that line:
$-1s/^search/domain/
The next subcommand moves the line just before dot to the end
of the file and sets dot to the new last line:
-m$
The next subcommand changes the first plural word in the
current last line to its singular form; i.e., its trailing "s"
is eliminated (in this case dot is not changed):
s/s / /
The write subcommand writes the last three lines of the buffer
into the existing file /etc/resolv.conf.next, completely
replacing the data in the file but not changing the file's
permissions or ownership.
Note that writes do not affect dot.
$-2,$w /etc/resolv.conf.next
The next subcommand replaces those three lines just written
with the following the subcommand up to the single period
input delimiting line, producing a new dot at the end of the
buffer (if you are using a different name for vmadm, be sure
to replace "vmadm" in the text to that name):
$-2,$c
bridge_ports eth0 tap0
bridge_stp on
bridge_maxwait 0
bridge_fd 0
pre-up ip tuntap add dev tap0 mode tap user vmadm
pre-up ip link set tap0 up
post-up sysctl net.bridge.bridge-nf-call-ip6tables=0
post-up sysctl net.bridge.bridge-nf-call-iptables=0
post-up sysctl net.bridge.bridge-nf-call-arptables=0
post-down ip link set tap0 down
post-down ip tuntap del dev tap0 mode tap
.
This write subcommand writes the entire buffer into the default file.
Since we have not used the lowercase "f" subcommand to change
the default, it has remained the file that was initially read into
the ed buffer:
,w
This form of the quit subcommand terminates ed even if it
the buffer contains changes that have not been written to
a file:
Q
These shell commands display the results of the editing:
cat interfaces.next
cat /etc/resolv.conf.next
Your ed terminal session should look very much like this:
Step 2-6-2: Stop the eth0 Interface
Run the command "ifdown eth0" from the root session, which will
halt all network traffic to and from the LAN.
Step 2-6-3: Replace the Old Network Configuration Files
Run the following commands from the root session to save and
replace the network configuration files:
mv interfaces interfaces.prev
mv interfaces.next interfaces
mv /etc/resolv.conf /etc/resolv.conf.prev
mv /etc/resolv.conf.next /etc/resolv.conf
Step 2-6-4: Start the br0 Interface
Run the command "ifup br0" from the root session, which will
restart all network traffic to and from the LAN.
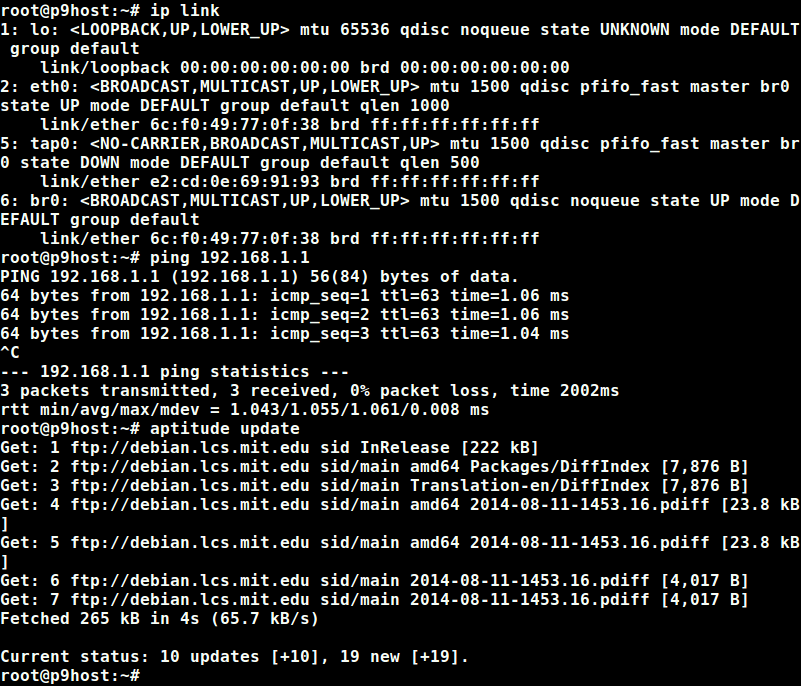
Once the messages have stopped, run the command "ip link" and
confirm the eth0 and br0 link addresses are both set to the MAC
address of your physical NIC.
Then check that pinging your external gateway returns echos.
Lastly run an "aptitude update" command and verify it actually
checks the Debian repository (and most likely downloads one or
more updates.
This entire step should look very much like this:
Once these test complete nominally, the host system is ready
for you to
proceed to the next section
and create the Plan 9 virtual machine.